I really liked the polycarbonate greenhouses: beautiful, strong and very durable. And plastic is not as fragile as glass, but it is quite transparent. In addition, it does not go to any comparison with the plastic film, which needs to be re-stretched every year.
To buy a ready-made greenhouse, to order the construction of the foundation for it, to install it is expensive for us. So we decided to build a modest greenhouse ourselves. I wrote a little cheat sheet on how to build polycarbonate greenhouses with my own hands. Maybe you’ll find it useful.
Check the quality of polycarbonate
It is important to check the quality of the polycarbonate yourself, without relying on the assurances of the seller. To do this, arm yourself with a caliper and measure the thickness of the polycarbonate sheet directly in the store. If it is less than 4 mm – do not take it, a greenhouse made of such material will not last long.

And then – everything is as usual in construction: we start with the foundation. I hope you have already decided on a sunny place for a greenhouse.
The foundation for a polycarbonate greenhouses
There are different types of foundations for greenhouses: wooden, stone, brick, tape… Let me briefly tell you about the most popular and easy to build: foundations made of timber and brick.
Foundation of timber
The simplest and most affordable option is to make a base for a greenhouse from a beam with a cross section of 50×50 mm (2×2 inches) or more.
It is very easy to build a foundation made of timber. On a flat, well-rammed area of the support, the dimensions of the greenhouse are set, a bar is attached to them. And how to do it is well shown in this photo:

Just want to note that the wood should be carefully treated with a protective composition, you can varnish 2-3 times. But even after such treatment, it will last no more than 10 years.
Brick foundation
Now let’s look at creating a stronger foundation for a greenhouse-a brick that will serve you faithfully for more than 50 years. The brick is laid on a small cushion of cement or concrete. The coupling is made in several rows. The number of rows depends on the volume of the greenhouse. For a standard greenhouse of 3 m x 6 m (3.3×6.6 yard), 2-3 rows of bricks are enough.
But, whatever foundation you build, be sure to install it with fasteners to the frame of the greenhouse. Any strong hardware of factory production of metal parts and other metal structures can act as a fastening. It is welded to a metal frame under the greenhouse. And if you do not have a metal frame, but a wooden one, then you can use a thick bar for mounting.
Assembly of polycarbonate greenhouse
I hope you have already thought about the size of the greenhouse. The diagram was designed to scale on millimeter paper. The locations of doors and windows for ventilation are determined. Now, according to your scheme, you need to mount a metal frame on which you will attach the polycarbonate sheets.
Mount the frame
For this purpose, a metal tube with a size of 20×40×2 mm (0.8×1.6×0.08 inches) is used. If you will mount the profile yourself, you will need a tool: a grinder or a saw for metal, as well as a welding machine to connect the corners of the structure. If cutting and welding of metal is problematic for you, you can order a frame in any workshop specializing in the manufacture of metal products. In any case, it will be cheaper than buying and installing a fully finished greenhouse.
The step between the elements of the greenhouse crate should be minimal (no more than 50×50 cm/1.6×1.6 feet), so the entire structure will be more durable. In addition, you can build a frame for the greenhouse from timber or boards. But, as I said – this greenhouse will last you no more than 10 years.
Assembly of polycarbonate greenhouse
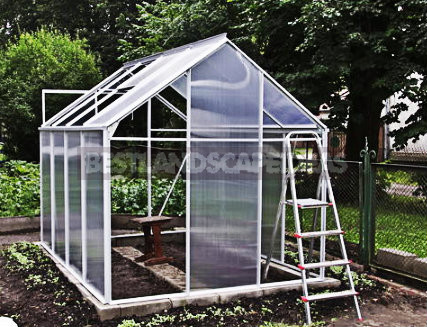
So, the metal frame is ready and installed on the foundation. Now secure the polycarbonate profile sheets with screws. And for a more aesthetic appearance and elimination of possible microcracks, the sheets can be attached with a heat gun. Polycarbonate sheets are laid on the frame overlap (overlap 6-8 cm/2.4-3.1 inches), hermetically glued on top with aluminum adhesive tape or galvanized steel tape. And the inner part of the joints is reinforced with a special perforated tape, which ensures the removal of condensate and prevents the appearance of dust and drafts in the greenhouse. The tension must be adjusted with nuts and bolts. As a result, you can get such a nice greenhouse made of polycarbonate with your own hands:

Greenhouse heating
Summer residents who plant seedlings in March, in order to enjoy a fresh harvest in early June, should take care of high-quality heating of the greenhouse. For these purposes, technical heating in combination with biofuels is ideal. And for technical heating of the greenhouse, it is necessary to lay communications from the greenhouse to the general heating system of the country house. Heating convectors should be placed around the perimeter of the greenhouse frame and connected to each other by loops.
If such heating is problematic, you can build a simple greenhouse oven with horizontal pipes laid along the perimeter of the greenhouse (under the shelves) and having a branch to the street.

We looked at how to make a greenhouse out of polycarbonate with your own hands. As you can see, this is not easy, somewhat costly and very troublesome. But we build for ourselves, don’t we? So, we need to try and create a comfortable greenhouse, which every year will please us with an excellent harvest.
Related posts:
 How to Create a Raised Kitchen Garden with Your Hands
 How to Build a Greenhouse With Your Own Hands
 Glass Greenhouse with Their Hands
 How to Choose a Variety of Cucumbers for Greenhouses
 Smart Greenhouses by Yuriy Zikov
 How to Retain Moisture in Soil
 Warm Garden for Vegetables With Their Hands
 Manure is the King of Organic Fertilizers
 The Value of Organic Fertilizers
 Top 10 Trends in Gardening
 Features of the Use of Peat as Fertilizer
 What is Superphosphate and How to Use It
 How To Plant And Care For Basil
 Variety of Zucchini
 How To Plant And Care For Rheum
 How to Save the Harvest of Pears and Apples