If you don’t have a cottage, then you can make a great vegetable garden right on the balcony. This does not require a lot of money — I, for example, used wooden clapboard, which was upholstered in the loggia. And now we have a mini garden right in the apartment.
Every spring, my wife begins to overcome the “gardener’s syndrome” — she plants salads, basil, peas and green onions. But the endless bowls of earth on the windowsills don’t look very good. And we decided that when repairing the loggia, we will take a place for a home garden.
During the overhaul in the apartment, our hands did not reach the loggia, but when we had to sit at home, we had the strength and time. I was terribly annoyed by the dark yellow clapboard trim and sliding windows, which the previous owners made 20 cm higher than the neighbors. Because of this, there was a constant twilight in the room and a feeling of a basement even on the 8th floor.

Ordered new windows, stripped the whole lining. I decided to sheathe the loggia with light laminate: I did this in the last apartment, and there the laminate showed itself perfectly as a finishing material. But I wanted to leave the wall for the garden brick: my wife likes the texture of the masonry. The situation was complicated by 2 problems — the wall was uneven at the top, and 3 rows of red bricks somehow got in there, and the color of the bricks did not harmonize with the light gray laminate. I thought to paint them, but then I would have to putty, primer. I made it easier: after installing new windows, I had half a bag of gypsum plaster left. I covered the wall with it, making a thinner layer, and primed it on top. The result was the effect of roughly plastered bricks.

Due to the lack of light (our windows are on the east side), it was decided to use glossy white PVC panels for ceiling decoration. I attached a clothes dryer to the clapboard crate.

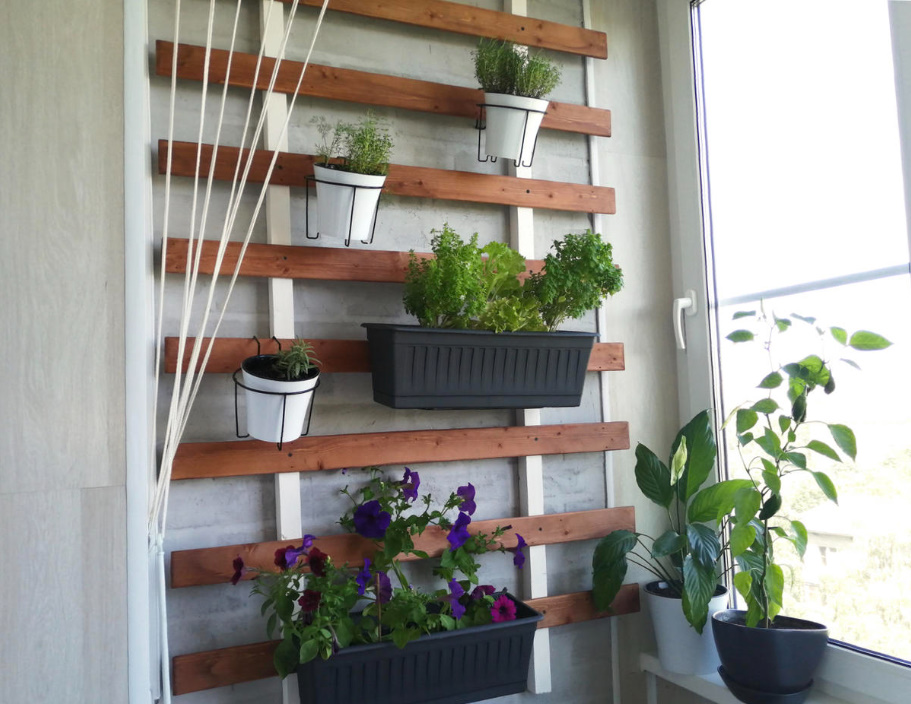
The design of the garden is simple — I will attach 2 bars with a cross section of 5 × 5 cm to the wall, these will be guides. I will drill the crossbars from the lining to them, then it will be useful to me again. It will turn out to be a kind of ladder on which you can hang holders for planters.
To make everything beautiful, the lining must be sanded and covered with stain. Therefore, the place of action is transferred to the dacha to friends.


Now I cover the blanks from the lining with a stain. I don’t really like messing around with decorative coatings for wood at all: they get their hands dirty, they spread out. That’s why I chose aerosol!
I shook the balloon, sprayed it from a distance of 30 cm from the surface — and that’s it! This stain showed itself well in the work: it did not flow when applied, lay down evenly, forming a beautiful coating. In the sun, it dried up in just half an hour.

We begin to collect the vegetable garden on the loggia. I will drill the bars first to mark the attachment points to the wall.


It remained to move the plants to the loggia. The wife found the planters in a Swedish store.

My wife promises to buy a phytolamp next year and start growing greens as early as March. I think it will work, because we now have two-chamber glazing, and I also insulated the walls. We’ll put a table, chairs, and we’ll have a patio!
Related posts:
 Interesting Design of the Garden
 Glass Greenhouse with Their Hands
 Insulated Flue – Saving Home from Fire
 Garden On the Windowsill: Grow Onions, Garlic and Carrots On the Greens
 Convenient and Useful Nozzle On the Trimmer With Your Own Hands
 Protect Your Garden, or How to Make a Scarecrow
 Outfit for Your Windows: Hinged and Roller Shutters, Mosquito Nets and Awnings
 In Your Garden Begins the Age of Stone: Choose Decorative Benches
 Agricultural Sense: an Educational Program for Beginning Farmers
 How to Build a Winter Garden in the Country
 How to Make a Washstand for Country House the Hands
 And Above us is Not Dripping: Shelter for the Garden
 Pros and Cons of Various Types of Solid Fuel for Boilers: Wood and its Derivatives
 Pros and Cons of Various Types of Solid Fuel for Boilers: Coal and Peat
 Choose Radiators for the Summer Cottage
 Additional roofing elements (accessories)