The kitchen in the house is a place where every woman spends a lot of time. It should be not only beautiful, but also comfortable, ergonomic, comfortable, do not create unnecessary problems when moving, and be easy to care for. The kitchen should be easy to maintain cleanliness and hygiene.
I also wanted to have such a kitchen at home. I wanted a spacious one, with enough space to store not only the necessary kitchen utensils, but also cabinets for preserving and hateful empty cans, large tables on which you can easily put fresh fruits or vegetables.
But just with this part, concerning the expanse, I, alas, was not lucky. The kitchen in my country house is the same size as in the apartment in the city, small size, about 3 by 2.5 meters (9.8×8.2 ft). I had to think a bit about redoing the kitchen to suit my needs.
I couldn’t give up on the dream of having a work desk in the kitchen under the window. I wanted to have a sink, but it also cuts off the work surface of the countertop, and I wanted to have a large workplace. In addition, the optimal organization of space in the kitchen dictates its own rules. Between the sink and the stove should be the largest part of the desktop. Very often, in the brochures of kitchen manufacturers, we see how designers care primarily about proportions, visual effects, often completely forgetting about functionality and practicality. And most often these designers are men.
If everything is done correctly and scientifically, then the order of operation of the units in the kitchen is quite stable. The most functional is the arrangement from left to right in this order: refrigerator-small work surface of the table-sink — large work surface of the table-stove-small work surface of the table. That is, you took the food out of the refrigerator with your right hand, put it on the table next to the right, put the food in need of washing in the sink, washed it, spread it out on a large cutting table, from which they will later get to the stove for cooking. The pots or pans removed from the stove can be placed on the table to the right of the stove, where no one will burn on them and they will not interfere with the further cooking process.
There are also criteria for the correct height of the desktop. Its indicator is measured as follows: stand up straight, lowering your arm. Bend the lowered arm at the elbow and measure the distance from the elbow to the floor. Subtract 15 centimeters (5.9 in) from the resulting value. The result will be the correct, ergonomic height of the working surface of the kitchen table. At this height, the spine will be unloaded, and you will be less tired.
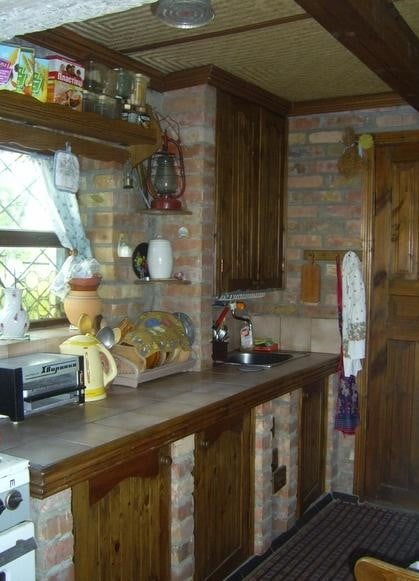
I did it a little out of line. Because I have a small room. I have the sink on the right, as this is due to the proximity of the water drain, and the stove on the left has a table, so that it is convenient to place the gas cylinder. I have it standing in a tiny corridor behind a small wall and so it is not visible.
There were few variants of the working surface of the table. In rural conditions, the use of chipboard in the kitchen is unacceptable, especially if it is possible to use wood or stone. And the cottage wanted to avoid the use of artificial materials as much as possible, in order to be as close as possible to nature and the time when people lived only among natural materials and had not yet invented plastic, chipboard, and so on.
So it turned out that I had two versions of the table in the kitchen: wooden or cement with tiles. Given the fact that the kitchen is located in the basement and its floor is below ground level by about 30 cm (11.8 in), which may indicate the occurrence of excessive humidity in the room, I decided on the option of equipping the kitchen with materials that are not afraid of dampness. So there was a project of a table made of brick, concrete and tiles.

At first, instead of wooden partitions of the lower cabinets of the desktop, brick partitions were erected. Well, they occupied a useful area, but became a reliable support of the tables. A sheet of galvanized iron was placed on the brick walls. At the corners, the 5-centimeter (2 ft) sides were pre-bent. It turned out to be a small trough in which concrete was poured.
Simultaneously with the formation of the table frame, a hole was provided in the metal for the installation of the sink. Next to the sink, I wanted to make a hole for the hatch, through which you could send the garbage from the table directly to the trash can. For this hatch, I used a piece of large-diameter gray sewer pipe with a lid on top. When closed, the hatch becomes part of the working surface of the table and does not interfere with the processes in the kitchen.
The trick with the trapdoor is that if I open the lid, I can sweep the trash off the table right into the pipe. Under the pipe is a bucket, and the waste falls directly into it, excluding frequent opening of the kitchen cabinet door. Believe me, it is very convenient!
When the concrete on the table hardened, we laid the table with tiles. The end face was finished with a wide wooden board, for fixing which it was necessary to lay wooden chops in the process of pouring concrete.
A local carpenter made us doors. Due to the lack of the necessary wood, the inner parts of the panels were made of ordinary cladding. This option surprised our carpenter very much, but the result still pleased him.
On the countertop in the corner where the sink was located, they had to build a small brick wall. You will say that you could hang a wooden cabinet on the wall. But the wall is made of granite! And electric drills, such as now, at that time I did not yet exist. Therefore, the brick walls became a support for shelves, on which a small capacitive water heater, dish dryers, and lighting were conveniently located. In addition, a brick wall covers half of the bowl of the sink, and there is room for such things as drying cutlery, soap dishes, brushes, washcloths, bottles of detergent, without which washing dishes can not do.
We gave up the dining table in the kitchen due to lack of space. And we eat in the country more and more on the street, and when it’s cold — in the fireplace room, in front of the TV. Alas, this habit has developed and does not eradicate it in any way. Sometimes the dining table in the kitchen is a pull-out sideboard table, which is conveniently located opposite the desktop. I also bought one in a nearby village. The quality of this piece of furniture deserves a separate comment. The perfectly fitted doors did not change their geometry after a while, the hinges did not loosen, and even an ant could not get through the gap between the closed door and the sideboard wall! Today’s furniture manufacturers could learn from this example.

The locker fits perfectly into the country-style interior. Old towels trimmed with lace also fit perfectly into the style .
On the walls near the window and the stove are wooden shelves for seasonings, cans of cereals. They were also a continuation of the planned style.
The load-bearing beam on the ceiling remained open. I painted it with dark paint, and it became even more expressive against the background of a light ceiling made of woven bamboo plywood.
On the floor are homemade rugs made by my grandmother. However, I do not place them there often, on holidays-because I want my grandchildren to use and see the skill of their great-great-grandmother.
I made a chandelier out of a small kerosene lamp, with a light bulb holder in it.

The window was previously planned to be blind from the bottom with a hole in the upper half so that the sill could be used as a shelf. The lower part of the window I decorated with stained glass film, imitating the bottoms of bottles. This gave the window a slightly fabulous and vintage look.

That’s all, in this way, the interior of my kitchen turned out to be a little fabulous. Exposed brick walls, exposed blocks of granite wall, dark-stained wood surfaces of doors, cabinets, ceiling beams. This interior not only looks interesting, but also saves money on finishing materials. This style is also called the low-tech style. I’m a fan of his.
Related posts:
 Unusual Country Furniture Made of Fabric: How to Make a Screen
 4 Best Ways to Add Square Meters to a Summer House
 8 Best Design Ideas to Improve Your Country House. Scottish Style
 Home decor beached style
 Outfit for Your Windows: Hinged and Roller Shutters, Mosquito Nets and Awnings
 And Above us is Not Dripping: Shelter for the Garden
 Half-Timbered Houses – a Standard of German Style and Reliability
 The Human Biorhythms and the Interior Changes Every Year
 Choose Radiators for the Summer Cottage
 Painting of Old Furniture: Choice of Paint
 Painting of Old Furniture: Tools and Materials
 Update Old Furniture. Decoupage.
 Aging Furniture: Staining Technique
 Update Old Furniture. Charm of Cracks.
 Aging Technique of Wood: Brushed and Firing