Fixing defects
After the old paint has gone into oblivion, we proceed to the next stage — the elimination of defects. This chest of drawers had no major damage – there were minor chipped edges, shallow scratches, a couple of cigarette burns, and a few single traces of Cossidae. But there was another problem.
After I got rid of the brown paint, I found that the chest of drawers was not as good as I would have liked. It was a cheaper variation of this type of furniture: the table top and sides were plywood. Solid wood-only the frame, facades of boxes and decorative elements. Therefore, the original idea (after removing the old paint, tinting the wood with a stain and covering it with varnish) had to be abandoned. I decided to just paint the chest of drawers, add decorative effects in the form of gilding, and then fix everything with varnish. But in this case, it is not necessary to strain too much when sealing defects: you do not need to pick up the putty in tone, imitate it knots and veins in the wood texture. Therefore, putty — any color, just to fill the recesses.
")
Fill with putty cracks, chips and scratches, dry. Again, we arm ourselves with a sanding skin and grind everything to smoothness — the putty mass should remain only in the recesses. In this work, you should not trust your eyes: the degree of smoothness of the surface is much better to determine by touch. The palm, and especially the tips of human fingers, is very sensitive. This quality is best developed in the blind. The sighted, of course, are more accustomed to rely on the eyes, but in this case the sense of touch has an advantage. Paradoxically, but the fact is that it is not the bare fingers that are more sensitive, but if you feel the irregularities through a thin pad, such as tissue paper. A thin medical glove will also do. Skin, feel, again skin, and again feel.
")
When you decide that enough is enough-we remove the dust, it is better to use a damp cloth. We evaluate the results of our work. It is possible (and most likely) that you will see that all the defects were not fixed the first time. You need to use the putty again and repeat the drying and sanding procedure. This is especially true for deep injuries. Do not try to fill in a large defect at once: the putty will shrink when dry, and the hole, even if not so deep, will appear again.
")
In my case, the keyholes were such deep damage. All the drawers had locks, which I decided not to restore — I just took out the mechanisms, filled the remaining cavities with wooden splinters with glue and patched them up.
Before painting, the surface must be primed. This operation is not that mandatory, but it is better not to refuse it: the paint will lie better, and the adhesion (the property of the paint to stick, adhere to the painted surface) will increase. This means that the primer is water-based. The main preparatory work on this is finished, we go to the decoration.
About the decorative concept
The basis of the decorative concept in updating the chest of drawers is its shape and time of manufacture. The chest of drawers was made, most likely, in the 50s of the last century. One of the trends of this era is defined by art historians as: everything is pompous, majestic and monumental.
")
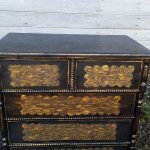
In the chest of drawers, this idea, in my opinion, is demonstrated by the twisted columns on the sides and the decor in the form of beads. And the shape and proportions, of course. I decided to enhance the appearance of the chest of drawers component of art Deco: paint it in “radical black” and complement the facades of the drawers with decor with gold trim. Art Deco requires gloss, so I will cover everything with a glossy varnish.
Decoration
Finally, after a few days of preliminary “dancing with diamonds” around the dresser, you can move on to what all these movements were intended for. I use lace to finish the drawers. I mark it up, cut it out, and glue it with glue. After the lace motifs are glued in place and dried, I paint with black paint. I took a simple acrylic one — the one I already had.
To add Shine (don’t forget that we have art-Deco), I use the Goldfinger restoration paste from Daler-Rowney “antique gold”. It can be applied in different ways. Either apply the gloss only on the convex elements to create the effect of antiquity, as if the thing was previously gold, but over time has become dirty, and the gold is now visible through a layer of” dirt ” in those places where it rubs more during operation (then it is easier to work just with your finger); or you can cover the entire part with gold. After drying, the gilt (if desired) is polished to a Shine with a soft cloth. Here I was torn by doubts: the tube is small, the price is high, and the finger-consumption is less… I Decide to make “gold under the layer of time”, although, of course, for the art-Deco style you need more gold.
")
Apply the varnish
After everything is sealed and finally dried, you need to apply a finish coating. I decided to use for this purpose varnish in an aerosol package. It is easier for them to evenly cover relief areas with complex geometry, and it dries quickly: the intermediate drying time between layers is only 10-15 minutes.
I chose yacht Polish. I chose this varnish, because it can be used to create a very wear-resistant glossy coating, and it is allowed to use it not only for interior, but also for outdoor work.
This varnish is designed to protect and give decorative properties to any wooden surfaces that are used in conditions of high humidity and adverse weather conditions. It creates a very strong glossy finish and protects wooden surfaces from mold formation.
How many layers to make? — The more the better. For example, Chinese lacquer furniture has dozens of layers of varnish. I got 3. it is very convenient that the varnish in an aerosol package dries quickly: and the work moves faster, and because of the high speed of drying, the dust does not have time to stick, which spoils everything. In my case (I paint on the street) this is very relevant. It is better, of course, to carry out such work indoors. With this varnish, there is no need to further sand the surface between layers.
")
Well, that’s it, the result is on the first photo of this publication. It remains only to put new handles. But their purchase is still delayed, as in our construction store, the choice is not rich. Of course, now the chest of drawers is not very suitable for storing tools in the garage, but I hope that the owner will find a new use for it, corresponding to the updated appearance. And the old chest of drawers will continue its long enough furniture life in a new status.
Related posts:
 Terraced motives the device is weatherproof wooden floors
 We Arrange The Space Around The House: Terraces, Verandas And Patios
 How To Give a Chest Of Drawers a New Life (Part 1)
 DIY Flower Pot Decor: More Than 50 Ideas (Part 1)
DIY Flower Pot Decor: More Than 50 Ideas (Part 1)
DIY Flower Pot Decor: More Than 50 Ideas (Part 1)
 Perfect Order: Practical Ideas For Placing And Storing Shoes
 How And How To Decorate a Wooden House From The Inside
 Everything about cookware – Best Types of cookware
 Glass Greenhouse with Their Hands
 Insulated Flue – Saving Home from Fire
 Convenient and Useful Nozzle On the Trimmer With Your Own Hands
 Protect Your Garden, or How to Make a Scarecrow
 Outfit for Your Windows: Hinged and Roller Shutters, Mosquito Nets and Awnings
 In Your Garden Begins the Age of Stone: Choose Decorative Benches
 Beautiful Pots for Indoor Flowers from Plastic Buckets
 How to Build a Winter Garden in the Country