In the modern world, it is not difficult to buy any piece of furniture. You decide on the style and design, allocate the amount that you expect to spend, and go ahead — you can buy in the nearest store, choose from a stunning variety of furniture hypermarket, order over the Internet.
But there are those who do not want to part with the old and familiar things. And others can not pass by a chair or chest of drawers, mercilessly thrown into the landfill; still strong, but already old and does not correspond to modern ideas of beautiful design. This story about how an old chest of drawers got a new life is a master class for those who appreciate old things and like to do something with their own hands.
A little background
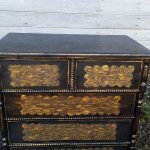
Once upon a time there was an old chest of drawers. Of course, it didn’t immediately become old. About 70 years ago, it was quite something, it corresponded to the fashion of its time. And most importantly-it was strong and reliable.
")
Then the owners of the chest of drawers most likely moved to a better world, and the next owners of the property in which our copy lived, considered it old, unfashionable and unnecessary. And along with the rest of the unclaimed belongings were thrown into the landfill, where it was found by my friend.
He couldn’t leave a serviceable but outdated item in the rain. The dresser moved into the garage. The new owner used it to store all the things every man needed. And he easily agreed to part with a convenient storage of valuable things for the opportunity to give the chest of drawers a chance at a better life — gave it up for alteration.
Alteration
Applying paint is not too burdensome procedure, it does not take much time, especially if the area of staining is small. For example, when it is a chest of drawers. But the process of updating an old thing can take more than one day. The result directly depends on the thoroughness of the preliminary work.
")
In order for everything to turn out beautifully and correctly, you need to prepare in advance — buy everything you need. In addition to the actual varnish or paint, you may need wood putty, joiner’s glue, primer, solvents and thinners, brushes, rollers, spatulas, tape, as well as polyethylene, paper or cardboard to hide the workplace (unless, of course, you update your furniture in a special workshop). And lots and lots of abrasive paper of different grit.
Removing all unnecessary items
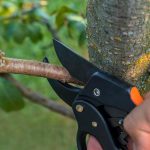
The first thing you need to do is to remove everything that is removed: accessories (handles, hinges, guides for drawers, shelf holders); if there is glass in the doors, and it is easy to remove, and most importantly, it is then just as easy to put back, remove the glass. If the complexity of the operation “remove-put back” is too high, just protect the glass with tape and newspaper. By the way, do not use transparent tape: it is too sticky and can leave difficult-to-remove traces, it is better to use paint. Only the old handles had to be removed from the chest of drawers in question.
")
After getting rid of all the obstacles, we examine the damage and plan the progress of work. In my case, there were no significant losses — minor chipping and General fatigue from a long life.
Removing the old coating
The next stage is the most “interesting”: you need to remove the old coating. The chest of drawers was covered with what looked like old varnish or brown paint. There are several ways to remove this:
- use a chemical remover;
- thermal method;
- mechanical removal.
Which method to choose depends on the type of coating, subsequent decorative plans, and the availability of the tool.
")
Chemicals for removing old paint are not always as effective as the manufacturer describes. Perhaps, not knowing the composition of the old paint, you will have to experiment with the selection of funds. In some cases, you do not need to buy special flushes — you can try using acetone or a solvent. The surface treated with a suitable tool should be covered with polyethylene, so that air does not get in and the paint “gets wet”.
The thermal method consists in heating the paint layer, for this purpose, a construction hair dryer is used. The old paint melts, and while it is softened, the layer is removed mechanically — with a scraper or just a spatula.
")
Mechanical removal of the old coating is performed using abrasive materials or hard brushes. On large planes (for example, on a table top), it is more convenient to use a sander.
It is most effective to use all 3 methods, depending on the need. The chemical method can be more convenient for removing paint from small parts (threads), using a hair dryer to quickly remove thick layers of paint. Well, the abrasive skin is useful as an independent tool, and as a finishing touch when using the first two methods.
Related posts:
 Terraced motives the device is weatherproof wooden floors
 We Arrange The Space Around The House: Terraces, Verandas And Patios
 How To Give a Chest Of Drawers a New Life (Part 2)
 DIY Flower Pot Decor: More Than 50 Ideas (Part 1)
DIY Flower Pot Decor: More Than 50 Ideas (Part 1)
DIY Flower Pot Decor: More Than 50 Ideas (Part 1)
 Perfect Order: Practical Ideas For Placing And Storing Shoes
 How And How To Decorate a Wooden House From The Inside
 Everything about cookware – Best Types of cookware
 Glass Greenhouse with Their Hands
 Insulated Flue – Saving Home from Fire
 Convenient and Useful Nozzle On the Trimmer With Your Own Hands
 Protect Your Garden, or How to Make a Scarecrow
 Outfit for Your Windows: Hinged and Roller Shutters, Mosquito Nets and Awnings
 In Your Garden Begins the Age of Stone: Choose Decorative Benches
 Beautiful Pots for Indoor Flowers from Plastic Buckets
 How to Build a Winter Garden in the Country