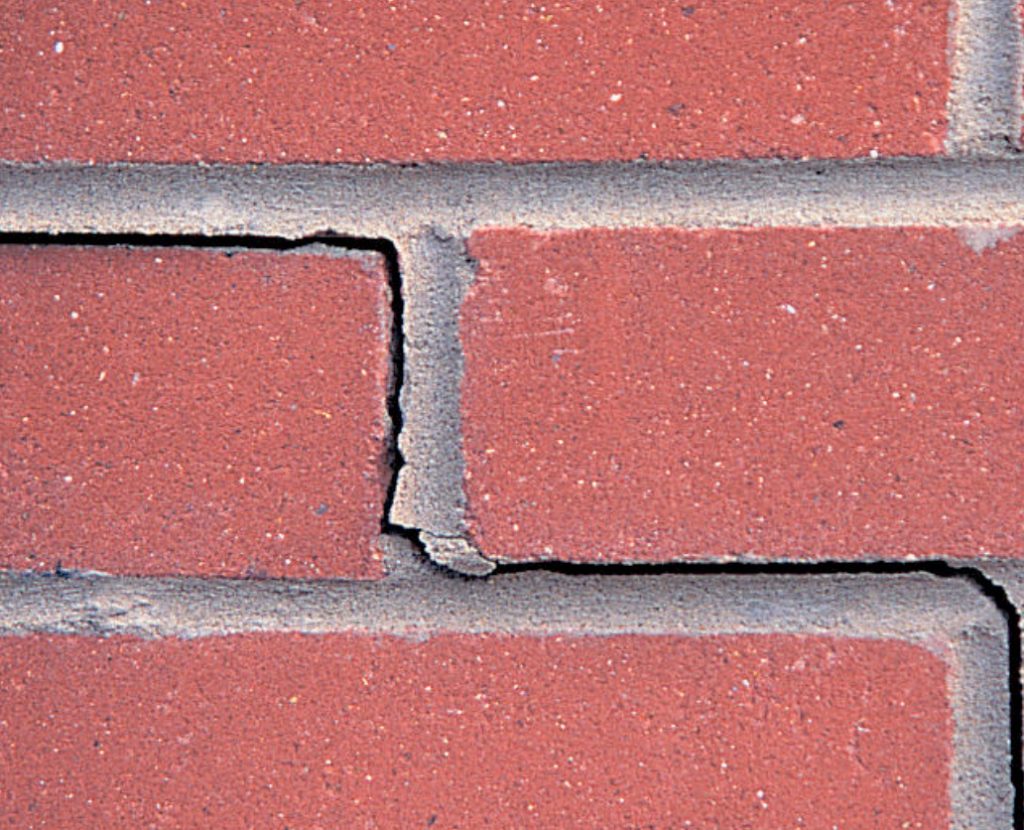
Cracked brickwork may be the result of the fact that due to the excessive content of cement, the mortar simply could not absorb small shifts in the structure of the building. However, it can also be a sign of a more serious problem — a settled foundation, for example. Do not pass by such symptoms, but immediately conduct a study and take up the necessary repairs.
Sealing cracks
If there are large cracks in the wall, consult with the builders to determine the causes. The cracked solution can be removed and the seams can be sewn again in the usual way. But the crack passing through the bricks will not be able to be properly sealed in this way, in this case the masonry will have to be repaired with the help of professionals.
Cracks on the painted wall are sealed with a solution mixed with a small amount of diluted glue for better setting. Before starting the repair, wet the damaged masonry with water from a hose, so that the solution penetrates more easily into the depth of the crack.
Priming before painting
The brick wall should be primed only if there are fades on it or it crumbles. In the first case, the brick will be protected by an alkali-resistant primer.
The crumbling particles will be bound by a stabilizing compound, which will simultaneously prime the wall. The first layer of facade paint is difficult to apply because of the absorbent properties of the brick. To make it easier, try slightly diluting the paint of the first layer with water or solvent.
Waterproofing of masonry
Colorless water-repellent solutions should make the brickwork waterproof, without staining it and without depriving it of the ability to” breathe ” — this is important so that the moisture in the wall thickness can dry out.

Before applying the solution, the surface should be prepared: seal up all the cracks in the bricks and joints, remove organic formations and allow the wall to dry completely. Cover the nearby plants with something.
Vapors of water-repellent solutions are dangerous for the respiratory tract, so be sure to wear a reliable respirator, as recommended by the manufacturer. Also, wear safety glasses.
The order of execution of the work:
- Apply the solution liberally with a large paint brush, working from the bottom up, and treat the seams especially carefully.
- Apply the second layer as soon as the first one is absorbed, so as not to leave untreated areas through which water can seep.
- For more confidence that you have smeared the entire wall, use a sealing compound with a volatile dye that will discolor after a certain period of time.
Be careful when working near wooden parts. If they accidentally get splashed with such a sealant, immediately remove them with a cloth soaked in white spirit.
What to do if the brick crumbled
Moisture that has penetrated into the masonry, freezing, causes staining and facilitates further penetration of moisture. If this happens point-by-point and in small areas, just cut down the defective bricks or stones and replace them.

If large areas of the wall have been crumbled, the only practical solution is to put up with its “second-rate” appearance, re-embroider the seams and treat with a transparent water-repellent composition. Use a locksmith chisel and a sledgehammer to cut out the seams around the brick, then cut down the brick itself.
To install another brick, first moisten the opening and lay the mortar on its base and one of the side walls. Then wet the new brick, smear its top and one end with a solution, then insert it into the opening. Make the stitching of the seams in accordance with the surrounding masonry.

If it is not possible to find a new brick of a suitable color, carefully remove the damaged brick, turn it with the reverse, undamaged side and so insert it back.
New stitching of seams
Frost in combination with erosion gradually destroy the mortar in the joints of the masonry. Pieces of mortar fall out, opening the joints, and through them rain and wind increase the level of dampness in the house. Cracks in the joints can also be caused by the use of a hard, non-plastic solution. Repair of defective seams is a simple matter, but it takes a lot of time. Repair a small area at a time, using either a ready-made solution or a mixture of your own preparation.
Application of the solution
1. Use a thin wooden rail to clean the old seams to a depth of about 12 mm. Hollow out the non-yielding areas with a locksmith chisel or a special scarpel and a trench hammer (a small sledgehammer), then clean the joints with a hard brush.
2. To prevent bricks or stones from absorbing too much water from a fresh solution, spray the wall with water. Prepare a certain amount of mortar in a bucket and transfer it to the falcon (this is a light plaster shield). If you mix the solution yourself, use the following proportions: 1 part cement, 1 part lime and 6 parts construction sand.
3. Pick up the “sausage” of the solution on the back of the trowel (special spatula) and push it into the vertical joint. It is quite difficult to do this so that the solution does not drip down, so substitute a container from below. Try not to pollute the surface of the bricks with the solution, as it will leave stains behind.
In the same way, embroider the horizontal joints. The shape of the seam at this stage does not play a special role.
4. When the solution has hardened enough to hold the fingerprint, it can be molded. It is important to mold each seam exactly at the right moment, so you may have to embroider the seams of the entire wall in parts.
5. After making the stitching, wait until the seams are almost solidified, and then brush off the excess mortar from the wall.
Dyes for mortar
There are special liquid or powder additives to the mortar that change its color to match the tone of existing seams. However, it is necessary to work with them carefully: it is difficult to choose the right color exactly, and if you act carelessly, spots may remain on the brick.
Seam stitching profiles
The seams shown here are traditional for brickwork. Smooth or concave seams are best suited for masonry. Provide the stitching of the seams between the facing slabs of hewn stone to a specialist.

1. Smooth seams
This is the easiest profile to work with. Scrape the solution with the edge of the trowel flush with the masonry, then apply the texture with a hard brush to “expose” the sand filler of the solution.
2. Concave seams
Such a seam seems ideal for an old wall, the quality of the bricks of which does not allow creating a neat seam of a different kind. Masons make a concave seam using a tool with a semicircular canvas in cross-section. First, rub the solution into the seam flush, then go through the seams with a tool.
3. Seams with a bevel
The bevel ensures the flow of water. Form the solution with the edge of a pointed trowel or embroidery, starting from the vertical seams. Then treat the horizontal seams, slightly squeezing the solution at the base of each seam. Finish the treatment with a special curved embroidery with a narrow thin blade and a tip bent at an angle of 90°.

Use a wooden rail to guide the movement of the embroidery. Nail wooden bars to its ends to separate them from the wall. Align the rail along the bottom of the seam.
Related posts:
 5 Best Gazebo for Country House. Types and Features
 Hobbiton – Features, How to Find, Photos, Design Ideas
 8 Best Design Ideas to Improve Your Country House. Scottish Style
 Home decor beached style
 Grills and a Barbecue for Villas with Their Hands
 How to Make a Well in a Country House or Cottage?
 Types of Barbecues and Mangals
 Grill and BBQ: Where to Put How to Cook?
 How to Create Your Own Theater of Light and Shadows
 Insulated Flue – Saving Home from Fire
 Choice of Wood for Building a Wooden House
 Drainage Systems In the Suburban Area
 How to Choose a Place for the Construction of the Bath
 Tiles for the Garden With Their Hands
 Outfit for Your Windows: Hinged and Roller Shutters, Mosquito Nets and Awnings
 Drainage Systems in the Suburban Area Surface Drainage