
This method of interior design was known even during the Roman Empire. Thanks to him, initially modest housing was decorated in such a way that in the end it almost did not differ from the marble choir of a rich citizen. The technology itself has not changed since then, but the materials are now using better quality.
What kind of finish is this
The term “Venetian plaster” is a literal translation of the Italian expression “stucco veneziano”. Today, marble plaster can be seen in many European cathedrals. It was often used as a basis for painting walls.
With the help of plaster, the effect of polished or mirror-polished marble and other natural stones was created. It consisted of marble flour, slaked lime, vegetable dyes and water.
The durability and amazing beauty of the facades and interior decoration of the buildings of Venice, which have been standing “knee-deep” in water for centuries, were achieved partly thanks to this unique finishing material. Now it includes both traditional mineral components and modern acrylic binders.
Application features
Real Venetian plaster is not only a certain composition, but also a complex application technique. What real masters create with its help can rightfully be considered works of art. This exquisite, elegant coating can decorate walls, ceilings, portals, columns, cornices. The drawing can be applied in different ways, which allows you to create a design for the most refined taste and fully realize the designer’s idea.
The Venetian plaster applied to the wall seems to glow from the inside and glitters. This effect of the play of light is achieved by applying many translucent layers. After the coating dries, the wall is rubbed with beeswax, which is transparent and provides protection from moisture.
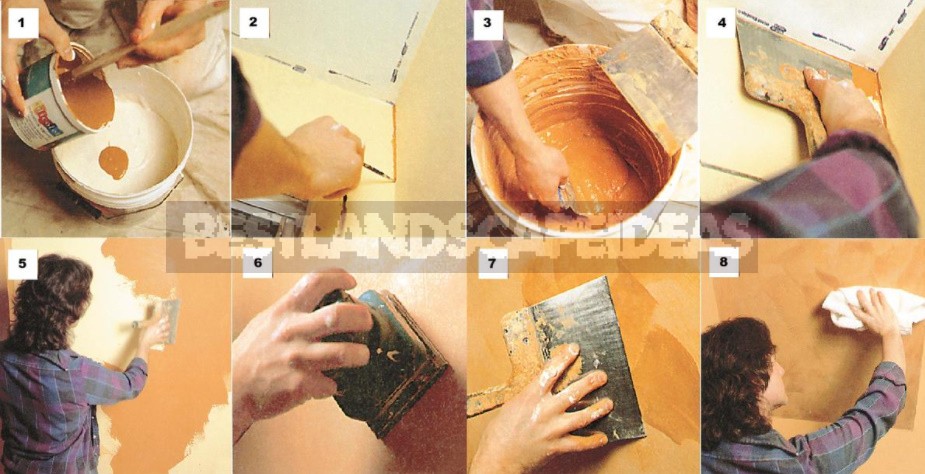
Photo 1. The plaster solution for the first primer layer can be tinted, achieving uniform coloring of the composition using a drill with a stirrer. Photo 2. To paint the corners of the room, use a soft artistic brush. Photo 3. The plaster solution is applied to the wall with two spatulas in small portions. The second spatula is used to set the solution and clean the first one. Photo 4. A layer of plaster is applied and rubbed with a spatula from the ceiling, as shown in the photo. Photo 5. The applied plaster layer should be as thin as possible. The hand movements are circular, linear, and of a random trajectory to ensure a very uniform (overlapping) application of sections of each layer. Photo 6. The plastered surface is sanded using a very fine-grained skin, with a grain size up to 1000-1500. Photo 7. On the polished and dust-free surface, the last layer of wax is applied, rubbing it into the surface. Photo 8. Polish the “Venetian plaster” and with the help of a grinding machine, or manually.
The wax enhances the gloss of the coating and gives a feeling of a stronger play of light. A thin transparent wax film changes the angle of refraction of the light beam. Due to this, the wall ceases to be flat and seems to go into the depth.
The walls finished with Venetian plaster can be washed and cleaned with detergents that do not contain solvents, for example, soap solution, water.
Coatings of this type are environmentally safe, non-toxic. They are also used for finishing rooms with high humidity, for example, for swimming pools, showers and bathrooms.


Leave a Reply