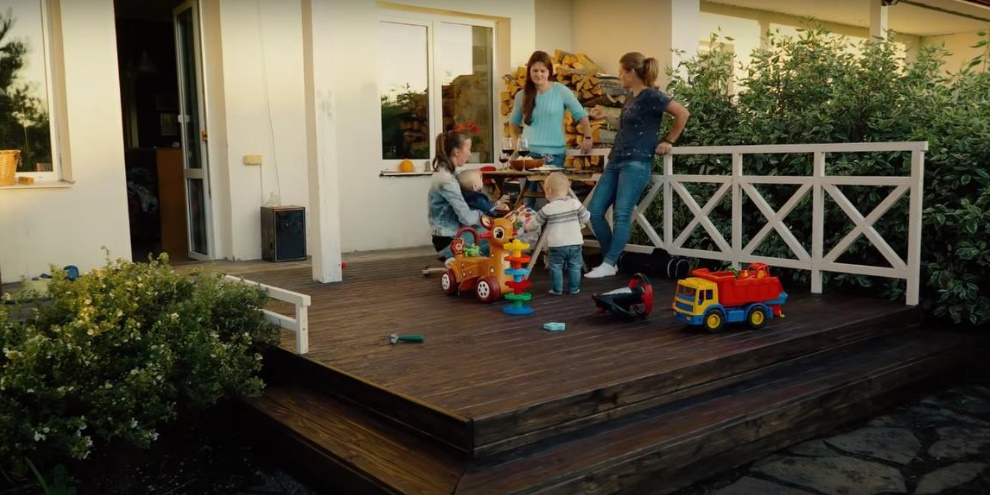
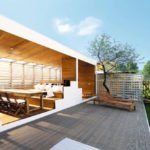
I have long dreamed of a spacious terrace where you could relax or play with your child in good weather. The time has come to realize our plans, and my husband and I have started working.
We will build an open terrace without a canopy. This is a kind of podium, a continuation of the house in the landscape.
Construction
Screw piles were chosen as the basis for the terrace. The binding and coating will be made of boards, which will then be treated with oil. The size of the podium is 3 × 3 m. Firstly, this is due to the length of the boards: so there will be no unnecessary scraps. Secondly, according to our calculations, these are the optimal sizes for our house and plot.

So, we bought piles for the foundation. Their diameter is 51 mm, the diameter of the blades is 200 mm, the attachment point of the head is a square tube of 50 × 50 mm. The height of the piles is 160 cm . Since the load will be small, such parameters are quite enough. 6 pieces are enough for a 3 × 3 m terrace, since three more attachment points will be on the already existing grillage.
Screw in the piles for the foundation
When we brought the piles, we found that they did not have a stop for the gate, and it jumps from a square pipe down to a round one. At work, when it is necessary to make a sufficiently large effort, it is simply impossible to catch the gate. For ourselves, we solved this problem with the help of clamps, which as a result served as a limiter.

The first stage is marking the installation points of piles. Our podium fit very well, we didn’t have to spoil the landing. We walked around the place of laying the electric cable, the opposite side rested against the bushes. The only thing that had to be dismantled was part of the path to the house.
The technology of pile mounting involves the preparation of a small pit. Of course, it is unlikely that it will be possible to dig it out perfectly exactly according to the markup. But this is not critical. Everything can be adjusted in the process of screwing in piles. To do this, simply tilt the pile and start to bury it at an angle. As soon as it gets to the specified point, screw it in smoothly.
It is important not to fill up the pile, but to screw it strictly vertically. To do this, by digging it into the ground, use the level. Make sure that at the end of the work, the pipe faces are parallel to the existing foundation.

Setting the height
We screwed in the piles with some margin in height. The length of the square pipe (20 cm) makes it quite possible to cut off the excess already after the finishing marking. We got two rows of three piles parallel to the foundation of the house. To make the installation of the middle supports a little easier, a rope was tied to the extreme ones. It is easier and faster to navigate by it.

It took about two hours to screw in 6 piles. The work is not easy — I think if it were necessary to screw in more, productivity would noticeably drop. Keep this in mind when planning your time.
Align the piles relative to the grillage
The task is to combine an existing terrace with an attached one. To do this, use the level. I also secured myself with an electronic level. To get to the right plane, I need to set the level, focusing on the existing flooring, and subtract 173 mm from this height. Why exactly so much? We add the height of the binding, the thickness of the finish board and do not forget about the thickness of the head plate. I ended up with 173 mm. I put the necessary markings on one pile and I will mark the rest using a laser level.

I was very lucky that at the time of this work, a shadow was formed over the future terrace, and the laser beam was clearly visible. If I had to mark up in the sun, it would probably be impossible to do without special targets or I would have to wait for the evening.
After the marking is applied to all the piles, we align their length with a grinder and weld the heads.

We make a binding
It’s time for strapping. For her, we took non-rigid boards of natural drying. They are cheaper, but it does not affect the appearance in any way. I covered all the boards for the frame with antiseptic to extend their service life.
We attach the first board to the existing grillage with plumbing bolts through the dowel through the boards. It will be part of the supporting structure. To this board we fasten the beam with the help of a metal support. We fix it with screws.

I first assembled the binding by fixing it into the end, so it is more convenient to work. To give the structure rigidity, I used metal corners.

We completed all this amount of work in 1 day. The second day began with the laying of roofing material under the frame of the terrace. It is needed so that the grass does not germinate.

Assembling the frame of the terrace
To begin with, we attach the wood to the heads with plumbing bolts.

Now we need to lay the intermediate logs to give the flooring rigidity. To do this, we attach a bar that will serve as a support. The size in my case is 50 × 50 mm. For intermediate logs, I use boards with a width of 150 mm. In each of them, on both sides, I choose a 50×50 recess so that a support bar falls into them.

Terrace cladding
I chose a 95 × 20 mm pine board for the cladding. This choice is justified by several factors at once. Firstly— the price. Such a board is inexpensive. Secondly, I understand that in the open air, the boards may soon become unusable, and they will have to be replaced. So, replacing boards with a thickness of 20 mm will be much easier and more profitable than 50 mm.
Some may fear that such a board will bend when walking on it. This moment I have thought through — the step between the lag is only about 35 cm. To understand whether the boards will spring, it is enough to decompose them and take a trial walk. My experiment has shown that there will be no problems.
Before sheathing the terrace, I will polish the boards and remove the edge with a semicircular cutter. I will cover the finished boards with a layer of oil for terraces from all sides. From experience, I can say that it is impossible to save on a coating for wood, since the service life of the building largely depends on it. You can save money at the application stage. To do this, choose not a brush or roller, but a sponge. With it, the consumption will be more economical, but not to the detriment of the quality of the coating.

Dried boards are nailed to the binding. For convenience, we nail a bar on one side, along which we will level the ends of the boards. After we have nailed them, we will cut off the excess to achieve a perfectly smooth edge. To make the gaps between the boards uniform, I prepared slats with a width of 1 cm. The foundation is ready.

Steps
We prepared a small trench and covered it with gravel. We will lay bricks on it and support the step. During the work it became clear that the steps should be on both sides of the terrace. It’s both more convenient and aesthetically pleasing to look at. Therefore, we prepare a gravel pillow on both sides. The frame for the steps is made of bars, at the corner we lay a diagonal support to attach the edges of the boards to it.

Due to the peculiarities of the landscape, the side step was not made along the entire length and, so that no one would be tempted to go down where it was not necessary, they decided to build a decorative fence. To do this, they took bars of small thickness and covered them with white terrace oil. In the floor boards, the grooves were chosen so that the bars stood flush in them. The longitudinal bars were attached. The lower one is between the racks, the upper one is on top, with small protrusions along the edges.

The third free side of our terrace turned out to be empty. I decided to make it decorative with the help of a geometric fence. It is made of the same bars as the fence on the other side of the podium, the color is also white, but the pattern will be different.

The final stage of our construction is re—treatment with terrace oil. Already in the very first days, the coating showed its best side: it began to rain, and it became clear that the wood does not absorb moisture.

Related posts:
 Glass Greenhouse with Their Hands
 Insulated Flue – Saving Home from Fire
 Convenient and Useful Nozzle On the Trimmer With Your Own Hands
 Protect Your Garden, or How to Make a Scarecrow
 Outfit for Your Windows: Hinged and Roller Shutters, Mosquito Nets and Awnings
 In Your Garden Begins the Age of Stone: Choose Decorative Benches
 How to Build a Winter Garden in the Country
 How to Make a Washstand for Country House the Hands
 And Above us is Not Dripping: Shelter for the Garden
 Pros and Cons of Various Types of Solid Fuel for Boilers: Wood and its Derivatives
 Pros and Cons of Various Types of Solid Fuel for Boilers: Coal and Peat
 Choose Radiators for the Summer Cottage
 Additional roofing elements (accessories)
 Terraced motives the device is weatherproof wooden floors
 How to Heat the Boiler with Wood
 Always on Guard: Security Systems for Country Houses