I have long wanted to try the technology of firing wood as a decorative technique. Because of this, I even bought a blowtorch last year. This technology is very old. When our ancestors dug a wooden pole into the ground, for example, for a fence, they burned its lower part, which was in contact with the ground. Thanks to this, the pole stood twice as long and almost did not rot. Then the firing technology smoothly moved into the plane of design techniques. Probably no one wants to mess with fire, although this is a great way to save money on tinting impregnations.
It’s time to light a new lamp
Wonderful prunings of my fence went to the simplest casket for the experiment of burning wood. They lay on the veranda for a couple of years and dried perfectly. The blanks for the casket were cut with a miter saw. The result was smooth rectangles that could be immediately glued together.

But first I decided to practice firing on unnecessary pieces. I poured gasoline into the blowtorch, pumped air and gasoline into the trough under the nozzle, lit it and left it to warm up. After about five minutes, the lamp warmed up and gave a fairly stable torch.

I tried to burn the blanks. According to fire safety rules, he kept a watering can nearby. The result of the firing did not suit me right away — I had to fill my hand.

I am assembling the body of the future casket
Joiner’s clamps are an irreplaceable thing! How I used to do without them is a mystery. Glued the side walls of the casket just butt-to-butt with carpentry glue. He pulled the box off with four joiner’s clamps. Removed excess glue.

It was hot outside, and the box was securely glued until the evening. At this time, I sanded the bottom and lid of the box. The box itself was also sanded, removing the traces of the first firing, and rounded the corners.

Now, for the second time, I carefully burned the product with a blowtorch inside and out. This time the “burnt” pattern turned out to be more even. So I will fix it with aerosol wax.

I cover the details with wax
This summer I have already worked with oil on wood and yacht varnish in an aerosol can. And I was surprised that they gave a high-quality result while saving time. Therefore, I decided to treat the box with another aerosol composition.
They probably learned how to wax wood at about the same time as they burned it. This material protects it well from UV, moisture and mold. In addition, wax is the most natural coating among those used for finishing wood. It emphasizes the texture of the product well, and this is the only product where you can adjust the “glossiness”. What I mean: when you buy a yacht varnish, you immediately take a matte, semi-matte or glossy. No improvisation. With wax, everything is much more interesting. After applying it, you get a matte surface. Don’t like it? Take a soft flannel cloth and start polishing until you are satisfied with the final appearance of the product.
The parts of my box were clean, so I just shook the can for a couple of minutes and covered the blanks with it.

I practiced a little on unnecessary pruning and, as soon as I got used to applying the aerosol evenly, I covered the parts with wax. Carefully removed the excess with a sponge and left to dry. I waited half an hour between the first and second layers.
Using wax in a can turned out to be very convenient. It is applied easily from an aerosol, evenly lays down a thin layer and dries quickly enough. For 2 days of work on the box, I applied 3 layers. I decided to polish it after a complete assembly. Polishing the surface of the casket with a soft cloth gave a semi-matte shine. The wax coating favourably emphasized the texture of the wood. The coating also protected the wood from moisture.
I did not glue the bottom of the box, but screwed it with long thin screws, drowning the head. For accuracy, I drilled a 1.5 mm hole under the screw, then made a shallow hole with a diameter of 5 mm to drown the head.

A body kit for the box was available. A year ago I ordered small hinges and locks. The screws were included.

It remains to make legs
On a miter saw from the scraps of a 20 × 30 mm bar, I cut off the same 30 × 30 mm squares in a couple of seconds . Then I sanded it a little, but I didn’t burn it with a blowtorch yet. Instead, I drilled holes in the legs, planted them on a wire…

…and burned after dinner right on the fire in the fireplace! So it is not necessary to have a blowtorch for firing.

Then I applied a couple of layers of wax. After it dried, I polished the legs with a soft cloth.


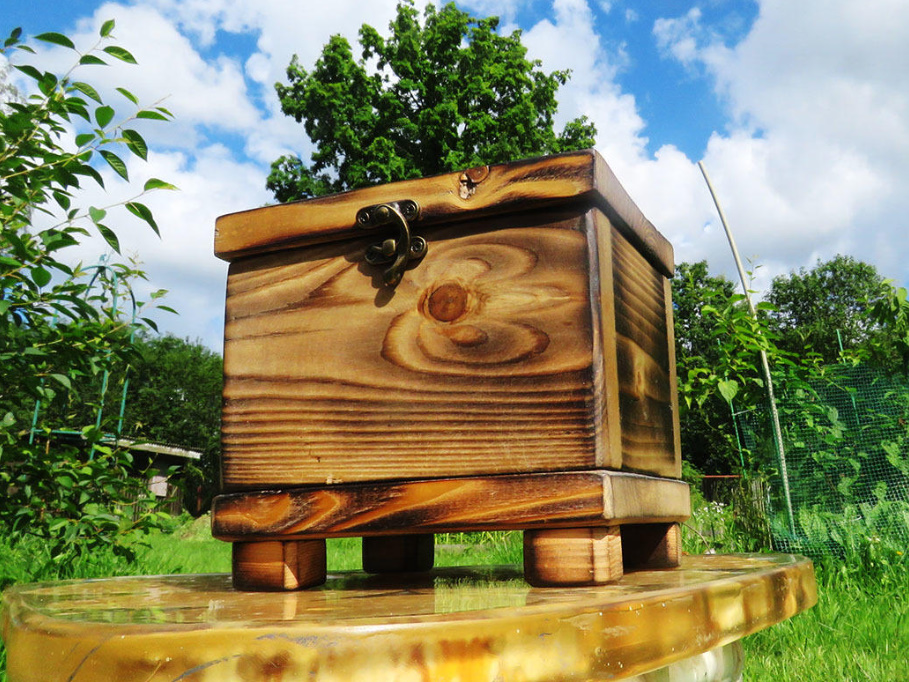
The box is ready. If my wife doesn’t like it, I’ll put it up for auction. And I also wanted to show how different wood can look depending on the processing method.

All three products — a table, a photo frame and a box — I made myself from the same boards. Only they are treated with different coatings. My favorite for today is a burnt casket with a layer of wax. What do you like better?
Related posts:
 Glass Greenhouse with Their Hands
 Common Mistakes in Preparing the Garden for Winter. Covering the Plants.
 Keychain, Made With Your Own Hands — a Great Gift
 Ideas for New Year Bouquets and Arrangements for a Pleasant Festive Interior
 Christmas Toys and Various Pendants With Their Own Hands
 Candlesticks With Their Hands: Ideas and Instructions
 Ideas for Nice Christmas Gifts
 Convenient and Useful Nozzle On the Trimmer With Your Own Hands
 Protect Your Garden, or How to Make a Scarecrow
 How to Make a Washstand for Country House the Hands
 Crafts from Ordinary Wine Stoppers
 Crafts With their Hands: Birds and Moths
 Gifts with Your Hands From the Bottom of Your Heart
 Update Old Furniture. New Life of Favorite Things