One of the “symptoms” of the approach of spring – a lively Twitter and sonorous singing of birds in the waking garden. And if your edge spring has not even looked, its arrival can be accelerated. Make a couple or a whole flock of winged creatures from paper, cardboard or plywood on the weekend. It will take a little time, and you and the children will enjoy it. Enjoy your creativity!
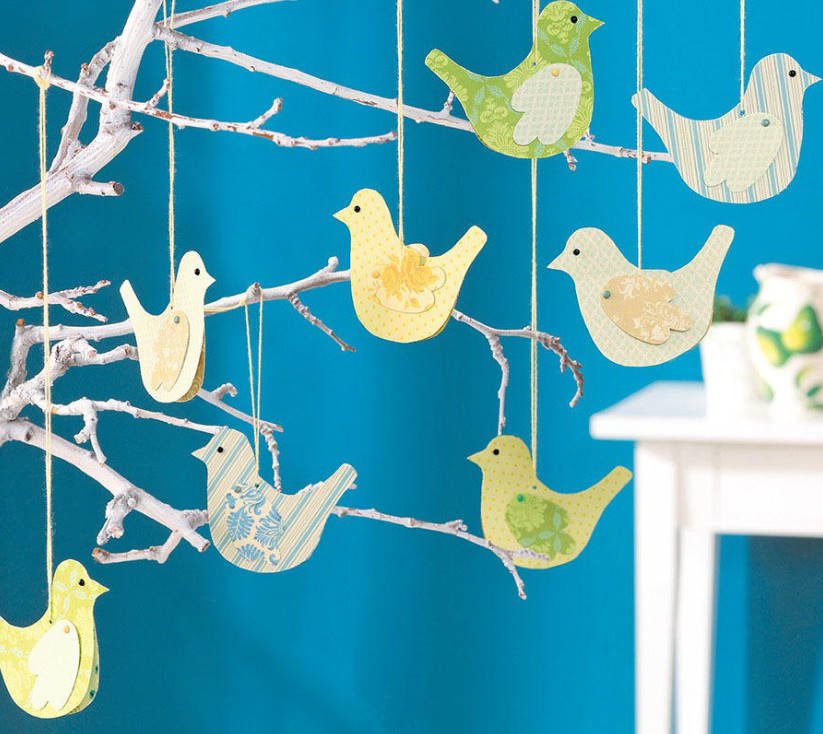
Flock of birds
Make a cute flock can be simple and fast. A little colored paper, beads, and little colorful stationery clips – that’s all you need.
You will need:
- set of paper with prints from collections of fabrics for sewing dolls Tilda
- wire in white cotton braid (diameter 2 mm)
- multi-colored clips with round head (diameter 4 mm)
- half-blacks of black color (diameter 4 mm)
- drawing tracing paper
- thin cardboard
- simple pencil
- eraser
- ruler
- universal scissors
- manicure scissors
- transparent universal glue
- punch

Scheme-pattern of birds
Job description
1. Details to copy from the page of the motives and zoom in and out using tracing paper to transfer to thin cardboard and cut out. Cardboard templates to put on your chosen paper, cut around 2 body and 2 wings, of which 1 part in mirroring, and cut.
2. One wing to impose on a trunk and, as shown in a photo, a hole punch to make a hole in a wing and a trunk. To do the same with the second half of the body.
3. Glue the black halves (=eyes), and the wings with the clips to fix on the body, if necessary, further fix a drop of glue.

Technology of work
4. Along the marked line on the template to glue both halves of the body. For hanging, make a hole above the wings. Hold it in the cord and both ends of the cord to tie a knot.
Another noisy flock
Fun and free soar feathered singers in the space of your home. You can make just one bird, and you can a whole flock and hang them on a branch. Decorate the window or hallway with birds.

Another noisy flock
You’ll need paper, scissors and a little patience.

Close up
Get to work boldly!
You will need:
- turquoise, bright pink and lilac cardboard for crafts
- bright pink, purple and turquoise silk paper with 3D fibers
- transparent double-sided adhesive film
In addition:
- scissors
- sewing needle
- thin cardboard
- scotch

Pattern diagram
Job description
1. From a sheet of motifs to increase the figures of birds, translate into thin cardboard and cut. From the selected silk paper cut four parts, larger than the pattern, from the adhesive film-two parts. Remove the protective layer from one side of the film. On the film to impose a piece of paper so that the film does not form bubbles and folds. After that, remove the second protective layer from the film and put the second paper part on top. In the same way to prepare preparations from paper of other flowers.

Technology of work
2. Then put the template on top, fix it with tape and cut the bird twice. For a monochrome bird cut out of cardboard two motifs (in this case, do not need adhesive film). Birds of the same color to glue. One of two birds to lubricate only the torso. On top lay the second motive, avoiding formation of folds.
3. From birds to bend the wings a fine needle to do in the trunk hole and then hook the right string for hanging.
Winged assistants
These lovely birds will not only decorate your window or terrace. In the evening they can give light or quiet music.

Winged assistants
You will need:
- 12 mm thick plywood
- white, Golden yellow, light green, bright green, purple and black acrylic paints
- lime or silver tubes of” wind music ” 90/110/130 mm long
- purple garden candlestick with a diameter of approx. 8 cm and a height of 7 cm with a handle
- 1 m of wire in green and purple paper braid with a diameter of 2 mm
- 50 cm silver wire with a diameter of 0.25 mm
- tracing
- carbon paper
- simple pencil
- eraser
- ruler
- Combi-clippers
- wood glue
- openwork saw or jigsaw
- sanding pad or sandpaper
- drill
- drill bit diameter 2 mm
- palette
- round pattern
- tea candle

Pattern diagram
Job description
1. From leaf motifs to increase the body of both birds and wings, translate on a tracing-paper and cut allowances in sections. Motives translate to the selected plywood and cut with openwork saw or jigsaw.
2. Then use the sanding pad or sandpaper to treat the edges of the cut parts. If necessary, sandpaper rough surfaces. Birds primed with white acrylic paint, diluting it with water in a ratio of 1: 1, leave until completely dry primer, if necessary, once again treated with sandpaper.

Technology of work
3. Paint the corresponding color to paint all details, to leave before full drying of a paint. Draw dots and stripes with a simple pencil, ruler and round pattern. Then paint the corresponding paint with a brush to paint the dots and strips.
4. To the body of each of the birds on both sides to glue the wings with wood glue. Use the drill to drill a 2 mm diameter hole in the upper torso. At the bottom of the drill in the trunk of another hole for hanging tubes and candlestick.
5. First, hang the birds with a wire in paper braid. Then for one birds on the wire to string three tubes, wire extend through the hole at the bottom of the body and on the back of the birds twist the ends of the wire. To another bird to hang a candlestick. In a candlestick put tea light a candle.
Waiting for a miracle
Original charms for Windows: striped, checkered and polka dot owl, and layered between mushrooms. This decoration will attract admiring glances.

Owls & mushrooms
You will need:
For owls
- book cardboard
- cardboard checks, polka dots and stripes
- white, Golden-yellow, blue photograph
- lilac structured cardboard
- small buttons
- brown wire with a thickness of 0.37 mm
- adhesive pad
- white 3D felt-tip pen
- segments of satin ribbon 50 cm long and 3 mm wide
For mushrooms
- red, lilac, light green, dark green and brown paper for
- crafts
- red, blue, light green natural paper
- tracing
- cardboard
- simple pencil
- ruler
- scissors
- transparent adhesive tape
- transparent universal glue
- darning needle
- punch

Pattern diagram
Job description:
1. Details for owls and mushrooms increase from a sheet of motifs to the appropriate size, transfer to tracing paper and cut at a distance from the contour. Then paste the motifs on a thin cardboard and cut exactly along the contour. Templates to impose on cardboard of the chosen color, to fix with an adhesive tape and to cut out all details. For mushrooms use colored paper, superimposed on each other for 6-7 layers, cut out the details of 20 x 20 cm. Cut out details fasten paper clips or transparent tape. Top to impose templates, fix them with tape and cut.
2. To the body of the owl to glue the head together with sticky pads, then glue the belly.

Technology of work
3. To attach the wings buttons with pieces of wire. To do this in the wings to make the right number of holes with a darning needle. In 2 holes to insert, respectively, a piece of wire, to string a button, the ends of a wire to twist, an excessive wire to bite off with clippers. Wings and legs glued to the body using adhesive pads. Eyes glued to the pupils. Glue the eyes and beak with glue pads. On each eye put a white point 3D-marker, leave to dry. In the head to make a hole with a hole punch. In the hole to pass the wire and make a loop. Slip into it the tape for hanging, tie the ends of the tape.
4. Now glue the mushrooms. To do this, one mushroom from the leg to the cap to hold a thin strip of glue, in the middle of the first mushroom glue second mushroom. In the same way to glue and other mushrooms. After the glue has dried, trim the edges of the mushroom with scissors. Hole punch to make a hole in the hat. In the hole to stick a thin satin ribbon for hanging, tie the ends of the tape.
Butterflies Paradise
Moths-traditional Japanese motifs-will be especially beautiful if you make them from colored paper or paper with drawings. To make them look like real, you need skill and training.

Butterflies Paradise
You will need:
- Sheets of corrugated paper in a strip or with another pattern size 15 x 15 cm
Job description:
1. Put the paper square on the table with the colored side down and first fold it diagonally, then open. Turn and fold the paper sheet and spread out on both lines of the middle.
2. Then add the detail, as shown in the figure, the result is this figure.
3. Rotate the figure 180° right and left lower corners of the top layer, respectively, folded to the marked middle.
4. Now the figure looks like this. Work turn off.
5. The lower portion of the triangle to loosen up a bit.

Scheme of work
6. Now the figure looks like this. Work again to turn.
7. Both are at the top of the wing to bend down. Note: when folding the two side of the plot stand up for yourself and form small packages, which must compress flat.
8. Now the work looks like this. Turn the figure again.
9. Turn the top down on top of the wing valves.
10. One part of the top again to turn back to get a spout. The left half of the moth to turn back.
11. From the moth now looks like this. Fold the valve along the wing, respectively, along the dashed line down and turn the fold-all ready.
Related posts:
 Gifts with Your Hands From the Bottom of Your Heart
 Everything about cookware – Best Types of cookware
 The Highlight of the Villa Interior – Original Watches
 Keychain, Made With Your Own Hands — a Great Gift
 Ideas for New Year Bouquets and Arrangements for a Pleasant Festive Interior
 How Beautiful to Decorate Your Christmas Interior with Wool Pompons
 Christmas Toys and Various Pendants With Their Own Hands
 Candlesticks With Their Hands: Ideas and Instructions
 Ideas for Nice Christmas Gifts
 Beautiful Pots for Indoor Flowers from Plastic Buckets
 Crafts from Ordinary Wine Stoppers
 Terraced motives the device is weatherproof wooden floors
 “Sweet Couples” – Preparing Gifts for Valentine’s Day
 Nice Soft Gifts Made With Your Own Hands
 A Few Ideas of Unusual Use of Zipper