The theme of the Christmas decor continues unusual decorations for Christmas trees and interior, made of a variety of materials: cones, woolen threads, plexiglass, wire, wooden spires… and even the usual store Christmas balls can be turned into exclusive. Choose the ideas you like and enjoy your creativity!
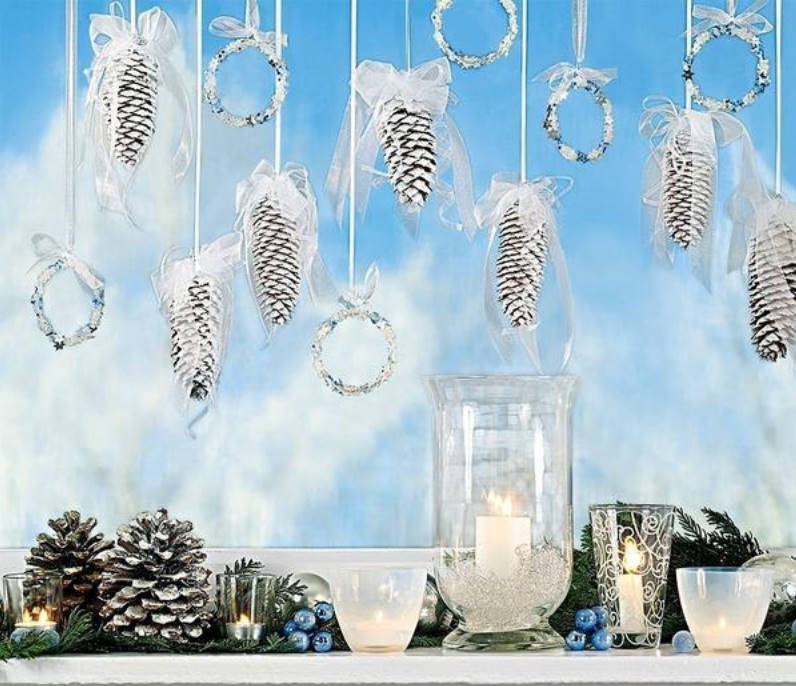
1. Winter imagination: the suspension-bumps and rings
Santa Claus solemnly into their rights, then all must Shine and Shine. We offer you an original Christmas decor: pendants-cones and silvery wire rings.
You will need
For cones:
- spruce or alder cones
- white spray lacquer
- decorative transparent frost
- transparent sequins (diameter 10-12 mm, 5 pieces)
- 1 m organza ribbon 25 mm wide and 1.2 m 3 mm wide
- 1 m white satin ribbon 3mm wide
- brown knitting wire (diameter 0.37 mm)
For the ring:
- approx. 1.3 m silver wire (diameter 0.6 mm)
- a silver wire (diameter 0.4 mm)
- blue Indian glass beads (diameter 2.6 mm)
- transparent rainbow rocaille (round glass beads with a diameter of 0.5 mm)
- transparent metal rocaille in the shape of a hexagon (diameter 0,3 mm)
- silver sequins in the shape of stars
- 1.5 m white organza ribbon 10mm wide
- scissors
- ruler
- hot glue gun
Job description
1. Cut the knitting wire wrap the top of the cone. Wire ends lift up and twist. Bump to put on the suitable substrate or to just hold in one hand and spray with white aerosol varnish, then hang to dry the paint (step 1).
2. After the paint is dry cover cone reinforced with glue on the still fresh adhesive spray decorative frost. Lump again hang until frost dries (step 2).
3. Segments of the ribbon of organza of different widths to impose on each other, fold the bow and tie in the middle with wire. For each cone to make 2 bows. The ends of the wire at the top of the cone to shorten and bend the loop. To hang a lump by means of a white satin ribbon. Bows stick to the top of the cone. In addition to the cone, stick a bugle.
4. From a thick silver wire cut for each ring, cut a length of approx. 1.3 m length of wire to wrap several times around a cardboard tube (diameter 10 cm) or plastic bottle. Then remove the wire ring carefully from the tube or bottle. The ends of the wire wrap several times around the ring. Fold the excess wire at the ends in the form of a loop for hanging (step 3).

Technology of work
5. Then a wire ring to put the hot glue gun, liquid glue to put the little beads gently squeeze. To ensure that the glue remains hot.
6. Glue the ring beads (see photo to step 3). On a section of thin silver wire to string the little sequins in the shape of stars and to wrap the ring with beads. Ring hang on a narrow ribbon of organza. As for the cones of the braid to tie bows and attach them to the ring.
2. Balls-pompons “in polka dots”
Christmas decorations in the same style: pompom balls are not inferior to glass! This composition is designed in classic Christmas colors-red and white.

pompons in polka dots
You will need:
- remains of white and red wool yarn (130 m / 50 g)
- red and white sequins (7 mm in diameter)
- template for making pompons size 5.5 cm
- universal glue
- scissors
- long needle
- about 1 m tape (width 5 mm) in a red-and-white cage
- 5 ready woven stars (with a diameter of 1.5 cm)
Job description
1. To manufacture 3 red and 2 white pompoms.
2. The pompons stick in random sequins.
2. For loops to use tape in a cage 20 cm long.
3. At the junction of the loops and balls to stick to the woven star.
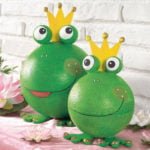
3. I love the gnomes
Take advantage of the good season of discounts in nature! Little gnomes proudly show clothes luxurious colors, they play along the autumn leaves of the most beautiful shades, and in addition they never fade.

Gnomes and leaves
You will need
For one gnome:
- split plexiglass “drops” (12 cm long)
- acrylic body paint, Apple green, green, beige and red-brown
- red watercolor pencil
- touch-up pen white
- 2 black half beads (diameter 5 mm)
- cotton ball (diameter 12 mm)
- cord Apple-green and brown (diameter 2 mm, length 60 cm)
- felt cream, red and dark brown (2 mm thick)
- crinkled velvet white paper
- clear lacquer, silk gloss
For the leaves:
- transparent foil of a weather vane (with a thickness of 2 mm)
- acrylic paints are Golden-yellow, green, orange, red and maroon
- thick water resistant black felt pen
- beads are Golden-yellow and orange
- threads for embroidery olive and brown
- narrow ribbons and threads of suitable colour for hanging
- aerosol glue
- transparent paper
- thin cardboard
- simple pencil
- eraser
- ruler
- universal scissors
- manicure scissors
- glue for textiles
- pins
- hot glue gun
- stationery hole punch or hole punch with shaped nozzles
- glass jar for paint
- sponge for painting
- rag to remove paint
- wiper

Scheme-pattern
Job description
1. Remove grease particles from the surface of the plexiglass “drop” forms with the wiper. As shown in the photo, paint the face area with an acrylic body paint, let the paint dry. Then half of the shape to be painted in brown, and the other half in green. Cotton balls to paint with red acrylic paint and after drying to varnish. Black half beads to stick on places of eyes, red cotton balls-on a place of a nose. Draw it red paint cheeks (photo 1).
2. The motives for the beanies, beards and mustaches zoom in, cut and pin prick on the appropriate sheet of felt. For each person cut 2 pieces caps and 1 item beard. White circles for the cap “fly agaric” cut hole punch-office or with shaped nozzles (photo 2).

Technology of work
3. Glue for textiles glue on the edges of the parts of the cap, glue to allow to dry and at the tip of the cap to break the hole for hanging (photo 3).
4. Stick the beard and mustache, both halves of plexiglass forms connect and to put on the running cap. On red riding hood paste white mugs. Hanging gnomes on the matching colored narrow tape (photo 4).
5. The motif of the maple leaf to put under the degreased foil for weathervanes and translate the contours of the black marker. After drying, the half of the leaves first on both sides to cover the yellow acrylic paint with a sponge. On the still wet paint with a sponge to apply green paint. The rest of the papers first to cover the orange paint, then apply red and maroon paint. At the end of the hole punch punch hole in the stem and hang the leaves on a suitable color thread (photo 5 + 6).
4. Wonderful little animals for decoration
On Christmas and New year’s Windows are usually decorated with stars and snowflakes, angels or snowmen. However not less attractive will look there and inhabitants of forests, which we all so love!

Charm pendants
You will need:
- the saw cuts branches with a size of approx. 9 x 4.5 cm
- set of acrylic paints
- thin brush
- light green paper
- carbon paper
- various decorative ribbons
- satin ribbons of different colors with a width of 0.3 cm
- acrylic paints of white and flesh color
- dense cardboard
- black, white and colored handles for decorative works with a core size of 1-2 mm and 0.8
- cotton swab
- simple pencil
- zig zag fabric scissors
- conventional scissors
- universal adhesive for DIY

Scheme-pattern
Job description
Wood charm pendants:
1. Saw cut branches primed with acrylic paint Nude, paint allow to completely dry. The saw cut through the carbon paper to transfer motifs from the log sheets.
2. Separate internal sections alternately painted with acrylic paints (fine brush) or markers before doing this be sure to allow to completely dry previous layer of paint. Figure complete with markers, to completely finish the face. Cheeks brown cotton sticks.
3. The contours of the circle in black. On the back side to glue satin ribbon for hanging.
Herringbones:
1. Cut the Christmas tree out of cardboard. From color paper cut barrel.
2. Herringbone paste over a variety of decorative bows, while the ends of the bows cut conventional scissors or scissors “zigzag”.
3. In conclusion, glue the trunk of the tree from the back side to glue satin ribbon for hanging.
5. Picture of a saw cut from the bark

Interesting cut
You will need:
- slept with bark size of about 17 x 9 cm
- a fastener for hanging pictures
- set of acrylic paints
- thin brush
- acrylic paints of white and flesh color
- decorative red and white ribbon
- carbon paper
- white, black and colored markers for decorative works with a core size of 1-2 mm and 0.8
- cotton swab
- zig zag fabric scissors
- conventional scissors
- simple pencil
- universal glue

Scheme-pattern
Job description
1. Cut with bark primed with acrylic paint flesh colored paint and allow to completely dry. With leaf pattern using carbon paper to transfer the motif on cross-section.
2. Separate internal sections alternately to paint with acrylic paints with a thin brush or decorative markers, each time to give the previous paint to dry completely. Pattern complete with markers, fully finish the face. Cheeks brown cotton sticks.
3. The contours of the circle in black. On the reverse side, attach the loop for hanging and glue decorative tape.
6. Holiday decor for Christmas balls
Glass balls decorated with fabric in a white-red cage or traditional Christmas patterns – it’s so cute!

Cute balls
You will need:
- matte red and white mother-of-pearl balls for Christmas tree (diameters 6 and 8 cm)
- white, red, orange, light brown and black acrylic paints
- white and red lacquer pencils
- braid in a white-red cage 40 mm wide
- white and red mulberry bark paper
- red self-adhesive acrylic sprockets
- shaped hole punch with motifs ” snowflake “(diameters 5 and 2.5 cm)
- white faux pearls (4 mm in diameter)
- about 20 cm of tape width of 10 mm in white and red checked and striped
- 20 cm white tape 6 mm wide
- tracing
- carbon paper
- soft and hard simple pencils
- ruler
- scissors
- circle pattern
- transparent universal glue

Scheme-pattern
Job description
1. Before starting all the balls clean with a special tool for cleaning the glass and leave to dry. One part of each ball is painted with acrylic paint. But first on the ball to draw using a round template and a white lacquer pencil circle, while paying attention to the loop for hanging the ball was directed upwards (as an option: draw a circle on a thick cardboard with a compass and cut with a breadboard knife). Then gently cut a piece of sponge to take a little white paint and draw a circle to put the point (step 1).
2. From leaf motifs to increase to the desired size of the stag and snowman, translate on a tracing-paper, cut at some distance from the contour. The template then flip over the back to stroke the soft pencil and the contour slightly to incise. The template now to put on the ball to squeeze with one hand, another hand hard pencil to trace the outline (step 2).
3. The motives to paint, as shown in the photo, and leave before drying paint (step 3).

Technology of work
4. White lacquer pencil to put on the ball decorative touches and draw snowflakes. With the help of a figured hole punch knock out of the white and red paper large snowflakes. These snowflakes stick drops of glue on the rest of the balls, balls decorate small acrylic self-adhesive stars.
5. A small heart is cut with a plaid ribbon motif, a large heart is made of white paper. Hearts consistently stick one after another on the balls. With lacquer pencils to draw stars and snowflakes. To each ball to pick up the corresponding braid, to tie bows, bows to paste on loops for hanging by means of hot glue.
7. The leaves at different angles of view
Installations of paper amazing colors, beautifully matched to each other, will create a special atmosphere in your home.

Leaf pendants
You will need:
- a set of thin paper apricot, red and blue tones
- red and blue paper
- satin ribbons cream, orange, light blue and lilac (width 3 mm, length 1 m)
- wooden beads wine red, blue and purple (diameter 12mm)
- tracing the drawing
- thin cardboard
- simple pencil
- eraser
- ruler
- universal scissors
- manicure scissors
- scotch
- paper clips
- punch
- transparent glue stick

Scheme-pattern
Job description
1. Leaf patterns to copy, enlarge, use tracing paper to transfer to cardboard and cut with scissors precisely. To choose the appropriate to each other colors of paper, folded 8 layers of paper of different colors and cut into squares measuring 15 x 15 cm Layers of paper on the edge to fix it with staples or tape. To impose a template of sheet and fix it with tape and cut with scissors.
2. Glue 8 of leaves with each other. To do this, from the stem to the tip of the sheet to apply a thin strip of glue, put the sheet and press down the middle of the applied stripes of adhesive. One after another, to stick together so all 8 of the leaves (photo 1).
3. Some glue to dry, if desired, can be more clearly cut outlines of the leaves and on the stem hole puncher to punch a hole (photo 2).

Technology of work
4. For each sheet to choose the right color ribbon and wooden bead. Tape through the hole and align the ends. String the bead, fix a drop of glue and tie the ends of the tape knot (photo 3).
5. Separate the paper layers to expand like a fan so that the halves of the leaves were arranged in a circle with equal intervals (photo 4).
Related posts:
 Ideas for New Year Bouquets and Arrangements for a Pleasant Festive Interior
 Candlesticks With Their Hands: Ideas and Instructions
 Grills and a Barbecue for Villas with Their Hands
 Keychain, Made With Your Own Hands — a Great Gift
 New Year’s Topiary With Their Hands: Master Class
 Christmas Wreaths, Garlands and Other Decorations for Christmas Interior
 Christmas Deer — a Constant Guest, Who Settled in Our Houses
 Figurines for Home and Garden With Their Hands: Snowmen and Santa Claus
 Christmas Trees With Their Hands: Simple and Beautiful
 Ideas for Nice Christmas Gifts
 Crafts With their Hands: Birds and Moths
 Gifts with Your Hands From the Bottom of Your Heart
 Christmas Angels: Ideas for the Needle
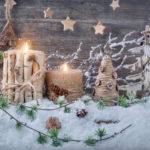 Christmas Crafts and Decor in Eco-Style
 Christmas Toys With Their Hands: Master Classes