Gold has always attracted people, they sought to decorate themselves and the space around with this precious metal. In ancient times, such luxury was the lot of only the upper strata of society and the Church. With the discovery of methods of manufacturing thin foil gold finish has become more accessible than solid gold or gold-plated items. A petal — foil from alloys that mimic natural gold gilding made a quite ordinary way of decorating architectural elements, furniture and interior items.
Whatever you choose-natural gold or cheaper imitation of copper alloys with other metals, the basic principle of the technique of gilding and the necessary tools are the same.
Gilder tools
Gilding — the process, do not tolerate the hustle and bustle. Therefore sometimes it seems inaccessible to the uninitiated in the mystery: in the workshop of the gold quiet, no one running and not make any sudden movements, only masters, surrounded by delicate instruments do their job.

This slowness and dimensionality is associated with the feature of the material. A sheet of gold is easy to tear or crumple. Gold foil is very thin and light, so it flies away from the slightest whiff. And it is easily electrified and can stick to any foreign object.
Knife and pad
This will require a Gilder suede cushion and solitary knife for cutting the sheets of gilding. The pad is a Board covered with thick leather, suede on the front side.

Some models have a protective screen to protect the workplace from air movement caused by drafts or passing by a person. The foil cutting knife with flexible steel blade has a rounded edge. The blade is manually polished and sharpened to cut the gold leaf in one motion without scoring.
Penzel and other brushes
You will also need a set of brushes — natural or synthetic, different shapes and sizes. With the help of them, the treated surface is covered with soil, dust is removed, polymer, glue for gilding, lacquer-Mordan is applied, they are used for drawing parts. In General, use the same as regular brushes. Size, stiffness and shape are selected depending on the type of work: for elements with fine thread and brush used smaller numbers.

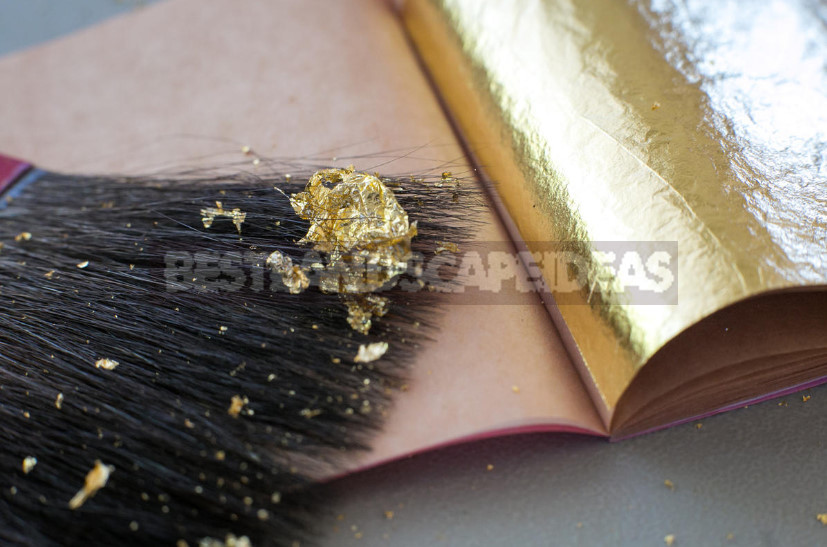
But among a set of brushes from the Gilder there is a special tool with a specialized purpose — penzel. Flat, rectangular or fan — shaped, with a soft long pile-it is used to transfer sheets of gold leaf or sweat on the surface prepared for gilding or a cushion for cutting. Rectangular brushes are more convenient for large smooth surfaces, fan — shaped-for small parts.

In sale there are brushes for gilding with natural hair. Most often for their production use long soft and elastic hairs from the tip of the squirrel tail or synthetic fibers. Experts suggest natural penzel to apply for gold leaf and silver, and artificial — sweat. Brush size and shape are selected according to need.
Tool for gilding
Tool for pozolotin work is divided into roughing and solitary. To clear terrain after applying primer apply tools similar to the tools of cutter: chisel, chisels, cutters, stonechats, a variety of hooks, brukarz. As well as spatulas for applying soil, abrasive tools-small and large, sponge.
Agate teeth
After application of the tinsel and drying of the adhesive layer, the surface is polished. To do this, use special polishing tools — agate teeth.

They have a different shape, a complete set of 10-12 different tools. It is said that the name “teeth” came from the fact that in the old days for polishing gilding used bear fangs. Although, most likely, they are called teeth because of their shape. And they are really made of agate, so they are very beautiful.
In addition to the described tools, gilders use in their work cotton swabs or soft tissue such as Batista.
Technology of gilding works
The process of gilding is very laborious. Any negligence in the preparatory work or when applying the gilding itself, stuck dust or hair lead to defects on the surface of the product.

Traditional methods of gilding — polymer and oil-are very time-consuming, the process consists of many operations. Oil gilding is stronger.
Preparatory (draft) works
Before applying the actual gilding, the master does a huge amount of work. First, the surface is glued: a joiner’s glue is applied in several layers to strengthen the part and create a strong adhesion with the subsequent layers of the ground — levkas (a mixture of joiner’s glue and chalk). This operation is also carried out in several layers (up to nine) with complete drying of each of them for several hours. The ground should completely hide the pattern of the material, such as wood. If the levkas layer is thin, the texture can appear and spoil the impression of the object made of gold.

After applying enough layers of gesso embossed clear to give him back the clarity that was lost from the many layers of soil. After cutting the relief detail polished pumice and horsetail or modern abrasive means, achieving porcelain smoothness, gently remove dust and wipe with a damp cloth or suede.
After drying and careful inspection of the surface for defects, you can proceed to the application of the polymer. The surface prepared for gilding should not be touched by hands — fingerprints can spoil the final result.
Gilding on polymer
Gilding on the polymer allows you to get interesting results of a combination of different textures of gold. Those parts of the relief (recesses) that will be covered with matte gold (for example, created), tinted with ocher to give the gold coating a greater visual depth. The rest of the surface is covered in several layers of polymer.

On the places painted with Golden ochre carefully, so as not to affect the polymer, gelatin is applied. After drying the surface covered with a poliment, Polish with cloth. For a greater matte effect, the concave parts of the relief can be covered first with sheets of silver, and then — gold.
The prepared polymer layer is moistened with diluted vodka,and then the treated area is transferred with a penzel or gold knife pieces of gold leaf. The size of the foil pieces depends on the details of the relief: larger pieces or whole sheets are used for large elements. Water moistens the fish glue which is a part of a poliment, alcohol evaporates and a piece of a gold foil as though is drawn in a layer of a poliment and is pasted.

Sheets of gold are stacked so that there were no gaps, “nailed”, shaded to the surface with a cotton swab or a normal squirrel brush (in the recesses). If between the elements of the foil remain uncovered places, they impose a “patchwork” of small pieces.
After about an hour, the gold-plated surface can be polished. Before that, it is necessary to sweep away the remains of gilding with a dry brush without effort. Cover with gold should only be an area that can be polished on the same day.
Oil gilding
The method of gilding for oil preparation is simpler, although it will also require rough priming. The soil is selected depending on the base material. For wooden, plaster or made in the technique of papier-mache elements as well as in the case of gilding on the polymer, you can use the levkas. Metal parts are treated with primer on metal. After drying the soil surface is painted in yellow and gold tones to highlight the gold coating.

The prepared area is varnished in several layers with complete drying and grinding of each layer: the smoother the surface, the better the result. Then applied varnish-Mordan. Its composition may be different, now on sale there are synthetic drugs with different “life time”.
For large surfaces should choose a long drying compositions. Morgan dried to the state of “tack” — when the surface appears dry but when you touch stick.

The time specified by the manufacturer is approximate, drying depends on humidity and temperature. Therefore, it is necessary to make a sample on which to control the degree of drying of the varnish — the gold foil should stick firmly and smooth well with a tampon. If gilt with the smooth moves, the gold “sinks”, it is also advisable to dry the varnish. On dry, Mordan gold will not stick. In this case, it is necessary to completely dry the applied layer and cover again. As described earlier, the excess gilding is removed with a brush and the surface is polished.
Although the process of gilding seems complicated, the most important thing in it — the ability to hard work and attention to detail. It is worth trying your hand at this kind of decoration.
Related posts:
 Home decor beached style
 Country Kitchen-a Joy for the Hostess
 Painting of Old Furniture: Choice of Paint
 Painting of Old Furniture: Tools and Materials
 Update Old Furniture. Decoupage.
 Aging Furniture: Staining Technique
 Update Old Furniture. Charm of Cracks.
 Unusual Country Furniture Made of Fabric: How to Make a Screen
 Aging Technique of Wood: Brushed and Firing
 Gilding as a Way of Decorating: Inspiring Ideas
 4 Best Ways to Add Square Meters to a Summer House
 Table Under The Sink In The Bathroom With Your Own Hands: Instructions
 Lighting For The Desktop In The Kitchen
 5 Best Gazebo for Country House. Types and Features
 The American Country House in Retro Style. Design Ideas