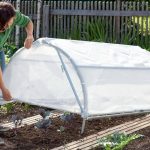
Arriving at the dacha in the spring in anticipation of early plantings, some of us find that the greenhouse has survived the winter with losses. Among the most unpleasant surprises are the deflection of the frame and the breakdown of the skin. In addition, we can expect less noticeable defects. Time during the planting season is especially expensive, so we will arm ourselves with knowledge in advance to quickly solve problems.
Restoring the frame
If after the winter you found that the frame of your greenhouse bent, it means that it could not withstand snow loads. Defects must be eliminated, and the base must be strengthened. To strengthen the greenhouse, you can go several ways. For example, you can make double arcs (Fig. 1), build horizontal struts (Fig. 2) or shorten the step between the supports (Fig. 3). Each of these methods works and significantly strengthens the structure.

In general, the simplest option of reinforcement-supports inside the greenhouse-is suitable for both arched and straight-walled greenhouses. In fact, these are pillars with transverse elements at the top. These crossbars are attached along the upper guide rail of the frame. If the greenhouse is small, one support is enough, for long greenhouses you will need at least two. Such reinforcement can be installed at the end of the season, when there are no plants in the greenhouse or they no longer need constant care. The main thing is to make it before the snow. That is, in the summer, they will not interfere, and their construction can be postponed until the end of summer.
But the device of temporary supports that are not fixed on the frame can turn into an additional problem. On heaving soils, with a temperature difference, such a support can be pushed out. At best, it will simply fall, at worst, it will damage the greenhouse lining.

For arched greenhouses, several more ways of strengthening are suitable. As a rule, the step between the arches of the frame is 1 m. If the arches have bent after a snowy winter, you can strengthen the structure by reducing the distance between them. To do this, you will have to add arcs (Fig. 3).
Duplicate arcs (Fig. 1) — in this case, it is necessary to make arches of a smaller radius according to the pattern. The optimal distance between the main and additional arcs is 5 cm. They can be made of rebar, rolled metal, pipes with a square section or open profiles. The lower arch is fixed by welding or fixing into segments equal to 5 cm.
Transverse struts (Fig. 2) — the principle of reinforcement is similar to duplicate arcs, but in this case it is not necessary to bend the profile. It is only enough to cut it into elements of the required lengths and fix it on the main arches with the help of welding or clamps.

Note: if the height of the greenhouse is small, duplicate arcs and horizontal struts can create obstacles, which, of course, have no place in the greenhouse. Then there is only one option for strengthening — reducing the step between the frame arches.
Replacement of damaged polycarbonate
If the canvas or part of it is seriously damaged, it is necessary to carry out restoration work. To do this, the broken sheet must be dismantled and replaced with a new one. But sometimes only part of the sheet is damaged, and then you can do without inserting a new fragment. It is not difficult to do this. Remove the entire sheet, cut off the damaged part along the cavities. To protect the open areas of the honeycomb, you will need a special insulating tape. Next, cut the part of the desired width from the new sheet. To connect the two parts, use the docking profile. Install the prefabricated sheet on the frame, securing it securely.

Important! Spring preparatory and repair work is necessary and important not only for the successful cultivation of the crop, but also for the greenhouse to withstand the upcoming winter. It is not necessary to postpone the elimination of defects, even if they seem insignificant. It is much more profitable to fix them while they still do not require large investments.
Spot repair of the skin
Of course, a good greenhouse should have a complete covering. There should be no cracks, holes and holes in it. But in fact, we can not always provide protection from natural phenomena, and over time, various kinds of defects can form in polycarbonate. A diligent summer resident (and we are exactly like that) is unlikely to change the entire canvas if there are small holes or chips on it. But you still need to do something with them, otherwise moisture will get into the honeycomb through them, as a result, the translucent structure will begin to become cloudy.
Small holes on the polycarbonate can be filled with a sealant. It is better to take transparent compositions. To begin with, the work surface should be cleaned of dust and debris, degreased, and then well smeared with a chip sealant.
Larger holes will have to be patched with patches. To do this, you will need a piece of transparent polycarbonate. There are two repair options. Which one to choose will depend on the features of the hole and your capabilities. The first way is to give the hole the correct geometric shape and paste a patch of similar dimensions into it. There are subtleties here. Before gluing a new piece of the honeycomb of the main polycarbonate, it is necessary to waterproofing. After gluing, the perimeter of the patch should be treated with a sealant.
The second option is to use a polycarbonate overlay, that is, fix it on the surface outside the greenhouse. This can be done with bolts, or you can strengthen the fixation with glue. In any case, it is necessary to seal the honeycombs of the main web and patches. Naturally, the application of patches should be carried out after cleaning and degreasing the surfaces. The longitudinal honeycombs should be placed horizontally.
Current maintenance of the greenhouse
Tighten the screws
Even if your greenhouse has survived the winter without breakdowns, it needs routine maintenance. It is necessary to stretch all the screws, and those that turn, replace with new ones. Over time, the fixation weakens, and in strong winds, the polycarbonate can deform. This is especially true for greenhouse houses, since their windage is much higher than that of arched ones. It is important to make sure that there is no dirt left between the self-tapping screw and the base. Dust and litter should be removed. It is necessary to tighten the screws firmly, but without allowing a deflection in the polycarbonate sheet. Check the stability of the frame: try to shake the greenhouse from the inside. If you feel a backlash, pull the mounting bolts.

We will paint the metal supports
Evaluate the quality and integrity of the protective coating. Most often, damage is formed in the places of joining and fastening of elements, as well as on the welded seams of the metal frame. If you find places where the coating is broken, it must be restored immediately. Most likely, you will have to remove the polycarbonate for this. Clean the workplace, treat it with an anti-corrosion compound (if it is a metal), apply a primer and a high-quality finish coating. It is better to choose proven weather-resistant paints. If the frame is wooden, the cleaned surface is treated with an antiseptic.
It may seem that such a painstaking, time-consuming work is completely optional. They say that nothing terrible will happen if the local places of the frame remain unpainted. But let’s imagine that in the spring, having discovered the problem, we did not fix it.
In summer, plants grow in the greenhouse, a specific microclimate with high humidity is formed. That is, mold or rust forms on the site of non-paints, and in such favorable conditions it begins to develop rapidly. Then autumn comes, but we continue to grow crops in the greenhouse — and in conditions when it is colder outside, we can no longer open the greenhouse to eliminate the problem before the onset of winter. So we go into the cold with an increasing problem. And in winter, snow falls, due to temperature changes, a crust is formed. A snow cap will appear, and with it the load on the frame of the greenhouse will increase. And now the moment is not far off when the frame weakened by rust or rot will break, unable to withstand the load. It is much more difficult and expensive to restore a greenhouse after such damage than to immediately process the detected coating defects.
Disinfection of the greenhouse
In addition, if mold appears on the frame, be prepared for the fact that the plants will start to get sick. The microclimate in the greenhouse is ideal for the spread of spores of a harmful fungus that is sure to hit the plantings. Therefore, it is important to detect and fix the problem in time. But local treatment may not be enough, since the spores could already have settled on the surfaces. It is recommended to treat all surfaces in the greenhouse with special compositions.
We will restore the transparency of polycarbonate
Unfortunately, it is almost impossible to restore transparency to the greenhouse. In this case, measures should be taken at the stage of purchase or installation. There are several reasons why polycarbonate has become cloudy or has acquired some shade. Firstly — the quality of the material itself, or rather the degree of its protection from UV rays. Here, one option is to initially buy a greenhouse with polycarbonate protected from sunlight by co-extrusion on top of the sheet.
If you notice that mold forms in the honeycomb and therefore the material becomes cloudy, it means that the technology of assembling the greenhouse is broken. As a rule, algae develop when the honeycombs of the material are arranged vertically, and precipitation falls into them.

But it also happens that the honeycombs are located horizontally and even well sealed, and green algae develop inside. Here the problem lies precisely in excessive sealing. The seams of the canvases should not be filled with a sealant. For insulation, you need to use a special profile that protects against moisture, but at the same time provides some ventilation inside the honeycomb.
Related posts:
 Glass Greenhouse with Their Hands
 How to Arrange an Effective Drip Irrigation in the Greenhouse
 How to Choose a Variety of Cucumbers for Greenhouses
 Smart Greenhouses by Yuriy Zikov
 Polycarbonate Greenhouses With Their Hands
 The Foundation for Greenhouses: When You Really Need Him?
 Warming of the Greenhouse Base With Foam: Technology and Advantages
 How to Prepare a Greenhouse For Winter
 Automatic Ventilation Of Greenhouses. What Are The Options?
 Greenhouse for Spring Seedlings
 Early Start: Choosing a Material For a Greenhouse
 How To Build An Autonomous Winter Greenhouse
 How To Build An Autonomous Winter Greenhouse. Installation Of Ventilation And Heating
 Greenhouse Options: Ready-Made And Hand-Made
 How To Make a Greenhouse From Improvised Materials
 How To Choose The Perfect Greenhouse For a Summer Cottage