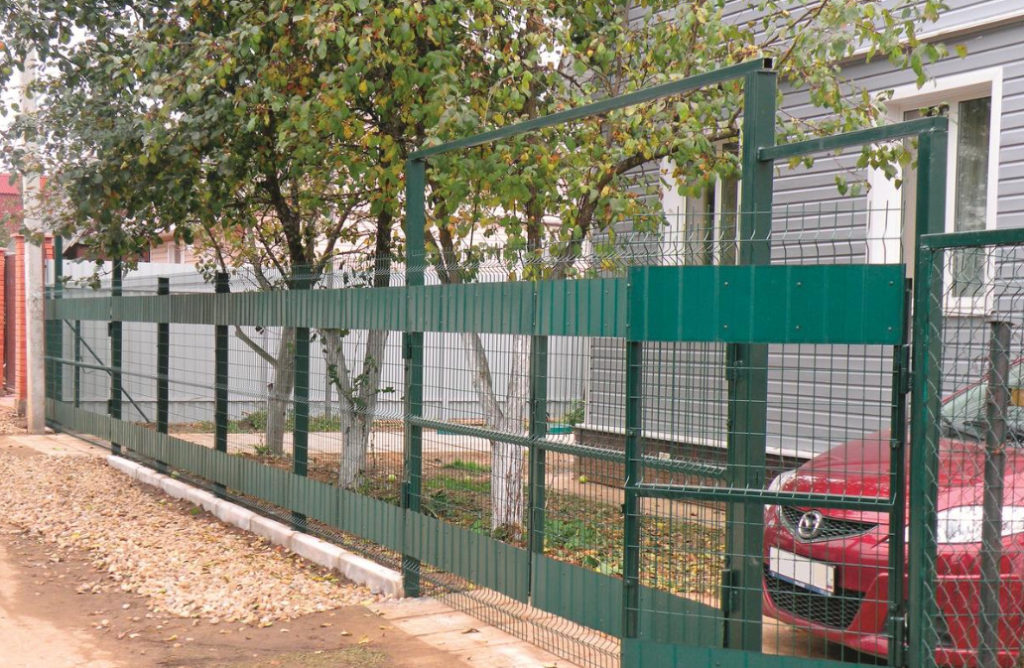
When designing a suburban area, it is not necessary to adhere to established traditions and stereotypes. Why not apply non-standard solutions that will delight the eye for many years? To mark the boundaries of the house territory, we made a light and elegant fence using ready-made sections of welded wire mesh.
Our site has been inhabited for a long time — it has been more than 20 years since we put up the first fence posts. And during all this time, none of them squinted. However, the time has come to update the fence: the chain-link mesh began to rust, and it was noticeable. Yes, and a truck that once brought sand, the body badly damaged it. Besides, a second gate was needed.
We didn’t even consider the idea of using profiled flooring, as most summer residents do. The suburban area is already small — there is nowhere to plant a flower, and even that requires sunlight. And the front side, where a new fence is needed, is just the south side. They began to puzzle over how to make the new design look interesting, but at the same time it did not shade the site and somehow protected it from prying eyes.
Welded mesh
One day, near a gas station, I saw a very nice fence made in the form of a grid of thick (4-5 mm) wire. Sections with molded triangular “stiffeners” were fixed between the racks with pipes with a diameter of approximately 50-60 mm. I searched the Internet and quickly found a seller in our area.
The most attractive thing in this variant was that the fence cloth did not need to be stretched like a chain-link net. The size of the canvases varies from 1.5 m to 2.5 m, they are not heavy and this allows you to work alone. The bars are protected by a green anti-corrosion polymer coating. The cells have the shape of a rectangle with dimensions of 50 × 100 mm.
I chose a square profile as the pillars: for fence posts — 80 × 80 mm in cross section, and for gate posts — 100 × 100 mm. For the latter, pipes with thicker walls are needed, otherwise it will not be possible to weld the hinges securely.

So that the views of passers-by would not bother us too much, I arranged protective strips of profiled flooring installed at the eye level of an adult. If you really want to look, you’ll have to bend over and turn your head. Obviously, a normal person will not show his curiosity to others. The protective strips are not conspicuous, because they are painted in the same green color as the entire fence. Their width is 200 mm. For symmetry, the same strips are attached to the bottom of the fence.
Fence installation
First it was necessary to dismantle the old fence. Using a lever, two assistants and I quickly pulled out the old racks, since they were put on pipes hammered into the ground. Tellingly, the pipes that were in the ground remained in good condition — the clay soil and oxygen access to the metal was limited.
For the new racks, we have already drilled wells using a gasoline drill. Twenty years ago, such a technique was not even dreamed of. I laid the racks to a depth of almost 1.5 m, tightly ramming the sinuses with crushed stone. As the supporting elements of the frame, I used crossbars made of a square profile (30 × 30 mm) welded along the top and bottom of the fence. Not only ready-made purchased sections were attached to it, but also protective strips made of profiled flooring.

The distance between the posts in our case was less than the width of the purchased sections of the fence. The design of the grid made it possible to precisely cut off the excess part, which also went into business: I used the remnants as supports for climbing plants.
The problem arose when attaching the finished canvases to the frame of the fence. At the company where we bought ready—made sections, special plastic fasteners were also sold, but they only came complete with pipe racks Ø 60 mm and they did not want to sell them separately. Since I used a profile as racks, I didn’t want to take extra scrap metal.
Got out of the situation as follows. Instead of plastic fasteners, I made homemade metal brackets with holes for self—tapping screws – with their help, the fence rods were securely attached to the frame. A meter-long pipe of a suitable diameter was cut lengthwise with a grinder into two equal halves. Each of them was cut into slices 15 mm wide (Fig. 1).

For marking, I used a rectangular strip of tin bent in an arc. In the middle of the outlined “lobule” drilled holes with a diameter slightly larger than the thickness of the self-tapping screw on the metal. Then I cut semicircular brackets about 15 mm wide. In order for the bracket to press the rod tightly against the frame elements, it had to be slightly straightened, for which each semicircular bracket was simply squeezed between the cheeks of the vise. Thus, I received a flat bracket with a gap of 4 mm.

Gates
To arrange the fence, we invited two workers who carried out orders for the construction of fences. When installing the gates and wickets, I actively helped the guys. We did not order their manufacture — we assembled them right on the spot, without using a welding table with a conductor. I really liked the method. Experienced craftsmen probably know it, but for those who have not done it, I think it will be interesting (Fig.2).

Between the pillars A1 and A2 of the gate, horizontally profile pipes 1 and 2 of square cross-section (30 × 30 mm) were taken by welding. Then vertical jumpers 3, 4, 5, 6 were inserted between it, thoroughly welded to horizontal profiles 1 and 2. Between the jumper 3 and the gate post A1, as well as between the jumper 6 and the stand A2, a gap was left necessary for the installation of hinges, and between the jumpers 4 and 5 — a gap of ~ 6…8 mm. Then the horizontal lintels 7, 8, 9 were welded in the left and right frames of the future gates (between elements 3 and 4 and between 5 and 6).
For the rigidity of the future shutters, “kerchiefs” were welded in the corners of the formed frames — triangular steel plates with a thickness of 3 mm. Hinges were welded to each post and the corresponding side of the sash assembly. With a grinder, profiles 1 and 2 were cut at the places where they were attached to the racks, as well as in the middle. Similarly, the frame of the gate was made. It remains to hang nets and decorative elements on them.

In our opinion, it turned out to be a nice fence with two gates and a gate. Then several times the owners of neighboring plots approached us and asked where they could order such a structure.
Related posts:
 Glass Greenhouse with Their Hands
 Insulated Flue – Saving Home from Fire
 Convenient and Useful Nozzle On the Trimmer With Your Own Hands
 Protect Your Garden, or How to Make a Scarecrow
 Outfit for Your Windows: Hinged and Roller Shutters, Mosquito Nets and Awnings
 In Your Garden Begins the Age of Stone: Choose Decorative Benches
 How to Build a Winter Garden in the Country
 How to Make a Washstand for Country House the Hands
 And Above us is Not Dripping: Shelter for the Garden
 Pros and Cons of Various Types of Solid Fuel for Boilers: Wood and its Derivatives
 Pros and Cons of Various Types of Solid Fuel for Boilers: Coal and Peat
 Choose Radiators for the Summer Cottage
 Additional roofing elements (accessories)
 Terraced motives the device is weatherproof wooden floors
 How to Heat the Boiler with Wood
 Always on Guard: Security Systems for Country Houses