It is not necessary to buy a ready-made septic tank: all the work on the sewerage system can be done with your own hands.
Laying the pipeline
When arranging a yard sewer system, the following rule must be observed:: laying of pipes and installation of wells should be carried out on an undisturbed continental base (the bottom of the trench should not be loosened). No backfilling with the removed soil! And if you still have to pour it — use sand for this, carefully tamping it and spilling it with water.
The minimum depth of laying of the pipeline connecting the outlet of the internal sewer with the septic tank for the southern areas is 0.7 m, and for the middle strip — 0.9-1.0 m. These are regulatory requirements, although one of the winters with prolonged 30-degree frosts showed that it is better to play it safe and make it deeper. However, even with a 70-centimeter depth of laying, the pipeline did not freeze that winter — apparently, thanks to the volleyed discharges of warm wastewater.
Sometimes you have to use pipes made of different materials (this was the case, in particular, in our case). To connect them, at the joints, we made depressions 10 cm below the planned bottom of the trench. The joints were fixed with tin clamps, wrapped with electrical tape, and then filled with cement mortar to the walls of the trench. Since the pipeline was operated for some time without filling up, we had the opportunity to observe the joints. We did not find any leaks with this method of connection.

Fig. 1. Scheme of the sewer network: 1-house; 2-utility block; 3 — inspection well; 4-septic tank; 5-filter well; 6, 7-outlets
Observation well
If the length of the yard network to the septic tank is less than 15 m and the pipeline is arranged without turns, it can be done without inspection wells. In our situation, from the outlet to the septic tank was 23 m, and it was necessary to divert the waste water from two places: from the kitchen and from the bathroom. Therefore, we placed the observation well at the intersection of the outlets (Fig. 1). The square well (Fig.2) with the dimensions of 0.7 × 0.7 m was insulated due to the small depth of its foundation. The concrete bottom was filled with foam plastic, and the brick walls were insulated with foam. We made two covers. The lower one is insulated with foam, and the upper one, covering it, is a regular shield. If necessary, the space between the lids can be filled with sawdust or foam chips.

Fig. 2. Observation well (section): 1 — foam plastic; 2-reinforced concrete; 3-plastic pipes; 4-brickwork; 5-blind area; 6-frame block; 7-foam; 8-wooden covers; 9-plaster layer (on the grid of the chain link)
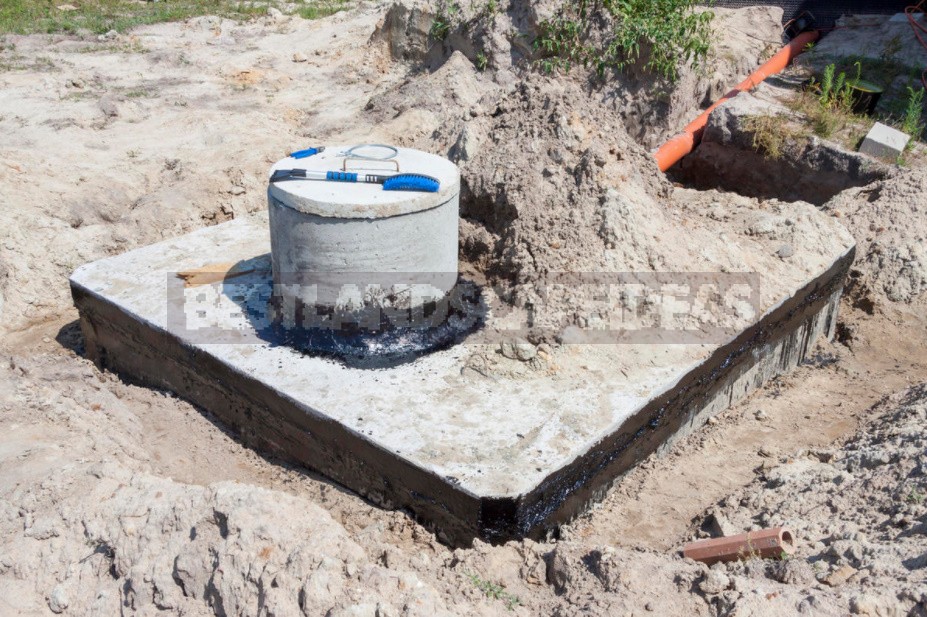
Septic tank installation
Suitable materials for the device of a septic tank — brick-iron or concrete. We preferred a concrete well (Fig. 3), cast using a technology that can be called the “single-form-board method”.
When installing a septic tank, you must first determine the size of the pit. For a family of 4 people, a well with a volume of about 2.2 cubic meters is enough. Based on this, you should choose the size of the formwork. In this case, the width of the shield is 130 cm, and the height is 80 cm. Thus, we made the smaller side of the pit 131-132 cm, which allowed us to freely lower the shield into it. The large side of the pit is 132 cm plus two wall thicknesses of the well. If the thickness of the concrete is 10 cm, then the larger side of the pit should be equal to 152 cm. After casting the walls, the internal dimensions of the septic tank were approximately 110 × 130 cm. With a depth of 150 cm, the volume of the well is 2.15 cubic meters.

Fig. 3. Single-chamber septic tank (section): 1 — outlet pipe to the filter well; 2-backfill; 3-blind area; 4-insulation; 5-septic tank filling level; 6 — anti-jamming tees; 7-ventilation riser Ø100; 8-inlet pipe
The work on the casting of the walls was carried out as follows. At first, the “bars” cut out of the foam with a cross section of 50 × 50 mm were nailed to the formwork board (Fig. 4 on the left) and the short sides were made. Then the foam “bars” were removed and filled in the long sides (Fig. 4 on the right). After the construction of the walls, concrete was laid in the bottom and ceiling.

Figure 4. (on the left) Formwork shield: 1-wooden shield; 2-foam block. (on the right) Septic tank filling sequence
Filter well
It is arranged very simply. It is a cylindrical shaft with a depth of 3 m. At the bottom — a layer of slag and brick battle height of ~80 cm, on top of which are laid car tires from trucks. This design reliably removes water from our bath for 18 years. The method of restoring the operability of such a filter well without dismantling it is simple. At a tangent to the walls of the well, dig a trench, fill it with drainage material, and then fall asleep. The well is ready to work again.
Recommendations
In conclusion, a few more tips for those who will have to do the internal wiring of pipes in the house themselves. The slope of the pipes Ø50 mm from the sinks, shower trays and bathtubs should be at least 0.025, and the slope of the pipe Ø100 mm from the toilet and the ventilation riser-at least 0.012. The ventilation riser should be installed as close as possible to the chimney to improve draught. The turn on the outlet of the internal sewer should not be made less than 110 degrees. If the pipes are released through the capital wall or the foundation of the house — the passage hole is made larger than the diameter of the pipe, and the gaps are sealed with clay concrete, strands of tarred oakum or something similar.
Related posts:
 5 Best Gazebo for Country House. Types and Features
 Hobbiton – Features, How to Find, Photos, Design Ideas
 8 Best Design Ideas to Improve Your Country House. Scottish Style
 Home decor beached style
 Grills and a Barbecue for Villas with Their Hands
 How to Make a Well in a Country House or Cottage?
 Types of Barbecues and Mangals
 Grill and BBQ: Where to Put How to Cook?
 How to Create Your Own Theater of Light and Shadows
 Insulated Flue – Saving Home from Fire
 Choice of Wood for Building a Wooden House
 Drainage Systems In the Suburban Area
 How to Choose a Place for the Construction of the Bath
 Tiles for the Garden With Their Hands
 Outfit for Your Windows: Hinged and Roller Shutters, Mosquito Nets and Awnings
 Drainage Systems in the Suburban Area Surface Drainage