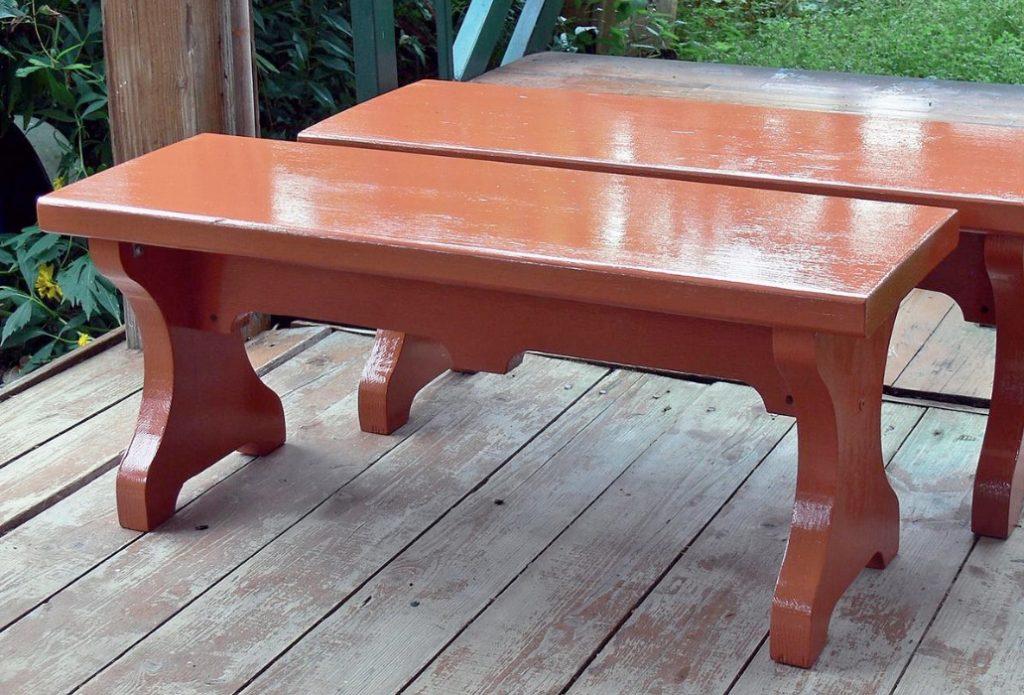
Today we will tell you how to make simple, reliable and at the same time cute benches that can be used on an open porch or porch.
In the summer, we repaired the front porch of our country house, which had served us faithfully for 17 years. Over time, the paint peeled off, rotted the bowstrings of the stairs and the ends of the steps, and the extreme balusters began to wobble. During the repair process, we replaced the wooden bowstrings with metal ones, and the stairs were made of wood-polymer composite.

To preserve the style of the porch side metal stringer stairs closed wooden filistatidae, and when painting walls, ceiling and railings of the porch chose the color of the siding, which covers the house. It turned out very well.
Something is missing
After finishing the repair, it became clear to us that the porch looks “empty” and for the completeness of the picture is clearly missing a couple of elements — on both sides of the entrance door just begged for two benches. But it is almost impossible to buy something suitable for the size of our porch, so I decided to make them myself.
The initial material was 2.5 m long steps removed from the stairs during the repair. At the time, they were made to order from small-ply pine. For 17 years of operation, the steps have been wonderfully preserved.

With the exception of rotten ends, there were no cracks-neither in the solid wood, nor at the seams of gluing individual slats.
Simple design
The size of the benches was determined primarily by their placement on the porch and the size of the available blanks. I chose the height of the benches so that sitting on them, it was convenient to change shoes.

The bench consists of a seat 1, side supports 2 and 3. to ensure rigidity, the side supports were connected with a screed 4, for which I used nuts-barrels 5 and screws 6.
Procedure for performing the work
Production began with the preparation of the material. I chose well-preserved steps, cut out of them on a circular machine seats, ties and side supports in pairs (one piece for two ties or supports). I processed all the surfaces of the blanks with a flat-grinding machine.
1. first of all, I marked the legs. Then I drilled two holes Ø 60 mm and cut the workpiece into two equal parts

2. Select the extra material on the band saw between the resulting holes.

3. Drew a side support on the computer in a graphic editor, printed it on a printer at a scale of 1:1. Cut out paper stencils along the contour and attached them with tape to the blanks. Guided by a paper stencil, I sawed out the outline of the support.

4. Sanding shaped pads processed the edges of the supports.

5. I made the Ties in the same way as when making the supports. I drilled 4 holes in the workpiece Ø 60 mm, cut the workpiece in half, and selected the extra material between the holes.
To connect the tie to the side supports, I decided to use metric screws with nuts – “barrels” — in my opinion, a very reliable method of fastening. To do this, carefully prepare the holes: Ø 6.5 mm in the side supports and Ø 10 mm in the screed. I made them on a drilling machine, and the holes Ø 7.5 mm in the ends of the screed were drilled using an electric drill installed in the drilling rack (to ensure perpendicularity).
6. all details of the bench covered with primer.
7. After that, I connected the side supports and the screed with screws and nuts- “barrels”.

8. All parts are covered in 4 layers of rubber paint.
9. Seat benches attached to the side supports by using small steel angles and screws.

10. to ensure wear resistance, additionally covered the benches with yacht varnish.
Related posts:
 Grills and a Barbecue for Villas with Their Hands
 Glass Greenhouse with Their Hands
 Ideas for New Year Bouquets and Arrangements for a Pleasant Festive Interior
 Christmas Toys and Various Pendants With Their Own Hands
 Candlesticks With Their Hands: Ideas and Instructions
 Convenient and Useful Nozzle On the Trimmer With Your Own Hands
 Protect Your Garden, or How to Make a Scarecrow
 How to Make a Washstand for Country House the Hands
 Sandbox in the Garden – Creative Solutions
 Sauna: What is Different From the Bath
 The Territory of Bliss: We Equip the Recreation Area
 Update Old Furniture. New Life of Favorite Things
 How to Feed Birds in Winter: Feed and Feeders
 How to Build a Cellar With Your Hands
 Furniture Made of Cardboard and Paper: the History and Technology of Such
 The Right Steamroom: the Subtleties of Design And Construction