
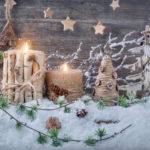
What a New Year without burning candles! Where are the candlesticks? Made with their own hands, they can become not only an interior decoration, but also a wonderful gift.
Shining lanterns
Instead of traditional greeting cards, why not give your family and friends these elegant candlesticks made with your own hands!
Mysterious magic candles
An interesting idea-festive candles in glass jars are suspended from a wooden shelf. The whole composition looks just fabulous!

Interesting candlesticks
You will need:
Job description
1. Banks for processing. Take a sponge, some “Frost Effect” paint and paint the cans. Candles work better, release a small part of the surface from the paint to make a small “window”. Leave until the paint dries. If necessary, apply a second layer of (step 1).

Technology of work
2. From the aluminum wire, bite off the segments of the desired length, bend them in the middle and use pliers to twist the loop. Then bend the ends of the segment. Put the wire on the edge of the jar and wrap it around it. Twist the ends of the wire. One end of the bite, the other end of the wire is bent in the form of a handle to push the loop through and use pliers to bend the hook (step 2+3).
3. Use the red ribbon to tie the bow in the middle of the tie wire. Connect two spruce twigs with a wire, bite off the extra wire. Then put the bow on the spruce twigs, attach the remaining wire of the bow and twigs to the attachment on the side of the jar, if necessary, fix it with hot glue.
4. Carefully knead the mass for modeling, roll out on a suitable substrate with a rolling pin and use the molds in the form of a month and a star to squeeze out the corresponding figures. Leave the figures to dry completely. The red aluminum wire bends in a spiral. To do this, the wire is wound on a round wooden stick, then carefully pull out the stick, put on the stars and the moon in a spiral. Remove the excess wire from the back side and glue it. A month to stick on a wire handle or tape.
5. You can write letters on the candles with white candle paint and leave them to dry (step 4).
Fabulous decor for the New year
Children love to make various crafts from natural materials. In late autumn, you can still find enough of them in the park and make, for example, a small squirrel with a candle holder or buy walnuts and create funny birds.

Squirrel and candle
You will need:
- wooden disk with a diameter of 18 cm (7.1 inches)
- moss
- brown felt for needlework
- brown chenille wire
- wooden ball with a diameter of 3 cm (1.2 inches)
- candle cup
- white lace on a 1 cm (0.4 inches) wide bobbin
- acorns
- a large lump about 6 cm (2.4 inches) long
- small cones
- white, red and brown acrylic paints
- brush
- white and black markers for decorative work
- universal adhesive
- hot glue gun if necessary
Job description
1. The wooden disc is painted red, the big bump is white, the wooden ball is painted brown. If necessary, apply a second coat of paint, let it dry completely. Draw a face with decorative pens.
2. Cut out 2 rectangles of 2 x 1 cm (0.4 inches) from the felt. Round off one short side and connect the opposite corners together. The resulting ears are glued to the ball, as in the photo; glue the ball to the cone.
3. For the squirrel tail, twist 2 pieces of wire 45 cm (17.7 inches) long, bend in the middle and twist again. Roll into the shape of a snail shell and stick to the lump.
4. For the legs, twist together 2 pieces of wire 6 cm (2.4 inches) long, bend the small loops and also glue to the bump. Cover the glass for candles with lace.
5. Glue the moss to the wooden disc. Fix the protein and candle cup on this base, then fix the other natural materials.
Oh, Christmas, Christmas!
For Christmas, you may want to decorate your home in a special way. A wreath-candle holder with funny figures of serpentines will help you create a festive atmosphere.

Wreath
You will need:
- bark wreath with a diameter of 30 cm (11.8 inches)
- 4 red candles with a diameter of 5 cm (2 inches) and a height of 10 cm (3.9 inches)
- 0.6 and 2.5 cm (0.2-1 inches) wide red-and-white checkered ribbons
- white, red and brown satin ribbon with a width of 0.6 cm (0.2 inches)
- candlesticks with spikes, natural color, diameter 5.5 cm (2.2 inches)
- red felt stars
- wool with a length of 1.8 cm (0.7 inches)
- wooden balls, drilled in half, with a diameter of 3 and 3.5 cm (1.2-1.4 inches)
- black halves of 0.8 mm beads (0.3 inches)
- red wooden beads with a diameter of 1 and 1.2 cm (0.4-0.5 inches)
- felt residue
- set of wooden thread reels
- set of wooden stars
- velour cylinder with a diameter of 2.5 cm (1 inches) and a height of 3 cm (1.2 inches)
- plastic cylinder with a diameter of 2 cm (0.8 inches) and a height of 1.5 cm (0.6 inches)
- mobile toy oval eyes size 0.8 (0.3 inches) and 1 cm (0.4 inches)
- white, light and dark brown acrylic paints
- brush
- black marker for decorative work
- red pencil shavings
- scissors
- universal adhesive
- hot glue gun
Job description:
1. Paint the wooden reels and wooden balls with acrylic paint, let the paint dry, then glue the balls to the reels.
2. Draw the antlers and ears of the deer on the felt . Red wooden beads, cut in half and with round eyes, stick to the muzzle of the deer.
3. Wrap a brown satin ribbon around the wooden coils. Insert the felt parts. Put the ribbon around your neck and tie it in a bow.
4. For snowmen, circle the reel with a white satin ribbon. Glue the halves of the beads as eyes, then glue the buttons. Shavings from a red pencil are gently rubbed on the cheeks in the form of blush. Attach a carrot as a nose, put a top hat on your head. Draw the mouth with a marker, tie a satin ribbon in the form of a scarf in a knot around the neck.
5. If necessary, secure the spiked candlesticks with a hot glue gun. Arrange the figures made of wooden reels, stars and a ribbon bow in a cage, as shown in the photo, or randomly and glue them. Put candles in the candlesticks.
Related posts:
 Ideas for New Year Bouquets and Arrangements for a Pleasant Festive Interior
 Christmas Toys and Various Pendants With Their Own Hands
 Grills and a Barbecue for Villas with Their Hands
 Keychain, Made With Your Own Hands — a Great Gift
 New Year’s Topiary With Their Hands: Master Class
 Christmas Wreaths, Garlands and Other Decorations for Christmas Interior
 Christmas Deer — a Constant Guest, Who Settled in Our Houses
 Figurines for Home and Garden With Their Hands: Snowmen and Santa Claus
 Christmas Trees With Their Hands: Simple and Beautiful
 Ideas for Nice Christmas Gifts
 Crafts With their Hands: Birds and Moths
 Gifts with Your Hands From the Bottom of Your Heart
 Christmas Angels: Ideas for the Needle
 Christmas Crafts and Decor in Eco-Style
 Christmas Toys With Their Hands: Master Classes