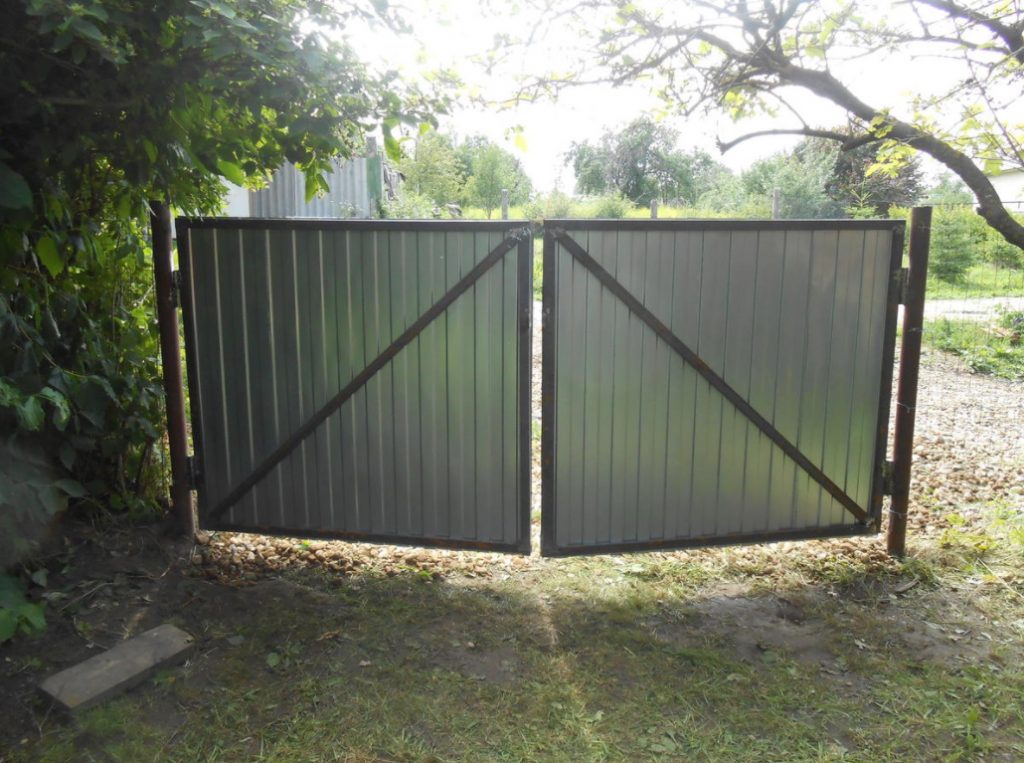
At one time, these gates served as the main entrance to the suburban area, but over the years everything has changed: they began to open only for the arrival of guests ‘ cars or the delivery of materials.
From the very beginning, the gate was not a decoration of the site: they were welded from a massive corner and tightened with an aluminum chain-link net. But in the era of total deficit on such trifles do not pay attention. Over time, the gate was deeply embedded in the ground. One sash has not been fully opened for a long time, as it was once accidentally bent by a sand truck driver. And after the village authorities raised the roadbed, the crushed stone did not allow to open the gate at all. Therefore, it is no longer possible to postpone repairs.
Repair or make new ones?
The gate posts were made of solid pipes Ø 60 mm and a wall thickness of 5 mm. There was no point in dismantling them and installing new ones, as there was no point in buying new gates. The gate is ≈ 3 m wide and 1.5 m high — the distance between the pillars did not correspond to the size of standard ready-made doors, which are sold in abundance in construction markets. So I had to do everything myself.
In addition, it took several dozen roofing screws, 0.3 kg of electrodes and several abrasive discs for the grinder.
Commencement of works
At the preparatory stage, the old doors were dismantled, the old hinges were cut off from the pillars and cleaned, after which the pillars were placed vertically. To do this, one of them had to be cut off from the ground to the middle of the perimeter and re-welded after fixing the pipe vertically.

We weld the loops to the posts
New loops were drawn to the posts with knitting or aluminum wire, checked again with a plumb line, and then the lower part of the loop was welded in place. The height of the loops on the opposite pole was fixed using a profile using a level.

It should be said that it is better to weld the loops immediately with the necessary gap, so that later you do not clean up the places for the reciprocal parts of the loops with a grinder. I didn’t, and three of the four loops required extra work.
Fasten the gate leaf posts
After fixing the loops on the posts, the vertical posts of the flaps were cut off. Their size was set based on the required height of the gate and the gap at the bottom above the ground. Racks were also tied with wire to loops and posts, and the vertical was checked with a plumb line. The clamps helped a lot: they reliably fixed the parts in the initial stage of welding. The location of the posts on opposite pillars was controlled by the level.

Welding started with a light tack, then checked the correspondence of the center lines of the loop and the vertical rack. If necessary, it was necessary to tear the rack from the loop and fix it again. And after the final welding, the freedom of rotation of the loops with racks was checked with the help of clamps. In case of difficulty, they worked again with a grinder, and removed the protrusions from the outside and undermined the internal pins of the hinges. Unfortunately, it was not possible to get the perfect combination of parts right away. After all, they did not work on the machine, without conductors, mostly relying on the eye.
The horizontal cross member on the wings of the gate
When the racks began to move relatively freely, they began to cook horizontal beams. To ensure the plane of the gate, the crossbars were connected to the posts and tightened with clamps. We constantly checked the position of the crossbars with the level! the

Upper crossbar was applied, and the lower one was inserted between the posts.

After the horizontal bars were welded, the middle goal posts were measured and cut out.
Depending on the roughness of the terrain, the height of the roadway, the width of the passage, the angle of entry of the car into the gate, you can play with the size of the doors. You can make an asymmetric opening of the doors — one on the street, the other on the site.
When making gates, the sashes can be made asymmetrical!
On the horizontal crossbars marked the place of installation of vertical racks. In our case, it was most convenient to install the racks in the middle. The racks were welded at a distance of 1.5 cm from each other. According to the obtained dimensions, two diagonal edges were cut off and welded from the remaining profiles.

At a convenient height and strictly observing their mutual position, the eyelets were welded to the posts. Thus, you can only unlock the gate from the side of the site.

Door leaf
After welding the frame, it was worth painting it and waiting for the paint to dry. I didn’t have time to wait, so after cleaning the welding places with a grinder, we started fixing the profiled sheet with roofing screws. Parts of the canvas were arranged in such a way that it could be cut at the bottom of the gate and at the edges, which would then be hidden by whole sheets.
For fixing in a 20-mm profile, first a hole was drilled with a self-tapping screw with a small passage inside to get a thread, it was unscrewed, and then the same screw (but with the drill cut off) fixed the sheet on the frame. If the sheet was adjacent to the narrow edge of the profile, this could not be done, short screws would go inside without hindrance.
Final cut between the sashes
After the final installation, the upper and lower segments of the profile were cut out with a grinder between the Central vertical posts — the gates are assembled.

On my next visit to the dacha, I will have to remove the profiled sheet and paint the frame. Mounting holes will not have to be re-drilled, so it will be easy to remove and install the profile sheet. It will take at least a couple of days. The weekend is busy with current Affairs, and the weather is not to guess, so we will wait for the holiday.
The savings compared to the complete removal of pillars, purchase and installation of new gates, according to my calculations, amounted to about 50%. Labor costs — 7 hours with an assistant.
Related posts:
 How to Feed Birds in Winter: Feed and Feeders
 How To Make a “Flower” Table For The Garden
 Mobile Pouf Made Of Plastic Bottles
 Folding Stool Made Of Board And Polypropylene Pipes
 Summer Shower With Your Own Hands From Profiled Flooring And Clapboard
 Restoration Of a Garden Bench With Your Own Hands
 Spectacular Hanging Planters Made Of Improvised Materials
 How To Make a Strong Stool With Your Own Hands
 Useful Things For Giving With Your Own Hands
 Wattle With Their Hands
 Glass Greenhouse with Their Hands
 Insulated Flue – Saving Home from Fire
 Convenient and Useful Nozzle On the Trimmer With Your Own Hands
 Tiles for the Garden With Their Hands
 Protect Your Garden, or How to Make a Scarecrow
 Outfit for Your Windows: Hinged and Roller Shutters, Mosquito Nets and Awnings