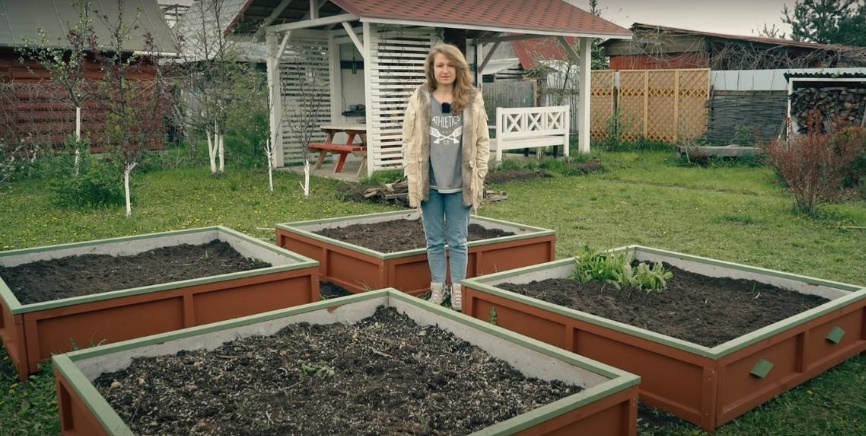
Is it possible to make such high beds so that you don’t have to update the walls for the next 10 years? I suggest you try it. But it will not just be a place of growing crops, but an art object, a decoration of the site.
It’s time for a change for my beds. The old ones were made a few years ago from what was left of the construction site. The boards fell into disrepair, and I decided not just to replace them, but to make such beds that will serve for many, many years.
Since my beds are located in plain sight, I want them to be not only practical, but also aesthetically pleasing. Therefore, I paid a lot of attention to the decor.

Let’s get started! The size of my beds is 1.5 × 1.5 m. Three-meter boards are ideal for such. I chose an unstressed wood, as in the arsenal of my tools there are both jointers and reismus. But to speed up the process and facilitate the work, you can still buy treated wood. However, it will be more expensive.

So, we cut the three-meter boards in half. We dissolve them so that they turn out:
- bars 35 × 40 mm;
- We leave 16 of them with a length of 1500 mm,
- another 16 with a length of 1455 mm,
- 32 pieces with a length of 210 mm,
- 16 bars — 350 mm each.

We cover all wooden blanks with antiseptic. I treated them with a roller, but you can do it in any convenient way — with a brush, spray gun or impregnation. By the way, it is more convenient and faster to impregnate small elements.

The enclosing structure is made of flat slate sheets. It took 16 canvases for 4 beds. Their thickness is 10 mm, but you can take smaller ones. I didn’t find any other options in the nearest stores, so I used what I had.
We mark up one canvas and make holes according to the marking. It is a kind of template, according to which I drill the rest of the canvases. When all the details are ready, we assemble them.

We lay out the frame from the bars. We mount a decorative crossbar in the center, we have legs on the sides. We attach a slate sheet to it. To do this, I used screws with wide caps. It is important that the hats do not fall into the holes. I did not assemble the frame separately, I decided to form the base immediately on the slate slab.

The legs and those parts that will be in contact with the ground are treated with bitumen mastic. The rest is painted with facade paint in two layers. So that the work does not turn into infinity, we try to paint and process bitumen not on one wall, but by stacking several at once.

After the paint dried, I started decorating. To do this, I prepared lozenges, painted them and fixed them on the walls with screws. To make it easier to fasten them, I first glued them to the facade with double-sided tape.

Now we are assembling the structure. To do this, I use the screws again. We install the resulting beds in place and bury the legs in the ground. Be sure to use the level so that the walls are even.

Since the beds were not so high before, we had to fill the new frame with fresh soil. In conclusion, we make the upper edging of the slats, painted in the same color as the decorative lozenges. We align the length in place and paint over the ends.
The beds are ready! Now they will serve for a long time, and due to their small size, it will be convenient to take care of the plantings.
Related posts:
 We Make a High Warm Bed With a Greenhouse
 We Collect a High Metal Bed, Ordered Via The Internet
 Interesting Design of the Garden
 Glass Greenhouse with Their Hands
 Insulated Flue – Saving Home from Fire
 Convenient and Useful Nozzle On the Trimmer With Your Own Hands
 Protect Your Garden, or How to Make a Scarecrow
 Outfit for Your Windows: Hinged and Roller Shutters, Mosquito Nets and Awnings
 In Your Garden Begins the Age of Stone: Choose Decorative Benches
 How to Build a Winter Garden in the Country
 How to Make a Washstand for Country House the Hands
 And Above us is Not Dripping: Shelter for the Garden
 Pros and Cons of Various Types of Solid Fuel for Boilers: Wood and its Derivatives
 Pros and Cons of Various Types of Solid Fuel for Boilers: Coal and Peat
 Choose Radiators for the Summer Cottage
 Additional roofing elements (accessories)