Every summer resident knows: summer shower on the site is the second most important building (the first, I think, needless to say), and therefore any landowner tries to make it with his own hands in the first place.
In the course is everything: improvised and special means, the accumulated experience of neighbors in the cottage, your own imagination. And all in order to be happy to freshen up after a hot day and wash off the fatigue.
From simple to complex
An improvised garden shower appeared on our site almost simultaneously with the acquisition of land: it was an elementary structure, which consisted of a barrel located on the roof of the shed, hose and shower heads. Protection from the wind and prying eyes served as a wooden frame, sheathed matte cellophane.
This was enough to quickly rinse and freshen up at the end of the day. But over time, the site took root, overgrown with buildings, and it’s time to build a full-fledged cubicle and take a separate place for it.
The model of the future building
Those who decide to build a shower with their own hands, should appreciate the different ideas for a summer shower in the country. After studying this issue, we have identified the main points concerning the future construction:
- It was decided to abandon the division of the finished shed partition for the arrangement of the shower in one part. And although many neighbors successfully and quickly carried out such a reconstruction, it did not suit us, because, first, it required a serious strengthening of the roof and walls, and secondly-selected a useful and necessary space.
- Having considered the options of frames, chose a frame made of wooden beams: some of the materials remained after the construction of the house, in addition, a beam with a cross section of 10 cm – a reliable support, the construction of it will easily withstand even a heavy barrel of water. To increase the service life and resistance to moisture, treated wood with a special antiseptic.
- The place for a summer shower was chosen the sunniest side of the site: since it was to be used mainly in the evening, therefore, the sun had to actively warm the water in the afternoon. By the way, in this place we had a natural elevation, otherwise it would be necessary to make a mound to ensure the flow of water.
The first stage-the Foundation for the shower
Any construction begins with the Foundation. To start on the selected area is marked under the Foundation area size 1×1, 2 m. this place is enough to feel free there. At the corners of the rectangle hammering pegs, pull the cord between them and once again check the distance by measuring the side and diagonal tape measure.
Since the shower is planned to be stationary and durable, use a columnar Foundation: in place of pegs garden drill make holes in the ground depth of 1m, put there a metal pipe with a diameter of 90 mm and a length of 1.2 m, and then pour a mixture of sand, cement and gravel in a ratio of 3:1:5. After that, once again check the distance between the pipes, which rise above the ground by 20 cm.

For reliability and protection of buildings from moisture-make wooden forms, and pour the same mixture as the Foundation: this will elevate our shower above the ground. When this is inserted into the not yet hardened columns 2-3 sprigs of rebar cross-section is not more than 1 cm, a length of about 20 cm, leaving 10 cm above the surface. Then we wait for drying of the base.
Provide drain
The next step is the construction of the drain. To do this, not far from our shower dig a hole with a depth of about 2 meters. So the edges do not crumble, it is necessary to strengthen the walls. We chose a simple and cheap way-put in a hole on each other 7 old tires. The second from the bottom made a hole and brought back the drain pipe. Its second end was connected to the shower tray.

The pallet in a summer shower is extremely necessary: without it water jets will wash away the soil. In order not to make a waterproof layer and to avoid unnecessary problems, we have installed a ready-made metal enameled pallet, which can be purchased in any specialized store.
Frame installation
After the base is dry, collect the frame of wooden beams, making the top and bottom of the dressing: separately collect the upper and lower frame on the ground, fasten the structure with bolts, then install on the Foundation. To do this, in the lower base of the drill holes for reinforcement and put on her wooden bars. For extra stability on the diagonal of the side frames and fasten the girth.

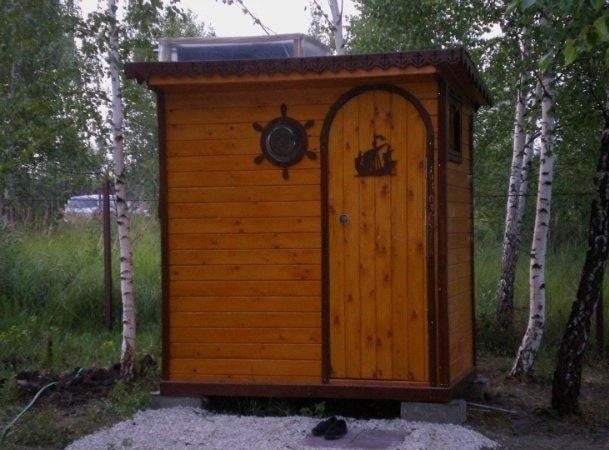
As a covering we chose dry planed wood – it is beautiful, environmentally friendly, the construction of it harmoniously fits into the overall landscape of the site. To protect the material from moisture and sun, covered with a matte varnish. The door was sealed to prevent drafts.
Put the tank
Installation of the tank can be done in two ways:
- just install the tank on the roof of the summer shower;
- make an add-on over the tank of bars and cover with polyethylene cellophane, erecting a greenhouse.
The first option saves time, the second-provides early heating of water and protection from heat loss. We chose the second option, as the weather is not always stable and Sunny.
To do this, just make 2 pieces of bars, knocking them into the shape of the letter V (the length of the bars depends on the diameter of the barrel). Connect the workpiece between a wooden rail and install them on the edges of the roof, securing screws. Then just liberally cover with cellophane.
As for the tank material-you can choose between plastic and metal. The metal painted in dark color, warms up faster, plastic-is lighter in weight. We found an old barrel of dark plastic with a volume of 200 l in our farm – it was adapted: it was laid on the roof and pulled by belts, fixing them with nails on both sides.

In the barrel from the top and bottom cut out 2 holes-one for watering (sealed around silicone), the second – to fill with water. Then lower the hose into the top hole, and the second end is connected either to the crane – if the site is supplied with water, or use a pump for pumping from the well.
Outside the building can be nailed hooks for clothes, the area around to plant moisture-loving plants-and beautiful and useful.
Summer shower with your own hands-it’s not just a building. This is an opportunity to combine comfort and environmental friendliness.
Related posts:
 5 Best Gazebo for Country House. Types and Features
 Hobbiton – Features, How to Find, Photos, Design Ideas
 8 Best Design Ideas to Improve Your Country House. Scottish Style
 Home decor beached style
 Grills and a Barbecue for Villas with Their Hands
 How to Make a Well in a Country House or Cottage?
 Types of Barbecues and Mangals
 Grill and BBQ: Where to Put How to Cook?
 How to Create Your Own Theater of Light and Shadows
 Insulated Flue – Saving Home from Fire
 Choice of Wood for Building a Wooden House
 Drainage Systems In the Suburban Area
 How to Choose a Place for the Construction of the Bath
 Tiles for the Garden With Their Hands
 Outfit for Your Windows: Hinged and Roller Shutters, Mosquito Nets and Awnings
 Drainage Systems in the Suburban Area Surface Drainage