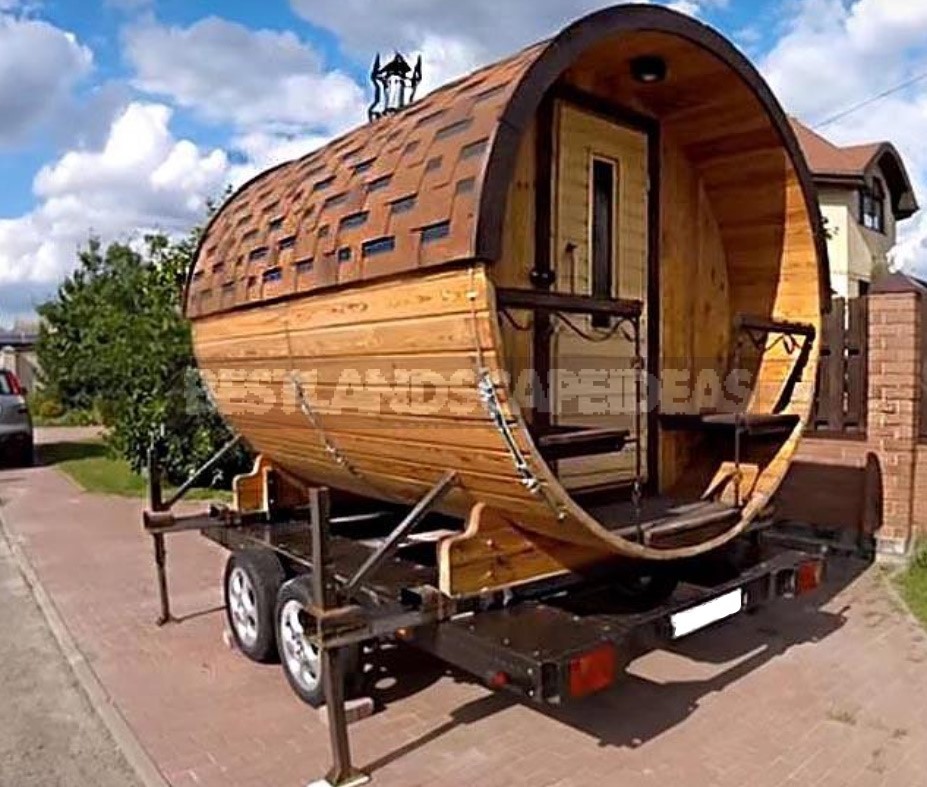
I decided to build a bathhouse and put it on wheels. The option of a bath-barrel seemed to me the most suitable. In operation, it is not inferior to the usual frame bath and, in my opinion, even faster goes into the mode of saving firewood. It’s easier to put a barrel bath on the wheels: I made a homemade stove for it and a special trailer for a car. My friends liked the finished sauna very much. Subsequently, I built two more baths-barrels, however, already stationary, not transportable. One of them was three-meter with one compartment-a steam room, the second-four-meter with a steam room and a dressing room.
I will try to decide for myself whether it makes sense to build such a bath myself or it is easier to buy a ready-made one. To begin with, I will set for myself the maximum deadline for putting an object of the “bath-barrel” type into operation for 1 month — and start construction.
Working in a garage workshop
A special bar with an original profile was ordered at the woodworking plant. I received my order in 4 weeks — it was time to sketch a drawing of the future bath-barrel. Initial data of the bath: diameter — 225 cm, length — 400 cm. The project includes a porch with a bench, a large steam room.
First of all, I tore off all the boards in the garage with a hand jigsaw. I selected better boards for the external lining of the bath-barrel. What else is good about a barrel bath? And the fact that most of the work can be done in the garage and not depend on the weather.

In a proven way, I made grooves for the front and back walls: with a hand hacksaw, we make two cuts to a depth of about 1 cm and remove the wood between them with a chisel. Two slots per board — 58 boards, made 116 slots during the working day. With the boards for the cladding, I sort of figured it out — I made 29 left boards and 29 right boards.

Now you need to sand the boards on both sides.

Dust everywhere — like after a volcanic eruption! Therefore, a good respirator and glasses are necessary.

The belt of the grinder was periodically cleaned with a metal brush. Only two tapes were enough. I immediately painted the boards. This should be done before assembly, so the design is better painted. In addition, the coating dries better in the room, and then lasts longer. The outer side is covered with an impregnation for the street, the inner side is covered with a means for steam rooms.

After a couple of days, the boards can be taken outside and stacked on the veranda.
We make end walls and stands
I empty the garage and start assembling the round walls. Along the way, I reject the worst boards. The material was purchased with a small margin, so there is plenty to choose from.

We start the assembly from the rear blind wall. The boards are arranged vertically. We make the power jumpers horizontal. One jumper on the top, the second one on the bottom. Two lintels on the sides and two for the shelves.
Now we cut the jumpers to a smaller radius. First, we mark a circle with a diameter of 225 cm along the outer diameter of the bath. Divide in half-we get the radius. From it it is necessary to subtract the thickness of the bar-and add to it the depth of the groove. We get the real radius of the jumper — 109.5 cm. We cut off all the excess with a jigsaw on a circle with a radius of 109.5 cm. We clean the edges with a sandpaper. We insert furniture screeds, they will add rigidity to the structure. Cut out the ventilation holes. I made two blank walls in 5 days.

The bath-barrel will stand on stands. The stands were glued together from scraps of boards. The radius of the stand is 3 cm larger than the main radius — 113.5 cm. The coasters were glued with German glue Kleiberit 569.0 Supratac.

To speed up the work, I bought a ready-made door. While the wall was still in the garage, I adjusted the platbands. I made a ladder out of aspen planks. High-quality inexpensive boards were purchased in advance for the occasion.

We collect the bath-barrel in 5 days
The barrel bath is delivered to the installation site in disassembled form. The weather forecast was encouraging: the week was supposed to be without rain. To speed up the assembly process, I engaged an assistant.
For a bath-barrel, you also need a foundation, here it is blocky. The blocks were installed in pits about 20 cm deep. Under the blocks were filled with rubble and rammed. In principle, the blocks could be replaced with paving slabs.
The assembly of the body of the bath begins from the center of the stands. We join the boards with spikes in different directions. The boards are mounted with the groove down. This improves the tightness of the structure: water does not flow into the groove.

It took two days to assemble the bathhouse building. Despite the careful sorting of the boards, more than half of them had to be wedged during assembly, so that there were no cracks. We collected the bottom of the body of the bath-barrel. Inserted into the grooves of the partition wall. The walls were firmly set in their grooves.The exact vertical of the walls was set by fixing the partition in the upper part and one bar, which was nailed obliquely.

Then the partitions were temporarily fixed with two boards on top. These boards hold the partitions in an upright position.

We fasten the sheathing boards with screws to the partition walls.

We suffered a little with the fitting of the last board.

They pulled the body of the barrel bathhouse in three places with cables. For ventilation of the under-roof space, narrow wooden slats were filled.

On these slats put plywood with a thickness of 4 mm. This plywood bends well. Now the roof covering will not come into contact with the sheathing boards. Cut a hole for the chimney.


The electrical wiring was laid under plywood, so it is not visible and protected from moisture. The wires were removed at the locations of the lamps and switches. The wire in double insulation was placed in a corrugated cable channel for reliability.

We worked slowly, with smoke breaks and tea parties. So, without much effort, we assembled a barrel bath in five working days. The chimney parts were purchased ready-made and certified. From the inside, the chimney pipe is fixed with a stainless steel plate. The plate has a hole for the diameter of the pipe.

From above, we fill basalt cotton wool around the pipe. At the outlet of the pipe, we install a heat-resistant rubber pad. It can take any shape and will be a good waterproofing. We attach an elastic band on self-tapping screws to the roof. A little bit of sealant — and there will be no leaks.

The furnace for a sauna
For the stove, I made a base out of a bar. He laid a fire-resistant plate on it, and the same plate separates the furnace from the wooden wall. It is made of minerite. You can also put an asbestos plate, but asbestos is harmful to health.
A samovar-type tank is mounted above the furnace on a pipe. Water should be filled manually, with a bucket. We pour warm water into the gang from the tank — enough to wash.

What is a good bath-barrel
What is good about a barrel bath, in my opinion? The kit of the bath-barrel in the “assemble yourself” format is quite compact, and it is easy to transport. It easily fits in a large trailer for a passenger car. When installing the barrel bath, you do not need a manipulator or a crane. By purchasing a kit for assembly, you will save a lot of time searching for materials and components. And with the assembly of such a bath-barrel, one person can cope with a minimum set of tools. You will need a screwdriver, a jigsaw, a shovel, a drill.

Related posts:
 Glass Greenhouse with Their Hands
 Insulated Flue – Saving Home from Fire
 Convenient and Useful Nozzle On the Trimmer With Your Own Hands
 Protect Your Garden, or How to Make a Scarecrow
 Outfit for Your Windows: Hinged and Roller Shutters, Mosquito Nets and Awnings
 In Your Garden Begins the Age of Stone: Choose Decorative Benches
 How to Build a Winter Garden in the Country
 How to Make a Washstand for Country House the Hands
 And Above us is Not Dripping: Shelter for the Garden
 Pros and Cons of Various Types of Solid Fuel for Boilers: Wood and its Derivatives
 Pros and Cons of Various Types of Solid Fuel for Boilers: Coal and Peat
 Choose Radiators for the Summer Cottage
 Additional roofing elements (accessories)
 Terraced motives the device is weatherproof wooden floors
 How to Heat the Boiler with Wood
 Always on Guard: Security Systems for Country Houses