If I were building my house now, I would do it on one floor. Large, wide, spacious. But I was building a country house at a time when there were strict restrictions on the construction of dachas. Therefore, the area of my house is very small, and I could only increase it by the number of floors. On the first floor there was a kitchen with a living room, on the second-two bedrooms, in the attic there was a small closet and the attic itself. And it was here that I had to face the problem: the stairs between the floors had to be fitted into very small spaces.
The fact is that when my husband gave the drawings to the builders with the plan of the house, they did not even think to look at it and began to build based on old, not real marks that my husband and I made ourselves. And when I got to the construction site, there was no limit to my disappointment. But what to do if the construction was already almost completed.
Now I understand that you need to stand your ground, and I had to get the builders to redo everything. This was a mistake, because later there were problems with the placement of the stairs. It turned out to be cooler than planned, and therefore less convenient to use and work with.
What are ladders and what are they made of?
I’ll explain a little bit about what’s what, and tell you about the general principles of placing stairs.
Basic concepts
A flight of stairs is a series of consecutive steps.
The steps are usually mounted in two, but sometimes on one inclined beam and can be placed on these beams in different ways:
- if the steps are located above the beams, then the beams are called stringer ladders;
- if the steps are located between the beams that seem to clamp them together, such beams are called bowstrings.
The steps that are stepped on are called steps, and the vertical stripes that cover the space between the steps are called risers.
Types of stairs
There are two types of stairs: rectangular and round. What type of stairs will be chosen depends not only on the taste of the owner, but also on the space in which they will be located.
The staircase can be single-marched, when the stringer ladder or string bow is adjacent to one of the walls of the room, or two-marched-when the stairs are located at an angle formed by two interconnected walls.
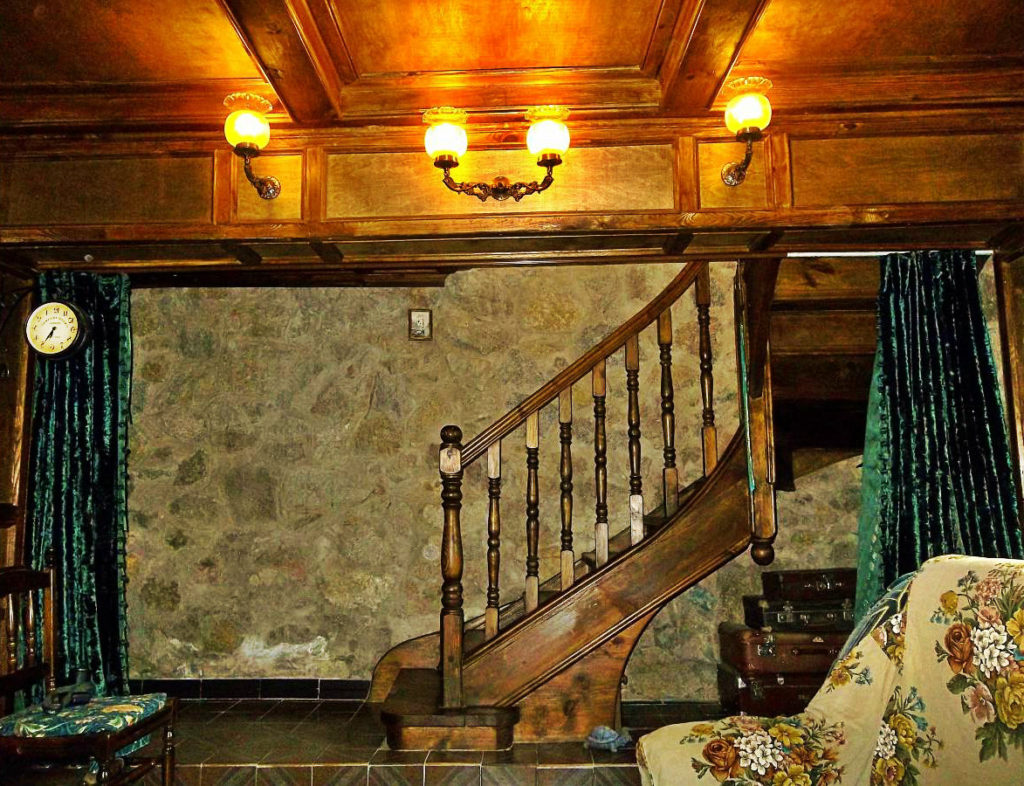
This is exactly the kind of staircase-consisting of two flights-that was planned in my house. Initially, a corner staircase with an intermediate corner was thought out. But due to the fact that one of the marches had to enter a smaller space than planned (since the builders deliberately reduced the length of the wall), we had to compensate for the missing number of steps in the turn.

Ideal options for stairs
Which stairs are considered the most convenient for walking?
The height of the lift from step to step should ideally be close to 15 cm (5.9 in). Maximum 20 cm (7.9 in).
The tread width is about 30 cm (11.8 in), but preferably no more than 20 cm (7.9 in). In this case, the higher the rise from the step to the level, the smaller the tread width.
A ladder with a lifting height of 20 cm (7.9 in) and a tread width of 20 cm (7.9 in) forms a lifting angle of 45 degrees – this is not very convenient and unsafe to use, especially when moving from top to bottom. Therefore, you need to try to reduce the height of the lift by a step and make the tread width wider, convenient for installing the legs.
When choosing a material for stairs, you need to remember that soft wood – for example, spruce-can only be used for stringer stairs. Most stairs are made of oak, beech, larch or pine. Pine is the most common and affordable material for suburban construction. That’s where we stopped.
History of my stairs
You can devote a separate chapter to my ladder. This is such an important stage in the construction of my house that it is difficult to even imagine. For a very long time, we could not find a master who would undertake its production. And it was planned much easier than what happened in the end.
Initially, it was planned to equip the room on the first floor in a rough style – something like a hunting lodge. The same style was assumed in the design of the stairs – rough, simple, perhaps made of logs.
The ladder was positioned at right angles, its stringers had to rest against the floor, walls and concrete beam, the structure was designed to be very rigid. But the stumbling block for most of the masters we turned to was the very turning steps and, most importantly, the lack of support for the pole on the turn, that is, on the floor. If you put a strong support post, as on spiral staircases, it would lean on the trapdoor in the basement. Accordingly, the column into which the turning steps had crashed must have hung above this hatch.

And yet such a master was found. The results of his work exceeded all our expectations and forced us to reconsider all further projects of the room.
Instead of straight stringer stairs, smooth curved lines appeared. When you looked at the stairs, it seemed to run down, curving into a figure of eight. Inverted balusters and, most importantly, curved railings! They are made of a solid wooden trunk.
Together with my husband, we went to a hardware store where our master chose a dry, thick branch, which we brought home. We later made our railings out of it. And to them, and the curved edging of the lower stringer ladder. Our master insisted on a light, natural wood solution, but we preferred the color of rosewood or dark oak.

The master assembled the ladder on self-tapping screws with gluing the elements with glue. Use nails in the construction of stairs is not necessary, as they are eventually released, and the attachment weakens.
After the stairs were made, they were finished. To begin with, carefully polish the wood with sandpaper. Then the coating is applied in several stages. The first is a primer with a colorless impregnation, so that the colored toning layer lies evenly. It is better to shade and apply the tinted azure with a woolen fabric – this allows you to apply the color more evenly, without smears and clots.
After impregnation with azure, 3 layers of varnish are applied, often on the jars the advice is indicated to do this with a woolen rag. After the first layer is completely dry, it is necessary to sand it with fine sandpaper to remove the fibers that have risen in the first layer of varnish. And the second and third coatings, with complete drying of each layer, will give you the desired effect.


