I will tell you how we solved the problem with the layout of the stairs in a small room.
My cottage isn’t too big. At the base of the hall is the ground floor, to which a standard prefabricated wooden house was raised.The first floor became a living room and kitchen, and the second was divided into two rooms-bedrooms. I wanted to use every bit of space, so the space under the roof was decided to turn into a small attic. But to implement this idea, you had to have a ladder, and there was very little space under it. The upper space in the ceiling was bounded by load-bearing beams, the wall between the rooms on which the door was located, and the brick box of the stove and the chimney of the fireplace. There was very little space for the stairs from 0.5 m to 1.5 m (1.6-4.9 ft). A simple staircase would take up half the room, and I didn’t want to do that.
Time passed, and there was no solution. Folding ladders were not sold then, and no one undertook to make them themselves. But one day, in the next issue of the Polish magazine “Master”, my friend drew attention to an interesting idea of a staircase along the wall. It was a mass of shelves, similar to standard bookshelves.They were placed on top of each other with a shift, creating a comfortable stage separately for each, right and left foot.
These stairs are called – space saver staircase, where their steps are located under the right and left feet. But the peculiarity of the stairs in the magazine was that the space under the steps was not empty, but was effectively used for storage.
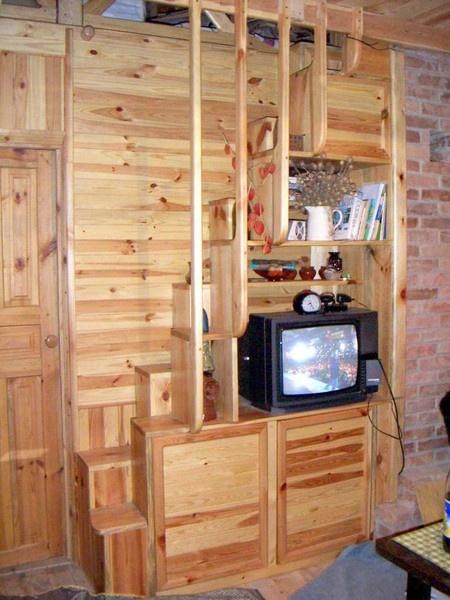
The idea came to mind, but in the process of thinking and adapting to our tastes, to the style of the room and, most importantly, to the needs, a lot of things were transformed. It so happened that, gradually shortening, the shelves created convenient steps and turned the stairs into a shelving shelf. Along the wall were two parallel rows of shelves, half-shifted in height relative to each other. For each leg-a series, the right goes only to the right, the left-to the left (relative to the movement).
It is very difficult to explain in words the construction technology of my stairs. I think it was easier to do that. First, several steps were installed behind the wall. The boards were attached to the wall with wooden spikes on glue and connected to each other at the corners with screws.
You can mount it in different ways: first attach the bar to the wall, and then put the steps on one edge of the board. Then vertical racks are made at the ends of the shelves of the boards. The supports of the boards on the side of the stairs are risers, the support for them is the previous row of shelves.
After installation, a row of shelves is attached to the wall, attached to it by the front row. In places of contact (intersection) with the first row of shelves, a bunch of wooden spikes is made on the glue. This added rigidity to the ladder structure.
Some of the steps-shelves are made for the entire width of the stairs, which also added stability to it. Such shelves were the table top under the TV, the seventh lower step, on which there is a jug of flowers, and the upper shelf. If you look from above, these steps look L-shaped and run under the first row of shelves.
The free space under the TV is closed by small doors. But this is not necessary-it all depends on your needs and desires.
In general, the view from the top of the stairs looks like this:

The question of safety on such a dangerous staircase deserves a separate discussion. It was necessary to install a reliable handrail. In the design described in the magazine, the handrail was a crossbar that rested on a vertical crossbar-balusters only at the lower and upper points of the stairs. At the same time, the space along all the steps remained open and unprotected. A rather unreliable and dangerous solution. We placed the railing vertically, and it became a kind of protective wall.
To do this, vertical racks were attached to the top beam of the ceiling and to the end of the front row of shelves. The result is a kind of palisade, it is quite difficult to fall through it.

The height of the steps was quite large (20 cm/7.9 in for each step and a total of 40 cm/15.7 in for a separate step), and to make it easier to go down (and this is much more dangerous than going up), we attached a round wooden handle on top of the bottom step. It helps you feel more confident when you go down.
Not without his little tricks. There was a small gap of about 10 cm (3.9 in) between the right, blind side of the stairs and the pipe. It was covered with a belt . It turned out to be a small niche for storing long things, such as fishing rods and ladders.
The lower stage also has a secret. Its lid is raised, and inside it is very convenient to store all sorts of small things for the cottage.

I like to put flowers on the shelves. The tree serves as a perfect backdrop for various seasonal plants.

Related posts:
 Unusual Country Furniture With Their Hands: Use Logs and Saw Trunks
 Gardening in Australia – Glenmore House and Garden
 6 Best Decorative Elements for a Patio in your Garden
 Best Spanish Decorative Ideas for your Country House
 8 Best Design Ideas to Improve Your Country House. Scottish Style
 Grills and a Barbecue for Villas with Their Hands
 Ideas for Landscaping
 Garden Figures With Their Hands
 Beautiful Lawn with Their Hands. Sowing the Lawn
 Rockery Against the Rules
 Create the Beauty of Landscape Design with Their Hands
 Independent Development of the Draft Site Plan
 The Highlight of the Villa Interior – Original Watches
 The Choice of the Fireplace: the Main Criteria
 How to Use Old Things in the Interior of the Cottage
 How to Improve and Maintain Cleanliness in the Hallway