In this article we will learn how these wonderful creations are arranged, how to create a container garden with your own hands and how to take care of it.
What is basis?
The basis of all created flower arrangements are the usual basket of metal mesh with inserts of coconut fiber. They differ in size and shape:
Holes for plants in the basket can be arranged in two rows; a special form of baskets provided for mounting on the wall:


There are designs for window sill and hanging compositions:

A separate discussion deserve the device for creation of “living walls»:

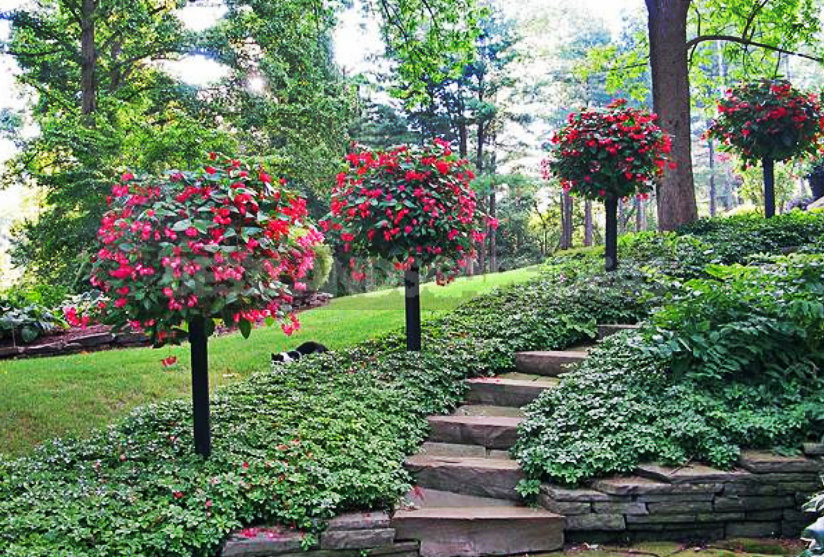
And here is one example of what can be done on the basis of such a design:

Yes, still the question remains: how to strengthen the baskets? For these purposes are used here such supports (metal or wooden):

Their height can be selected at their own discretion — depending on the purpose of use, compositional solutions and other factors.
How to plant?
So, step by step instructions for planting:
Step 1
Moisten the coconut fiber with water and pour the soil mixture into the basket to the bottom of the planting holes. Use only high quality soil mixes that you trust. Does not recommend the use of conventional garden land for planting in baskets: it is too heavy, dense for such purposes and can destroy plants.

Step 2
Remove the first plant from the pot. Immerse its roots in water and hold it for a while until the soil is saturated with moisture. Then remove the plant from the water and squeeze the earthen lump several times to remove excess water. A lump of earth with roots become dense, it should not crumble apart.

Step 3
Having squeezed a lump of earth with roots, insert it into one of the holes of the basket so that the entire above-ground part of the plant remains outside, and the root system is located inside. But even if some part of the soil is visible, do not worry: the roots quickly entwine earthen lump, it becomes solid, and the soil mixture does not fall out of the basket.

Step 4
Distribute the selected plants along the entire circumference of the container, alternating them according to your plan. Place them by repeating steps 2 and 3. Apply fertilizer . If the soil mixture you are using for planting already contains fertilizer, this step can be skipped; in this case, you will feed the plants in baskets as needed.

Step 5
Remove from the pot plant that you plan to plant in the center of the composition. Depending on the volume of its root system, see how much soil mixture should be added (so that the resulting top of the earthen clod with roots is about 1/2 inch above the edge of the basket). Place the plant in a basket and sprinkle the soil mixture around it, not reaching the top of the container by about 1 inch.

Step 6
Plants intended for planting on the upper edge of the basket, too, in turn, remove from the pots and soak. When the soil is saturated with water, the earthen lump must be squeezed between the palms to give it a flat shape and simultaneously remove excess moisture. Then place the seedlings in a container according to your plan. Plant when planting should be slightly tilted so that it covers the edge of the basket. Add the soil mixture, carefully distributing it so that it covers the roots of the plants. Do not sprinkle soil on the stems! Re-fertilize (if necessary). Do not water the planted plants for 3 days.

What to plant?
Not all plants are suitable for container compositions-both in terms of their decorative characteristics, and in terms of biological characteristics and requirements for conditions. To your container garden was durable and did not require special attention, it is necessary to listen to the recommendations of Pamela Crawford: her conclusions — the result of a large number of experiments.
The most difficult to pick up the culture for planting on the sides of the basket. What to choose?
Successful plants for the sides of the container
Feel good in such conditions:
- Begonia;
- Coleus;
- Creations;
- Viola;
- Lamium;
- Melodium;
- Hedera.
Plants that can be used
Some plants can be planted, but it is difficult to achieve sustainable results:
- Petunia;
- Creations;
- Verbena;
- Lobelia;
- Vinca.
Grow poorly on the sides of the basket
Many plants that grow well at the top of the container die quickly if planted on the sides. Thus, attempts to use the following plants were unsuccessful:
- Fuchsia;
- Antirrhinum;
- Tagetes;
- Calendula officinalis;
- Bellis perennis.
How to care for container gardens
There are some rules and regularities that help extend the life and beauty of plants in container gardens.
Dimensions of seating holes
As can be seen in the diagrams and photographs, coconut fiber inserts used for planting plants have special planting holes. Their size can be different: tried options from 1 to 2.5 inches. Optimal were holes with a diameter of 1.7 inches-smaller injure the roots of plants during planting, and large seedlings fall out.
The diameter of the earthen coma, accommodating the root system of seedlings – from 3 to 4.5 inches. To safely place it in the basket through the planting hole, make additional cuts (they can also be seen in the diagrams). Ideal – 4 incisions 1 inch long.
Fastening of baskets
If the baskets are placed on vertical supports, they must be properly secured: filled with soil, with planted plants, containers are heavy enough. The most successful as a basis was a 9-inch disk.
Irrigation mode
The most difficult task is probably to provide the container garden with the perfect watering. Pamela gardens were created and grown in different climatic conditions, and everywhere had its own nuances. The first experiments took place in southeastern Florida from autumn to spring and in new Hampshire in the summer, where the temperature did not exceed 32…+ 33 degrees Celsius. Here it was enough to water just planted plants every 3 days in the sun and every 5 days-in the shade; when they grew up, the sun became daily watering, and in the shade — every 3-4 days. It was used mainly drip irrigation and irrigation.
Where the summer temperature reaches even higher levels, any container plants have hard, especially in Sunny areas. On the other hand, there is a longer warm season, and you can grow gardens in containers in spring or autumn.
As you can see, there is nothing impossible to create a luxurious container garden with your own hands — even in not too favorable climatic conditions.
Related posts:
 How to Plant and Care for Acidanthera
 How to Plant and Care for Ixia
 Interesting Design of the Flowerbeds
 Tulips and Art Nouveau
 How Not to do a Lot of Work in the Garden.
 How to Create a Rose Garden. Planting Options and Selection of Roses
 How To Plant And Care For Viburnum – 5 Best Varieties
 A Lawn – Green Carpet in Your Yard
 Differences Of Platycladus Orientalis and Thuja Occidentalis
 The Species of Mosses and Their Habitats
 Almost Like in England-Cutting Evergreen Hedges
 Thymes and Savory
 House With Grapes
 Peonies for Slides and Rock Gardens
 How to Plant and Place the Most Beautiful Flowers in the Garden
 The Best Ideas for Your Summer House