Each Amateur flower grower who is engaged in a particular culture (or all at once), of course, has its own small or big secrets about their agricultural techniques. So in my piggy Bank of experience gathered a lot of conclusions, observations, reflections on growing gladioli. I will try to share them with readers.
Someone will find my experience too difficult, someone has long been known, and someone, I hope, will be useful.
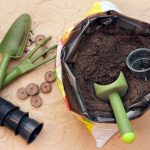
Where and how to plant gladioli
Let’s start with the soil. These beauties love a fertile, well-groomed soil (Chernozem, light loam, sandy loam), but organic matter directly under the planting is not necessary to make corms will be affected by scab, various rot. Therefore, the soil for gladioli is prepared a year before planting. On the planned site for them, plants are placed that require a large amount of organic matter in the spring. This can be vegetables, dahlias, Phlox. And the next year, gladioli are planted on this square.

You can not use the same ridges for them every year. First, small tubers-children remain in the soil, no matter how carefully and carefully the autumn digging is carried out. And they perfectly winter and spring together sprout, which will certainly lead to clogging and re-sorting of the collection. Secondly, in the soil during such planting, a mass of various infections accumulates that can destroy even the most resistant varieties.
For improvement and fertilizing the land in the early autumn sown green manures: rye, mustard, rape. In late autumn, before the onset of persistent frosts, I dig them up. This gives a very good effect. Rye, of course, is more correct to dig in the spring, but it has huge roots, it is quite difficult to break them, and as a result, the site looks untidy.
Before planting, the corms must be cleaned of covering scales and decontaminated from rot in two to three weeks. The baby gladioli must be cleaned before planting, this increases its germination, frees it from infection and microorganisms that may be under the shell. But you can not clean it long before planting, without the shell, it “turns to stone”. I store the cleaned baby in plastic bags in the refrigerator for no more than a week. Cleaning bulbs and babies also allows you to remove diseased specimens, if any were found.

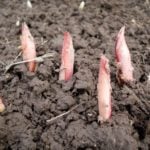
First I plant the baby, and then the adult bulbs. You can not delay planting, since the spring moisture necessary for germination quickly leaves. This time usually falls on the last decade of April-the beginning of may.
Top dressing for gladioli
Gladioli grow very quickly. It seems that we have just hatched out of the ground, and in a week or two we already see green thickets. Like all fast-growing plants, they require fertilizing, especially on low-yielding soils. I practice only mineral top dressing, as organic, in my opinion, cause fungal diseases.
In total, during the growing season, my plants get 8-10 feedings, although most gladiolus growers do this 4-5 times. Based on my practice, I came to the conclusion that fractional top dressing for these plants is better. Therefore, the recommended amount of fertilizers for one top-up is divided in half and introduced only in the form of an aqueous solution.

The first 4-6 additional fertilizing contain nitrogen, phosphorous and potash fertilizers in approximately equal proportions (15 g per 10 liters of water), and I also add calcium nitrate (5 g) and magnesium sulfate (10 g). In the next two feedings, nitrogen, calcium and magnesium are excluded, and phosphorus (in the form of water extract) and potassium remain. The last two top-UPS during late flowering and after flowering plants contain only potash fertilizers (potassium sulfate). I do not use fertilizers containing chlorine.
Various humates are very good for feeding, it is better in the first half of the growing season. Gladioli also respond well to spraying. Having received such nutrition, the plants look powerful, they have bright green foliage, beautifully colored flowers and strong matured bulbs.
Pests of gladiolus and fight with them
Gladioli have a lot of enemies-insects. Young leaves like to eat various caterpillars — this pest is signaled by the holes that have appeared. The green aphid also attacks them. But this plant does not have a more merciless enemy than gladiolus thrips.
Gladioli, strongly affected by thrips, do not bloom, the buds acquire a brown — as if burned-appearance and do not open. Since thrips is a very small insect (1-2 mm), many growers simply do not notice it. It multiplies quickly, flies from one plant to another, and if you do not fight it, planting is simply doomed.

You need to start fighting long before the appearance of peduncles, at the stage of 3-4 leaves. While there are no flower stalks, I spray my plantings once every two weeks. When the flowers are formed, these treatments are carried out every week. And when gladioli begin to bloom, you have to spray them every 3-4 days. Trips very quickly gets used to any of the tools, and the effect of processing is sharply reduced.
The destructive activity of thrips is especially noticeable on dark-colored varieties: there are ugly whitish spots on the petals, the plant looks depressed. On light-colored varieties, the damage is not so noticeable, but this does not make it easier.
I want to note that thrips is not only parasitic on gladioli. It affects both Phlox, and daylilies, and lilies, and peonies, and roses, especially while there is no favorite food – blooming gladioli. This pest loves hot and dry weather-it breeds rapidly and strongly spoils flowering plants. In such weather conditions, you need to be on your guard with Tetranychus urticae, for it is also a Paradise.
Gladioli diseases and their prevention
Very harmful to the gladioli of various diseases: Fusarium, Botrytis, a Sclerotinia, Septoria spot, bacteriosis. But if you follow the necessary agrotechnical requirements for growing this plant, trouble can easily be avoided.

Gladiolus is not spared and viral diseases. These are the most serious defeats, since there are no means of fighting them, and there is only one way out – immediate destruction of the diseased plant.
Digging and storing planting material
I dig out gladioli at the end of September – the first half of October. Perfectly ripened bulbs in those plants that have been flowering for 30-40 days. Of course, it is not always possible to withstand this, but winter hurries. Bulbs received from the children, dig out the last. Old, fulfilled their functions corms try to remove immediately when digging, if possible, because they rot during drying and affect the young planting material.
Each variety, along with a plastic label that says the name of the variety, is put in a separate bag (I use gauze or intended for storing vegetables). Leaves are cut off when digging, leaving a stump 5-8 cm. First, I wash the planting material in clean water, then put it in an insecticide solution for 30 minutes. This is done in order to destroy parasitic insects, especially thrips, which have already chosen winter quarters for themselves.
Then the bag is transferred for 30 minutes to the solution of the drug for the destruction of pathogenic putrefactive microorganisms. Then the planting material is scattered in various boxes and dried for two weeks at a temperature of + 26…+28 degrees. After that, finally clean the bulbs and baby from the remaining debris and unnecessary scales and leave to dry for about 2-3 weeks at the same temperature.

There comes a very important moment – winter storage of planting material. I’ve tried a lot of options. I kept it in the basement, refrigerator, cold room, but there were always serious attacks – trips were started, various rot, shrinkage. Finally, I decided on the most convenient, practical and reliable. I learned about a product called “electric Rake”. It looks like a large backpack of different capacities, hung on the balcony and switched on the power grid when the onset of negative temperatures. It has a thermostat that provides a constant temperature inside. I set the temperature to +3…+4 degrees, and my beautiful bulbs comfortably winter, do not shrink, do not mold. This is how I now store my entire huge collection of bulbs.
Well, then everything repeats again: planting, growing, fighting diseases and pests, digging and storing. This is an endless process that gives me great satisfaction!
Related posts:
 How to Plant and Care for Crocosmia. 5 Best Options
 Natural Species of Gladioli: the Perfection of Natural Beauty
 Gladioli After Flowering: When to Dig And How to Care
 Plant Gladioli!
 How to plant a Saskatoon around the house
 How to Plant and Care for Acidanthera
 How to Plant and Care for Ixia
 How To Plant And Care For Passiflora
 Tulips and Art Nouveau
 How To Plant And Care For Sparaxis
 Garden Ideas Using Decorative Onions – Very Useful Herbs
 How to Plant and Care for Tulips – 15 Best Options
 How to Plant and Care for Daffodils – Flower Varieties and Types
 How To Plant And Care For Potentilla
 Spring transplanting Peonies
 Clematis – arch with flowers