The suburban kingdom is a springboard not only for gardening, but also for culinary exploits, for which it is also necessary to prepare the “soil”. Therefore, today we will talk about the device of a summer kitchen — comfortable, functional and beautiful.
This strategically important object in one form or another is present in any suburban area, but in order to make the most of all its possibilities, it is necessary to think through and provide for all the nuances of its location and arrangement. Or, more precisely, to find the best answers for yourself to the main questions related to its creation.
1. Where to place it?
Do not expect monosyllabic recommendations in this regard — too many factors should be taken into account. From a practical point of view, a summer kitchen should be located next to the house — in this case, engineering communications are faster and easier, and it costs less. In addition, most of the dishes and kitchen utensils are usually stored in the house, which means they will always be at hand.
Tip: place the summer kitchen not in front of the entrance, but not far from the kitchen window — this is very convenient and practical.
")
If there is no window in the selected corner, plan the object so that it has one common wall with the house, then the kitchen will automatically turn into an extension, and you will only need to build a canopy that protects the space from rain and sunlight. It is convenient, economical, but not always beautiful.
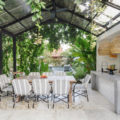
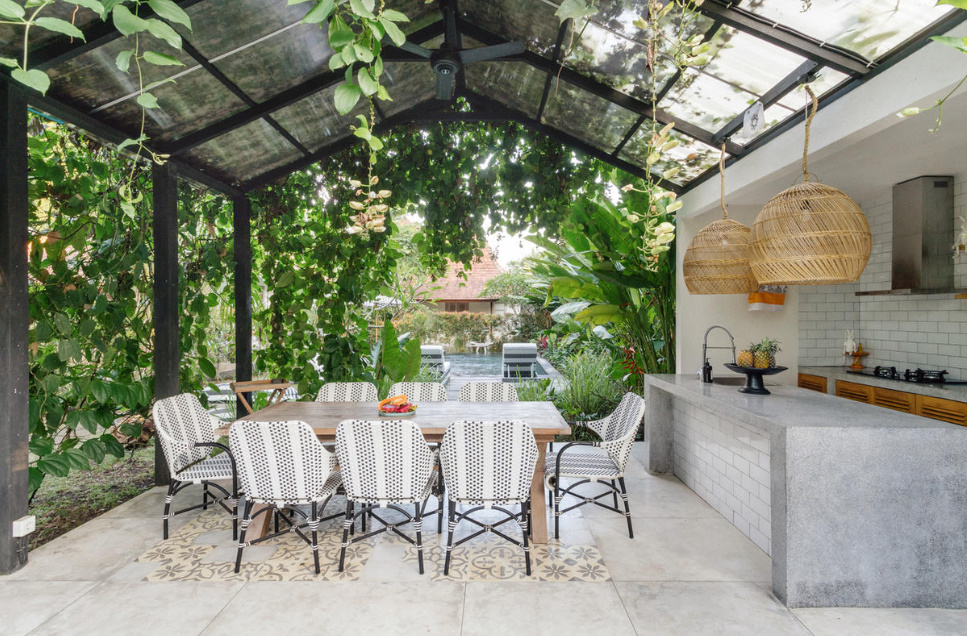
If we talk about aesthetics, then a cozy corner of the garden with picturesque surroundings, say, a well-groomed pond, a stylish rockery or with spectacular flower beds is much more suitable for these purposes.
")
In any case, the best option is considered if the summer kitchen is located in the depth of the plot (but as far as possible from the toilet, compost pits and garbage cans) and at the same time is reliably protected from the wind and the heat of the sun and inaccessible to curious neighbors’ views. For an open summer kitchen, it is important to choose a shady place, for example, under a tree, which should be high enough so that its crown does not hang over the stove, oven or barbecue. If you prefer the closed option, orient the kitchen windows to the north and east, this will reduce the ingress of direct sunlight into the room.
Important: Place this object on a small slope to ensure the flow of rain and meltwater, as well as sewage.
Just in no case place the building “in the middle of the road” to some significant object, be it a vegetable garden, a pond or a recreation area.
And finally, the last tip — be sure to lay a flat path connecting the summer kitchen with the house, and do not forget about its lighting.
2. How to plan?
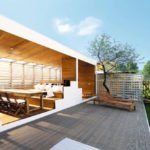
Before answering this question, decide how often and actively you are going to exploit this cute corner, because its appearance depends on it. If you visit a country house exclusively in the warm season and lead a completely secluded lifestyle, then it is quite possible to do with an economy option: an open kitchen with a simplified layout and the simplest possible equipment. Such a building looks like an open terrace, there is a roof over your head, a barbecue or a simple stove, comfortable furniture that is not afraid of dampness, and a corner for washing dishes.
The mini-roof over the workspace is not a question of aesthetics, but of practicality. For the same reason, chairs in an open kitchen should be made of “waterproof” materials.
")
A convenient, fast and economical option is an open arbor made of wood with a light translucent polycarbonate roof. In this case, you will have to give up the stove, but it will easily be replaced by a barbecue. But a capital foundation will not be needed — it is quite possible to do columnar.
There is an even simpler and more budget option: level the territory in a cozy garden corner, pave it with paving slabs or vibro—casting slabs, “cover” with two garden umbrellas, install a sink with a drainage system, put plastic garden furniture, a comfortable barbecue – and the platform for culinary exploits is ready!
A closed kitchen is a more serious structure, but its functionality is also wider. In this separate house there are communications, zones are allocated — working, guest and “recreational”, and if you provide competent heating, then in cold winters you can spend weekends here. But remember that in this case, the structure should be built of brick, stone or foam blocks. If you do not plan to use a summer kitchen in the cold season, feel free to build it out of clapboard.
The floor in the summer kitchen should be as practical as possible. In an open structure, it makes sense to make it from a decking pressed from a wood-polymer composite, or from wooden boards coated with oil or wax for outdoor work.
")
Important: do not use varnish for these purposes — it will crack over time, and the coating will have to be updated.
If you prefer a stone floor, remember that it can only be laid on a solid and reliable foundation. In a closed kitchen, you can safely use similar materials or give preference to porcelain stoneware or ceramic tiles.
Tile or wood? You can’t decide on a choice — use both materials in your kitchen. This duo looks very stylish.
")
Tip: do not choose a material of too dark shades — crumbs, dirt and puddles of water will be especially noticeable on such a surface.
3. How to choose the layout and furnishings?
Let’s start with cabinets — there should not be many and not a few of them, just enough to accommodate everything you need, but at the same time leave no room for cluttering up free corners. Estimate how much space is needed to store food, dishes and household appliances, lay a small stock and determine the number of cabinets, shelves and work surfaces.
The next step is a competent organization of the space, which depends on the size of the room, its functionality and your preferences.
")
The linear layout is good for a small budget summer kitchen, where the working and dining areas are located separately from each other. The main advantage of a kitchen with a corner layout is that several people can cook here at the same time. Therefore, there are more work surfaces here, and besides them there is not only a sink and a refrigerator, but also dining places for guests, and if space allows, then a bar counter.
The U-shaped layout is suitable for a detached kitchen with a variety of kitchen appliances; includes a sink, refrigerator, bar counter/spacious work surface. For a narrow kitchen, it is better to choose a two—row layout, and for a square space – a U-shaped one.
Tip: the dining area should be at a distance of at least 2 m from the barbecue or oven, then smoke, heat and odors will not bother vacationers, and chips, ashes and sparks will not spoil the decoration of the dining area.
In any case, when planning the kitchen space, adhere to the rule of the “working triangle”. Its meaning is simple: three working areas (sink, stove and refrigerator) should be in reasonable proximity to each other, forming a triangle (ideally equilateral). Thanks to this arrangement of zones, the kitchen turns out to be as convenient as possible.
In fairness, it should be noted that in the summer kitchen this rule is not always fully implemented, but still try not to build all the working areas in one line. For example, if you cook not on the stove, but on the grill, taken outside, then the sink and the food preparation area should also be arranged as close as possible to the exit.
Size matters!
The most common mistake when choosing a summer kitchen project is to underestimate the size of the minimum area of the dining area. A table with a length of 2.5 m can easily accommodate 6-8 people. Ideally, there should be a gap of at least 1 m between the table, walls and other furniture in the kitchen.
")
The dimensions of the furniture and the distances between the objects in the summer kitchen should be optimal for both the work process and for recreation:
- Table height: 85-90 cm.
- The width of the countertops: 60 cm.
- The distance from the sides of the sink to the adjacent structures: 45 cm on each side.
- Minimum working surface size: 90×60 cm.
- Minimum shelf length for storage: 50 cm.
Related posts:
 Glass Greenhouse with Their Hands
 Insulated Flue – Saving Home from Fire
 Convenient and Useful Nozzle On the Trimmer With Your Own Hands
 Protect Your Garden, or How to Make a Scarecrow
 Outfit for Your Windows: Hinged and Roller Shutters, Mosquito Nets and Awnings
 In Your Garden Begins the Age of Stone: Choose Decorative Benches
 How to Build a Winter Garden in the Country
 How to Make a Washstand for Country House the Hands
 And Above us is Not Dripping: Shelter for the Garden
 Pros and Cons of Various Types of Solid Fuel for Boilers: Wood and its Derivatives
 Pros and Cons of Various Types of Solid Fuel for Boilers: Coal and Peat
 Choose Radiators for the Summer Cottage
 Additional roofing elements (accessories)
 Terraced motives the device is weatherproof wooden floors
 How to Heat the Boiler with Wood
 Always on Guard: Security Systems for Country Houses