For a long time there was an idea to arrange a summer shower at the summer cottage, but constantly current problems distracted from this idea. How tired of getting in the car and driving home dirty after a hot summer day! And so, gathering my thoughts, I decided to arrange a summer shower with a metal frame. Since my favorite material is wood, I did not sew all the walls with profiled flooring and decided to sew half of them with wood.
Pit for collecting water
To begin with, I decided to make a pit for collecting water. The intensity of use is small, and the ground is sandy, so the pit was made shallow. In order to make it easier to make a hole and avoid landslide, I used two old tires installed on top of each other (15-inch). Marked out a place for a future shower and buried the tires. To keep the tires strictly on top of each other, they can be temporarily attached to several screws.

Then I made a formwork from unnecessary pieces of chipboard and selected the excess soil.

Having previously set the formwork to “zero”, I filled it with cement mortar, first from the edges, and then in the center. In order for the hole to be smooth, I installed a tire trim (along the side of the ankle). The size of the Foundation was equal to the external size of the future frame.

After the concrete Foundation was ready, I decided that the floor of the future shower should be covered with ceramic tiles. After the renovation, there were small remnants of tiles in the bathroom, which I used in the new project: as they say, “it’s a pity to throw away, it’s expensive to store”.

The seams are also embroidered with the remains of the Fugue. The tiles were laid. The base is ready. You can start making the shower frame.

Frame
For the frame, I used a rectangular metal profile with a size of 40×20 mm and a wall thickness of 2.0 mm, which is quite enough for the strength of the structure.

Welding work was unusual for me, as I had no experience. But thanks to the roughing and petal disc on the angle grinder, the frame turned out to be quite decent.

I was satisfied with my first experience in welding. To attach the frame to the Foundation, I welded four plates with a thickness of 4 mm. Rasps in the frame did not do, as the structure is small, and the overall rigidity and geometric immutability will provide the skin-a profiled sheet fixed to the metal frame.
After making the frame, all the metal was cleaned, degreased and painted with primer and enamel.

The metal structure was installed on rubber gaskets made of thick rubber, which will further protect the structure from corrosion and will not prevent water from draining from the floor.
Walls
After attaching the frame, a pair of sheets of profiled sheet were attached to it. I used a profiled sheet MP-20, attached to screws with neoprene padding, but it would be quite suitable and rivets in the color of profiled flooring.

The choice of profiled flooring should be approached on the principle of reasonable sufficiency. Too thin profiled sheet will be subject to mechanical impact, but too thick will be heavy and expensive, I stopped at the “Golden mean” – took 0.45 mm. I chose standard polyester as the coating. Since I work at the summer cottage myself, there are no assistants, some inconvenience was caused by fixing the profiled sheet in two hands. But the position can be improved by using quick-release clamps.
I want to make a small explanation on the profiled sheet with a polymer coating. If you need to cut off part of the sheet or make a cut, do not resort to the help of a grinder. When using an angle grinder with a cutting wheel, many sparks are formed, which when they hit the polymer coating destroy its protective properties. Therefore, it is better to use metal scissors or a specialized tool for cutting profiled flooring.
After installation, it is necessary to paint over (from an aerosol can or brush) the places where the metal is exposed (places of cutting or scratching), this will improve the aesthetic appearance of the shower and protect the skin from corrosion.
After the previous repair, I still have a certain amount of lining width of 120 mm. Sewing up the remaining walls and door with a solid layer of clapboard seemed a dull task, and the view would be too ordinary, so I decided to cut the edges of the clapboard at 90° and sew the walls with alternating and small overlap.

He fixed the boards on self-drilling screws, having previously sanded the surface and painted it with protective azure. In order to eliminate the “visual gap” of the structure, it is enough to make an overlap of the above-placed Board by 1.5-2 cm.

The shield for the pit
The shield for the pit was also made of boards, but in this case the front edges were passed with a kalevochnoy cutter to avoid injuries in the future. He calibrated the boards with an electric plane.

Fastening was carried out on self-tapping screws on the back side of the flooring. In order to prevent the wooden structure of the flooring from moving spontaneously on the wet ceramic tile, I nailed the pads of a rubber anti-slip Mat with a wide cap.

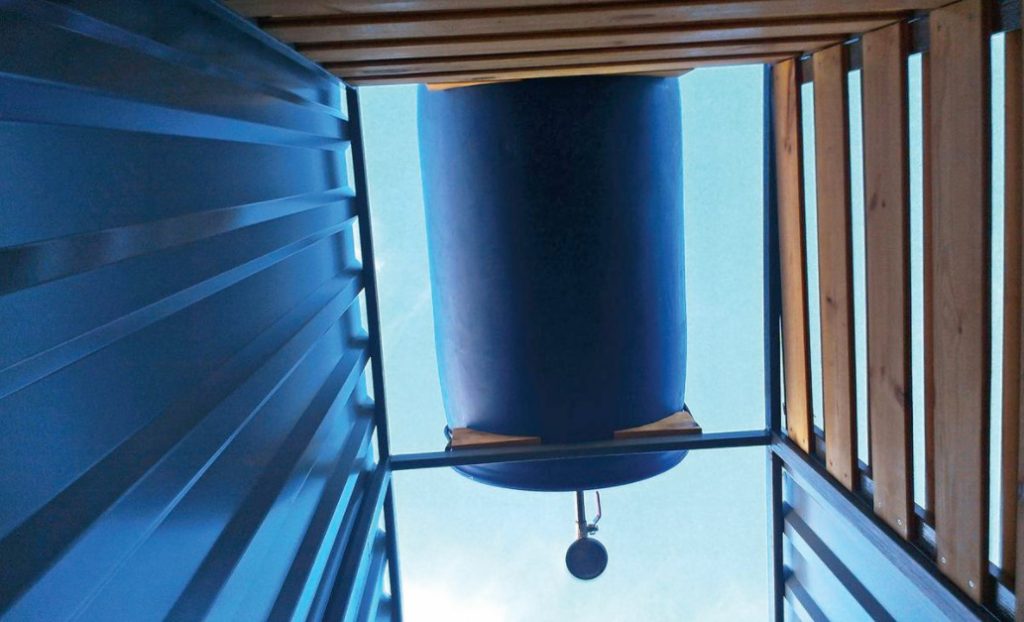
Water container
I thought for a long time about what to make a water tank out of, since the purchased one in our region is too expensive. Your choice is stopped on a conventional closed plastic barrel. Special attention should be paid to what was stored in this barrel until the moment when it was decided to sell. Very often they store acids and alkalis. Therefore, it is better not to risk taking a barrel with stickers that say what was stored there. The barrel I bought had two holes covered with lids.

I unscrewed one lid and made a hole for filling the barrel with water, and attached a shower head with a tap to the second one.
There are ready-made sets of plastic watering cans, but they seemed unreliable and flimsy, so I assembled the watering can from individual elements on a half-inch pipe. I drilled a hole in the cork and mounted it. It turned out very reliable and nice.

To install the barrel on the shower frame, I made a couple of stops on each of the crossbars made of scraps of timber with the necessary radius. The radius can be transferred using scissors and a piece of cardboard, it turns out accurately and quickly. Then a barrel with a watering can was installed and fixed to the stops with a wire. You can not attach it, under its own weight with water, it is quite reliable in the clip, but still with the current winds, it will not be superfluous to then not look for it from a neighbor in the country.

In the morning, I pour water from the water supply through the hose through the upper hole. During the day, the water is heated, and in the evening before leaving or before going to bed, there is already the necessary amount of warm water for a good shower. The pressure remains quite vigorous and continuous.

I used a lot of tools, probably used my entire Arsenal, but everything can be done with a minimum set, if I wanted to. The work turned out to be very versatile: concreting, welding, wood, plumbing.
Related posts:
 How to Feed Birds in Winter: Feed and Feeders
 How To Make a “Flower” Table For The Garden
 Mobile Pouf Made Of Plastic Bottles
 Folding Stool Made Of Board And Polypropylene Pipes
 Restoration Of a Garden Bench With Your Own Hands
 Repair Of Old Swing Gates With Your Own Hands
 Spectacular Hanging Planters Made Of Improvised Materials
 How To Make a Strong Stool With Your Own Hands
 Useful Things For Giving With Your Own Hands
 Wattle With Their Hands
 Glass Greenhouse with Their Hands
 Insulated Flue – Saving Home from Fire
 Convenient and Useful Nozzle On the Trimmer With Your Own Hands
 Tiles for the Garden With Their Hands
 Protect Your Garden, or How to Make a Scarecrow
 Outfit for Your Windows: Hinged and Roller Shutters, Mosquito Nets and Awnings