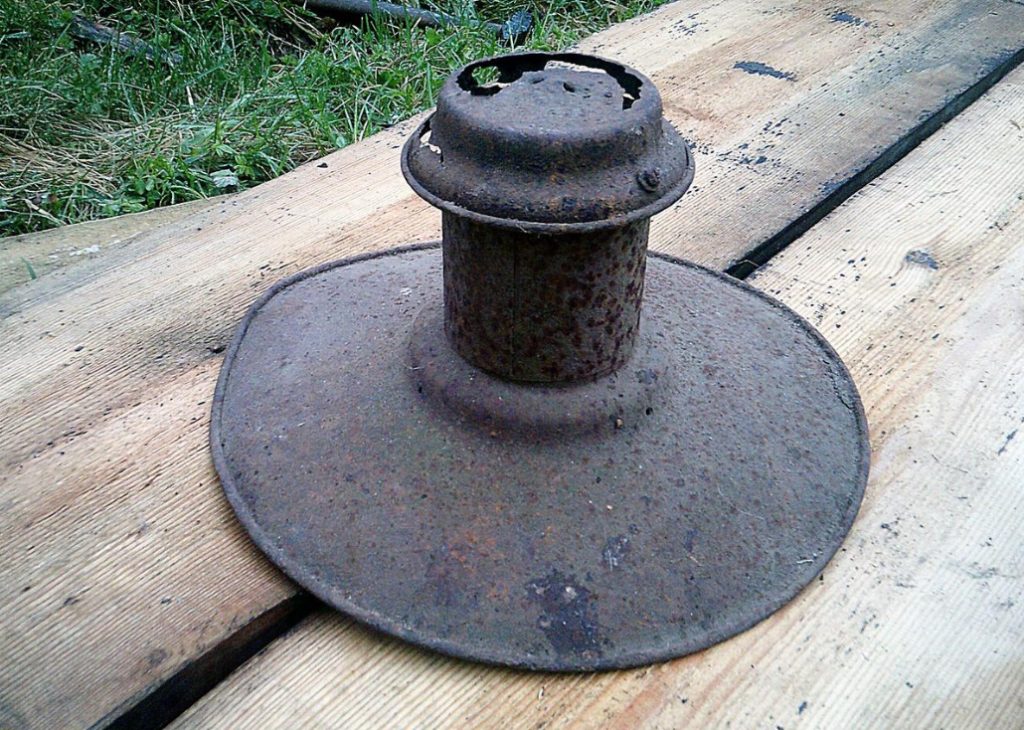
In my opinion, old interior items have a special charm: they always (or in most cases) have an interesting design. In the village house that we bought 5 years ago, there were no special antique rarities — most likely, because before our purchase, the house was uninhabited for a couple of decades. But nevertheless, there are all sorts of interesting items from the designer’s point of view. For example, a lamp like this. Or rather, a lampshade.
A little dented, rusty, without half the parts and with holes left by inexorable time. Most likely, it was the shade of a suspended kerosene lamp. By design, it is more similar to the head of the chimney: there is no space for wiring, but there are holes (at the top, under the hood) for heat removal.
Lower the degree of brutality
I like these things-stylish in their brutality. At first I thought to leave it so-with holes and rusty; just cover it with varnish to emphasize the texture. In cases where the object is made of old iron of sufficient thickness (the ancestors, unlike modern manufacturers, did not use metal foil, in which the candy can be wrapped, but real iron!), rust leaves interesting cavities in the surface.
But when I started cleaning the lamp from the flakes of metal that had flaked off from rust, I almost removed the top cap completely. Its rust “ate” most of all. Perhaps because, in addition to the water, the metal in this place was also affected by the temperature (if it is really a lampshade from a kerosene lamp).
So I just decided to paint it. And for simplicity, I’ll use spray paint. At first I chose gray, but then I decided to reduce the degree of brutality, especially since it will not be possible to demonstrate the beauty of rusty metal. The lampshade will be green — the color of fresh lettuce, judging by the cap. Or, as the manufacturer himself writes, a green Apple.
About the paint
My updated lamp I plan to hang on the outdoor terrace (well, of course, making it modern with the use of LEDs). Therefore, I need a paint that is resistant to all weather conditions — from rain and dust to sun and frost. The manufacturer claims that:
- the coating will last a long time and will not require repainting;
- to paint over the previous color of the surface you will need to apply only 2-3 layers;
- enamel forms a strong elastic coating (which does not crack and can withstand almost any atmospheric phenomena), and it is also adapted to cold climatic conditions, so it can be used for external work;
- due to the content of special resins and light-resistant pigments in the enamel, the painted surface retains its brightness and Shine even after several years;
- enamel can be painted on products with complex geometry, it does not run off when applied to vertical surfaces.
Let’s see how the paint behaves. Her task is not easy.
Step one: clean
As in any other case of repair or restoration of an old thing, we start by cleaning the surface of the object from dust, flaking and flimsy elements.

In this case, you will need brushes and abrasive skin-large and small. The easiest way, of course, is to use a metal or plastic brush, but in my case this is too aggressive: you can overdo it. So I clean it manually.
Step two: how to get rid of holes

The holes in the upper part of the lampshade are large. And what is most unpleasant — the remaining metal has become so thin and brittle that it easily falls off in pieces, increasing the already large gaps. Therefore, it is necessary not only to close the existing holes, but also to prevent their increase or the formation of new ones — that is, to strengthen them. One of the good ways to solve such problems, in my opinion, is construction mounting foam. Most often, it is used to fill mounting holes when installing Windows and doors: the foam, in contact with moisture in the air, expands and fills all the small cavities. And it’s pretty tight.

Since I plan to use the lampshade only as a decorative element, I do not need the upper part of the “pipe” as it is now. So, filled with foam, it will not interfere with anything. The property of polyurethane foam sealant to expand will allow you to close up the existing damage. Since the reaction requires contact with moist air, we will add humidity by wetting the surface first.

After curing the polyurethane foam, the excess can be cut off with a knife, giving the necessary shape. Then-once again sand, then putty to hide the bubbly structure of the foam.
Step three: apply the soil
Priming before painting — a good tone: the primer provides better adhesion of the paint layer and the base, evens out physically, and most importantly — makes the surface uniform in terms of absorbency. The use of primer reduces paint consumption; although, of course, from an economic point of view, this is not a significant argument, because the primer also needs to be purchased.
But hypothetical savings are not the main thing: it is important that the soil layer strengthens the paint coating, reliably “locking” the rust and not allowing it to show out. I chose a friendly primer-the same manufacturer as the paint. It contains anti-corrosion additives that prevent metal damage.
For better application of the soil, the surface is cleaned of dust and degreased. Complete drying of the soil takes about 10 hours.
The fourth and final step: painting
As always in painting, the process of applying the final paint coating takes a little time. The preparatory work takes much longer. But at last it was all done and dry. You can paint.

The color of the surface does not exactly match the color of the bottle cap, but the manufacturer did not promise this. The difference between uncolored paints is that the cover only sets the benchmark. But, in my opinion, the color is quite authentic for the overall appearance of the product — a good green. Perhaps, judging by the remains not “eaten” by rust, this lampshade was about this color in the years of its youth, until the light bulbs were replaced by kerosene lamps.

Well, I already have a lampshade. All that remained was to finish the terrace, put a round table on it, and hang a green lamp over it, drink tea, and watch the moths dance in the light of the lamp.
Related posts:
 Glass Greenhouse with Their Hands
 Common Mistakes in Preparing the Garden for Winter. Covering the Plants.
 Keychain, Made With Your Own Hands — a Great Gift
 Ideas for New Year Bouquets and Arrangements for a Pleasant Festive Interior
 Christmas Toys and Various Pendants With Their Own Hands
 Candlesticks With Their Hands: Ideas and Instructions
 Ideas for Nice Christmas Gifts
 Convenient and Useful Nozzle On the Trimmer With Your Own Hands
 Protect Your Garden, or How to Make a Scarecrow
 How to Make a Washstand for Country House the Hands
 Crafts from Ordinary Wine Stoppers
 Crafts With their Hands: Birds and Moths
 Gifts with Your Hands From the Bottom of Your Heart
 Update Old Furniture. New Life of Favorite Things