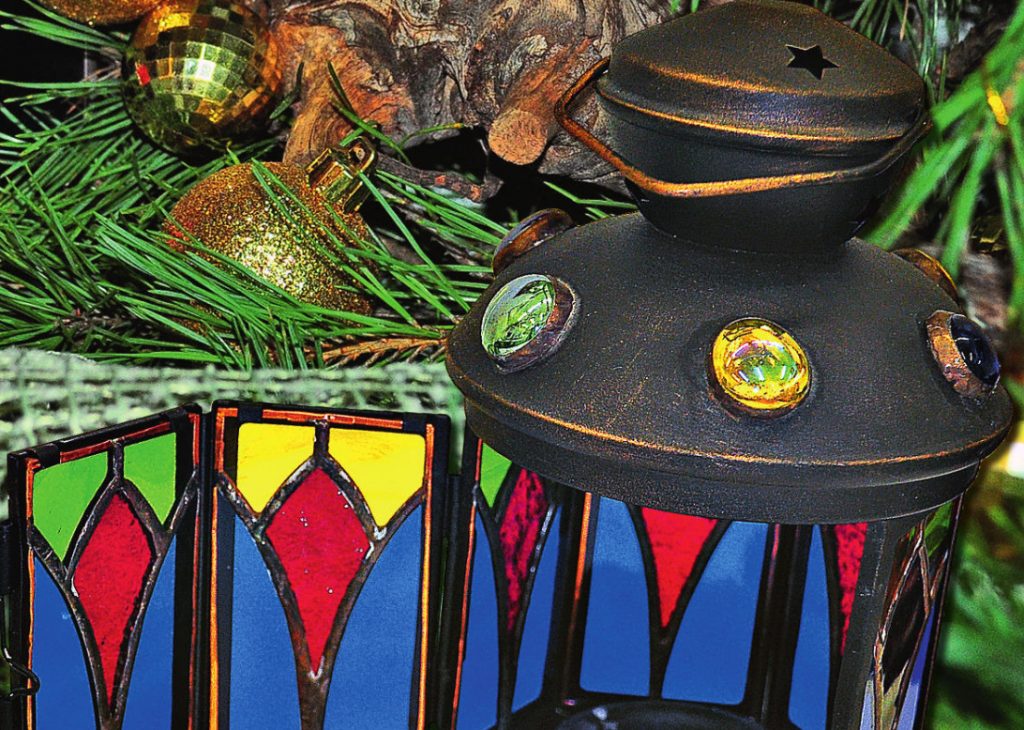
The most suitable lighting for new year holidays — bright lanterns, candlesticks. But here’s the trouble: those that are on sale, sometimes look too boring and sometimes primitive. Don’t worry! Here they know how to turn them into real masterpieces!
For work you will need:
- multicolored glass
- ruler
- oil glass cutter
- copper foil tape with adhesive layer
- the finished lantern with removable glass
- soldering iron
- tin
- solder

1. Preparing a paper template for stained glass
Take a ready-made flashlight from the store, carefully remove the glass from the removable frames and use one of them to make a paper template. To do this, put the glass on a sheet of paper, outline it along the contour and divide into sectors, each of which should be marked with color-red, blue, green.

Important: when cutting a marked pattern, slightly step back from the edges inward (about 1-1. 5 mm on each side). This is necessary to ensure that the finished stained glass at the end of the process freely entered the frame and it did not have to be undermined.
2. Cut strips of colored glass
From large glass plates carefully cut strips of glass in thickness equal to our multi-colored sectors-fragments.

3. Cut out the fragments according to the pattern
Use the template, placing it under the glass, and cut multi-colored blanks-6 pieces for each color.

4. Make a copper “frame”
Each of the cut fragments at the end of the paste over copper foil tape, putting its adhesive side on the glass. Important: the edges of the tape must be slightly compressed, so that they come to the surface of the glass at least 1 mm. Later on this place will be soldering.

Please note: the smaller the edge of the copper tape coming on the glass, the thinner the seam will be. We got a glass in a copper “frame”. To make this frame without a single fold and as tightly as possible to the ends and surface, it must be smoothed with a solid flat object, perhaps-a piece of another glass.
5. Solder the fragments into a single whole
Take a soldering iron, a container in which you want to pour the solder, a brush with which you will apply it, and a tin. Spend a brush on connecting seams (at us them it turns out on two on each glass), then by means of a soldering iron and tin solder three glasses among themselves.

Tip: first, make two control points on each seam, which will help to fix the glass in the desired position. And only then walk along the seam, fastening the fragments with each other. Pay attention to the external contours of our glasses — they must be perfectly straight, without minimum ledges-otherwise they will not enter the grooves on the lamp.
Important: for strength, the contours should be soldered on both sides, but the outer frame should not be touched.
6. Patinate the seams
Note-seams turned silver, and the flashlight — copper. To achieve uniformity of color, apply a solution of copper sulfate to the seams, and they will acquire a copper hue.

Immediately after application, do not forget to wash the glass under running water with a regular detergent.
7. Insert stacked stained glass in the flashlight

Ready!

Related posts:
 The Most Popular Country Dogs
 Ideas for New Year Bouquets and Arrangements for a Pleasant Festive Interior
 Christmas Toys and Various Pendants With Their Own Hands
 Candlesticks With Their Hands: Ideas and Instructions
 The Tradition of Winter, Bathing in Different Countries
 The Body Needs Different Juices
 Sandbox in the Garden – Creative Solutions
 Flower Show in Chelsea 2017
 5 Types of Useful Games for Children in the Country
 Sauna: What is Different From the Bath
 The Territory of Bliss: We Equip the Recreation Area
 The Festival of Landscape Art
 Original Ways to Fight Harmful Insects, Proven by Our Ancestors
 Recipe for Artichokes
 Gardening for Fun
 Scientists Intend to Find Out How to Be Treated With Gardening