Last time we talked about how to get a sharp, clear image in a picture. In this, on the contrary, we will discuss the situation when part of the image should be blurry, blurry. For what? This will be discussed.
Unsharp and-well? In photography, this technique is most often used in portrait photography, and-regardless of who is the “hero of the frame” – a person, an animal or a flower. The main thing is to achieve the desired artistic effect, it arises due to the contrast between the sharp plot center and the blurred background, which should not distract attention.
To master the skills of portraiture should be familiar with such a concept as “the depth of sharply depicted space”, or, more simply, “depth of field”. This term refers to the area of space in front of the camera lens, within which objects are sharp.
- The value of the depth of field depends on several major factors, the main one being the size of the aperture. At the same time, the larger the aperture, the smaller the depth of field.
- The second parameter is the focal length of the lens. When it decreases, the depth of field increases, so for landscape photography, wide-angle lenses with a small focal length are most often used. Focus distance plays an important role here: as the distance to the subject decreases, the depth of field decreases.
- Finally, the parameters of the photosensitive matrix play a significant role: as its size and resolution increase, the depth of field decreases.

Depth of field is an important tool in the Arsenal of a creative photographer. Depending on the camera settings, this parameter can vary from a few millimeters to tens or hundreds of meters. So, when shooting landscapes usually try to achieve a great depth of field throughout the field of the image, achieving detail in the foreground and in the background.
When shooting portraits and close-UPS often act differently, trying to highlight the main object.

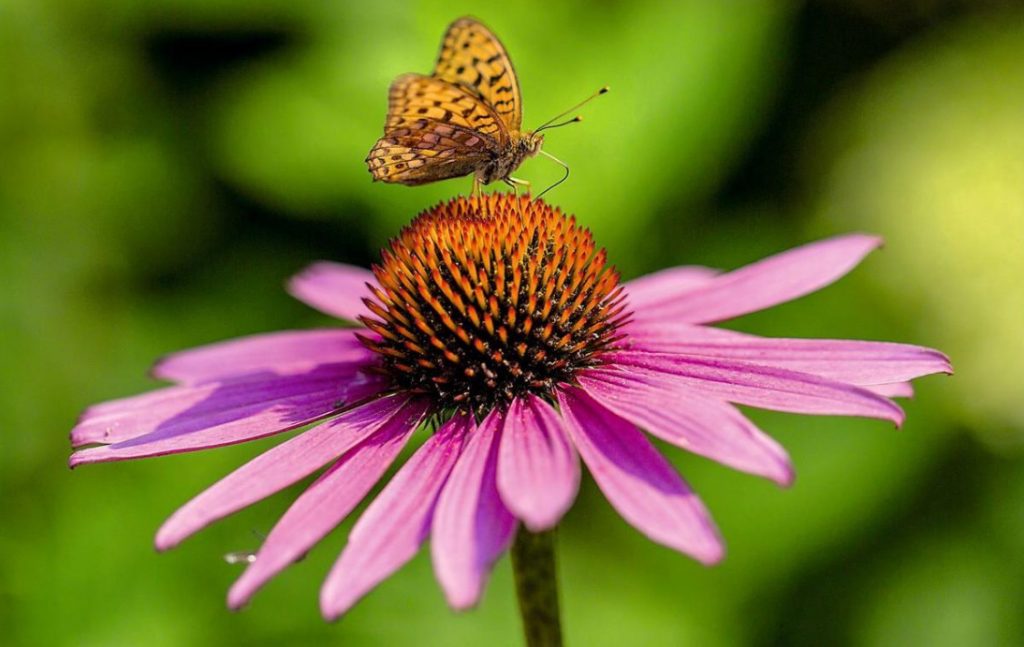
Left: Depth of sharply depicted space. In the center: a sharp image of the flower and a blurred background can be obtained at an aperture of f/5,6-f / 8. Right: when shooting flower details, it is important to choose the correct focus point
Imagine that we need to take a beautiful picture of a flower. Depending on the purpose for which the portrait picture is taken (Botanical photo or artistic image), select certain values of the aperture and focal length of the lens. If when shooting a flower close-up you need to get a sharp image of it, it means that the whole flower should fall between the areas of blur. Therefore, the numerical values of the aperture on the lens should be set sufficiently large, for example f/5,6 or even f/8, because we know that the smaller the aperture, the greater is the depth of field. At the same time, however, it is necessary to ensure that the background remains blurred, so close the diaphragm excessively should not be. In addition, it is important to choose the right focus point, so that all without exception, the details of the flower (for example, the edges of its petals in the foreground) were sharp.
Completely different aperture values will have to be set for an artistic shot, the plot center of which will be, for example, the stamens in the center of the flower. Shooting with a conventional lens, use open diaphragms with a value of f/2,8 — f/3,5. For such shooting, you can also use long-focus optics, and for compact cameras, zoom the lens to the “telephoto” position or use the “macro” mode. Shooting with a macro lens at close focus greatly reduces the depth of field, so the aperture has to be reduced to values up to f / 16, otherwise the picture will resemble a hazy abstraction. In this case, the focus of the camera must be very accurate, otherwise the desired fragment may not fall into the zone of sharpness.
Related posts:
 The Most Popular Country Dogs
 Ideas for New Year Bouquets and Arrangements for a Pleasant Festive Interior
 Christmas Toys and Various Pendants With Their Own Hands
 Candlesticks With Their Hands: Ideas and Instructions
 The Tradition of Winter, Bathing in Different Countries
 The Body Needs Different Juices
 Sandbox in the Garden – Creative Solutions
 Flower Show in Chelsea 2017
 5 Types of Useful Games for Children in the Country
 Sauna: What is Different From the Bath
 The Territory of Bliss: We Equip the Recreation Area
 The Festival of Landscape Art
 Original Ways to Fight Harmful Insects, Proven by Our Ancestors
 Recipe for Artichokes
 Gardening for Fun
 Scientists Intend to Find Out How to Be Treated With Gardening